Table of Contents
How to Setup Custom Fee for Kiosk
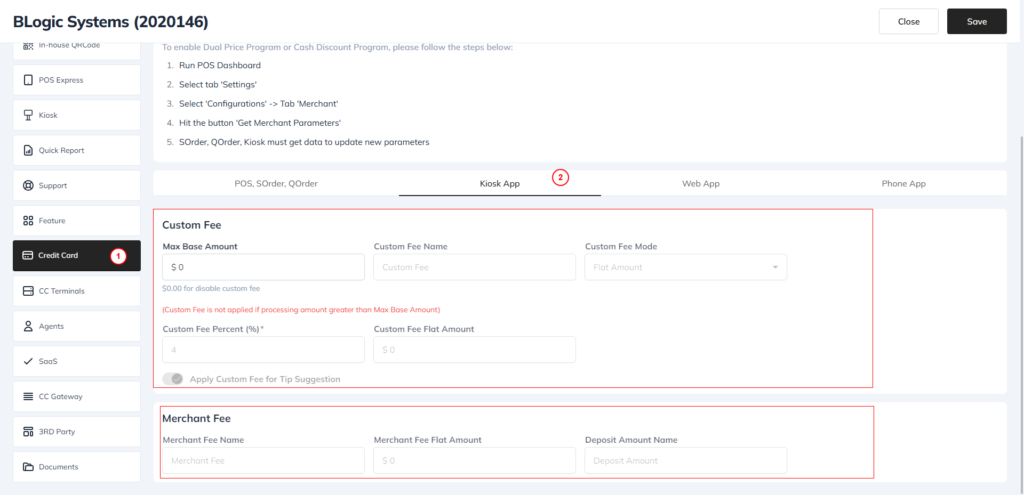
To set up a custom fee for the kiosk, follow these steps:

- Access the License Web:
- Open your web browser and navigate to the license web portal.
- Select the Store Tab:
- Once logged in, click on the Store tab at the top of the page.
- Choose Your Store:
- From the list of stores, select the store for which you want to set up the custom fee.
- Navigate to the Credit Card Tab:
- Click on the Credit Card tab to access payment settings.
- Choose the Cash Discount Program:
- In the Credit Card section, locate and select the Cash Discount Program option.
- Select the Kiosk Section:
- Look for the Kiosk section within the Cash Discount Program settings.
- Enter Custom Fee Details:
- In the Max Base Amount field, enter a value greater than 0 to apply a custom fee.
- Enter the desired custom fee amount in the designated field.
- Save Your Changes:
- Click the Save button to apply the custom fee settings.
Note
To apply a custom fee to a ticket, you must enter a value greater than 0 in the Max Base Amount field. This is essential for the custom fee to take effect.
How to Change Custom Fee Name
To change the name of the custom fee, follow these steps:
- Enter a Custom Fee Name:
- In the designated field, type the new name for the custom fee you wish to use.
- Save Your Changes:
- Click the Save button to update the custom fee name.