Introduction
The House Account feature, integrated into your Point of Sale (POS) system and BLogic View, allows businesses to extend credit to customers, track transactions, and manage accounts seamlessly. Whether you’re creating a new House Account, processing payments, adding funds, or reviewing detailed reports, this guide provides comprehensive, step-by-step instructions to ensure you can use the feature effectively. Designed for both novice and experienced users, this article covers all aspects of House Account management with clarity and precision.
Table of Contents
- Creating a New House Account in BLogic View
- Managing House Accounts in BLogic View
- Tracking House Account Transactions in BLogic View
- Using House Accounts on the POS
- Viewing House Account Reports on POS
- Step-by-Step Procedures
1. Creating a New House Account in BLogic View
A House Account allows customers to make purchases on credit up to a specified limit. Follow these steps to set up a new account:
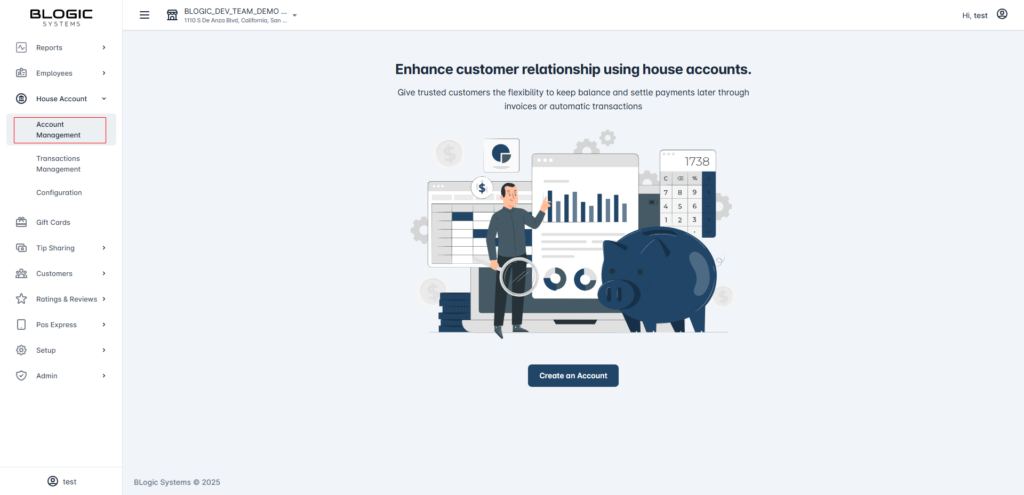
Steps:
- Log in to BLogic View: Access the system using your credentials.
- Navigate to House Accounts: From the main dashboard, select the “House Accounts” module.
- Start a New Account: Click the “Create an Account” button.
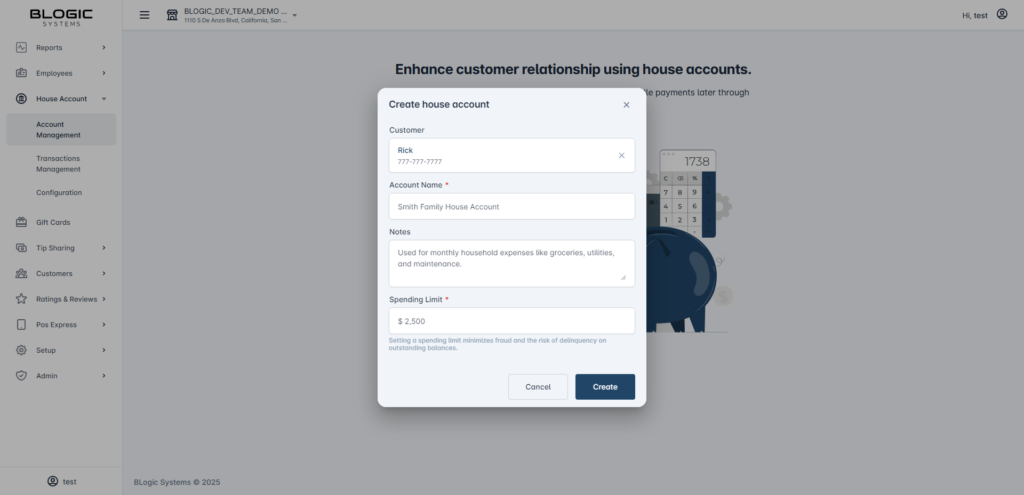
- Enter Account Details:
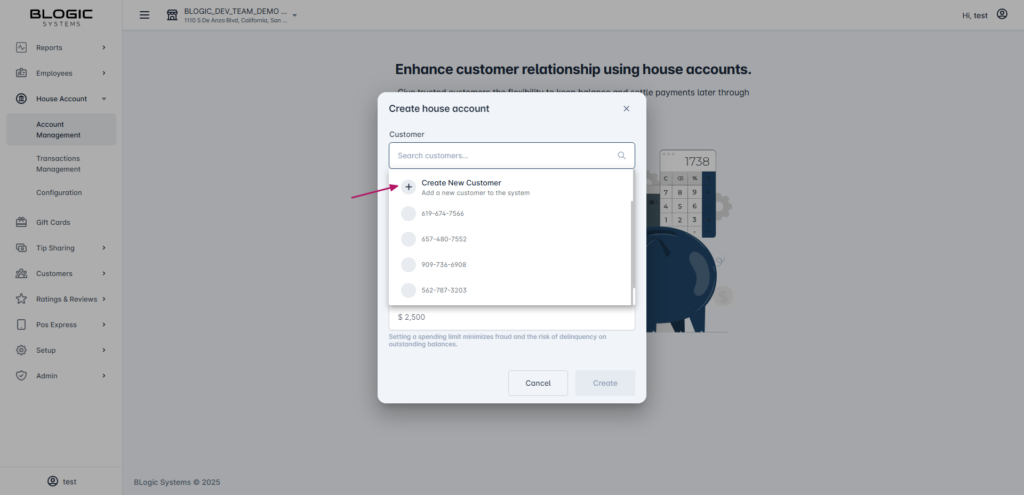
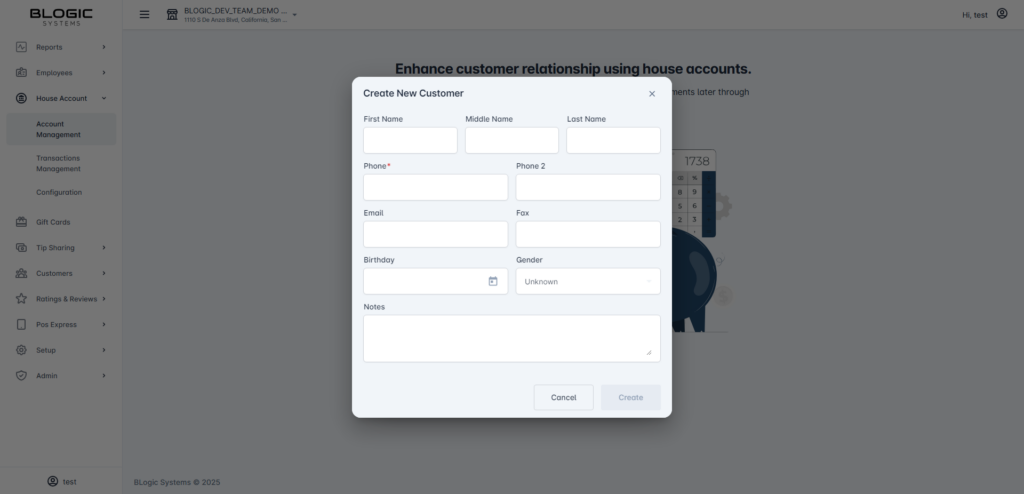
- Customer (Required): Use the dropdown menu to select an existing customer. If the customer isn’t listed, click the “Create New Customer” button, which opens a dialog box. Enter the customer’s details (e.g., name, phone number) and save to add them to the system.
- Account Name (Optional): Assign a custom name to the account (e.g., “John’s Credit Line”) for easy identification.
- Notes (Optional): Add any relevant details, such as payment terms or special instructions.
- Spending Limit (Required): Specify the maximum credit limit (up to $1,000,000). Enter a numeric value (e.g., 500 for $500).
- House Account #: This field may auto-populate depending on your system settings. If not, assign a unique identifier.
- Review and Save: Double-check the information, then click “Save” to activate the House Account.
If the customer isn’t listed, click the “Create New Customer” button
2. Managing House Accounts in BLogic View
The Account Management section in BLogic View lets you oversee all House Accounts with powerful filtering, searching, and analytics tools.
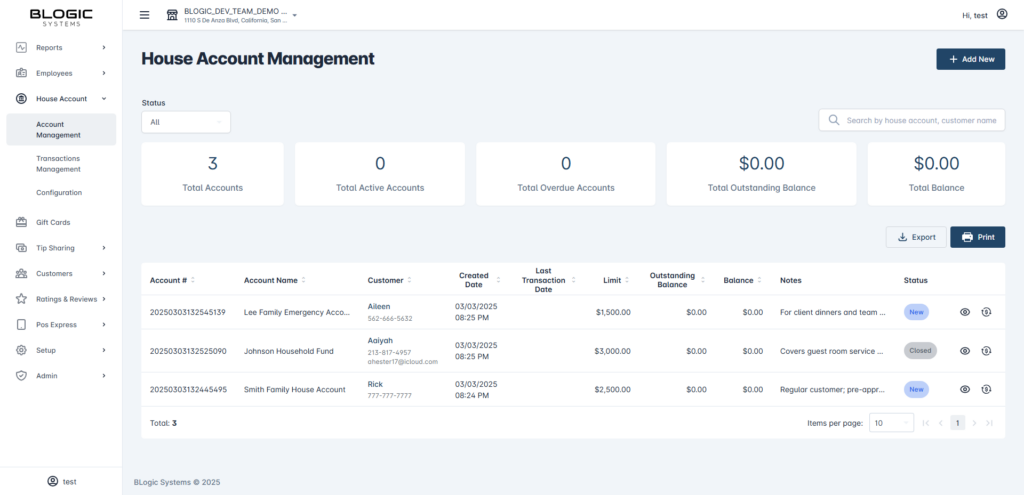
Steps:
- Access Account Management: In BLogic View, go to the “House Accounts” module and select “Account Management.”
- View Summary Analytics: At the top, you’ll see key metrics:
- Total Accounts: The total number of House Accounts created.
- Total Active Accounts: Accounts currently in use.
- Total Overdue Accounts: Accounts with unpaid balances past due.
- Total Outstanding Balance: The sum of all unpaid debts across accounts.
- Total Balance: The sum of all current account balances.
- Explore the Account Table: Below the analytics, a table lists all accounts with these columns:
- Account #: Unique identifier.
- Account Name: Custom name (if provided).
- Customer: Linked customer name.
- Created Date: When the account was established.
- Last Transaction Date: Most recent activity.
- Outstanding Balance: Remaining debt.
- Balance: Current available credit.
- Notes: Additional details.
- Status: New, Active, Overdue, or Closed.
- Filter and Search:
- Use the filter dropdown to narrow by status (e.g., “Overdue”).
- Enter keywords (e.g., customer name or account number) in the search bar to find specific accounts.
- Take Action: Click an account row to view details or edit as needed.
3. Tracking House Account Transactions in BLogic View
The Management Page offers two tabs—Transactions and Total By Day—to monitor account activity in detail.
3.1 Transactions Tab
Track individual transactions with filters and summaries.
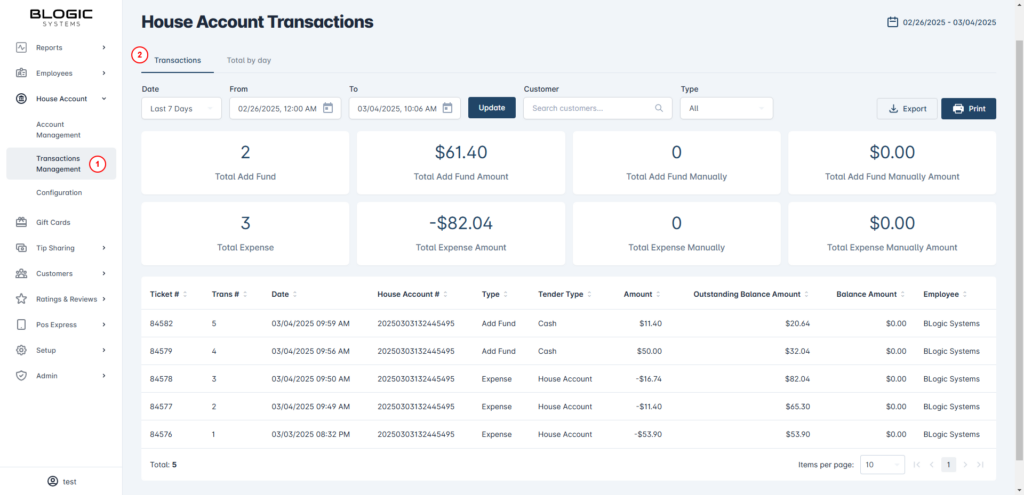
Steps:
- Open Transactions Tab: In the “House Accounts” module, select “Management Page” and click the “Transactions” tab.
- Apply Filters:
- Date Range: Enter “From” and “To” dates to narrow the timeframe.
- Customer Dropdown: Select a customer to view only their transactions.
- Type Dropdown: Choose a transaction type (e.g., “Add Fund,” “Expense,” or “All”).
- Review Summary Section: Totals display at the top:
- Total Add Fund: Number of fund additions.
- Total Add Fund Amount: Sum of added funds.
- Total Add Fund Manually: Manual fund additions.
- Total Add Fund Manually Amount: Sum of manual funds.
- Total Expense: Number of purchases.
- Total Expense Amount: Sum of purchase amounts.
- Total Expense Manually: Manual expense entries.
- Total Expense Manually Amount: Sum of manual expenses.
- Examine Transaction List: A table shows:
- Ticket #: Associated ticket number.
- Trans #: Transaction ID.
- Date: When the transaction occurred.
- House Account #: Linked account.
- Type: Add Fund, Expense, etc.
- Amount: Transaction value.
- Tender Type: Payment method (if applicable).
- Outstanding Balance Amount: Remaining debt post-transaction.
- Balance Amount: Current credit post-transaction.
- Employee: Staff member who processed it.
3.2 Total By Day Tab
View aggregated daily totals for a broader perspective.
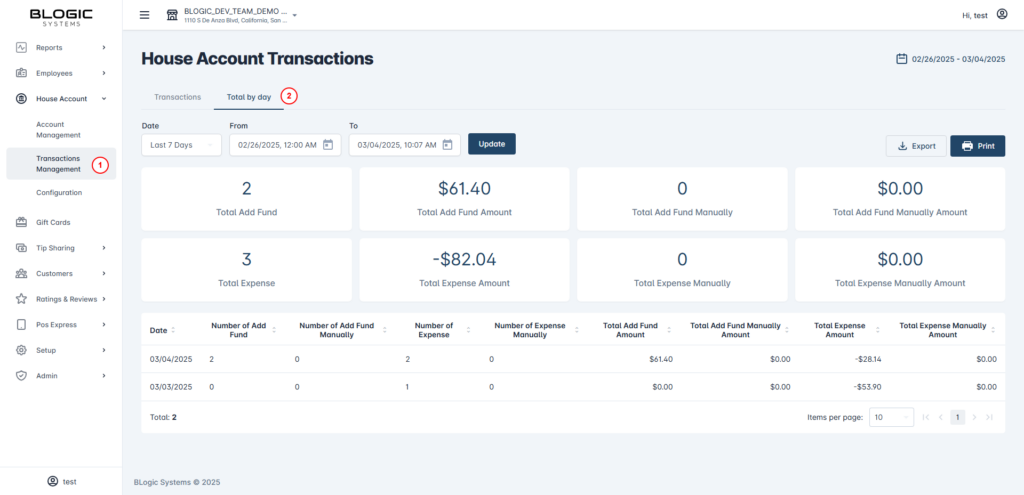
Steps:
- Switch to Total By Day: On the Management Page, click the “Total By Day” tab.
- Set Date Range: Specify “From” and “To” dates.
- Check Summary Section: Aggregated totals include:
- Total Add Fund: Number of fund additions.
- Total Add Fund Amount: Sum of added funds.
- Total Add Fund Manually: Manual fund additions.
- Total Add Fund Manually Amount: Sum of manual funds.
- Total Expense: Number of purchases.
- Total Expense Amount: Sum of purchase amounts.
- Total Expense Manually: Manual expense entries.
- Total Expense Manually Amount: Sum of manual expenses.
- Review Daily Summary List: A table lists:
- Date: Specific day.
- Number of Add Fund: Count of fund additions.
- Number of Add Fund Manually: Manual additions.
- Number of Expense: Purchase count.
- Number of Expense Manually: Manual purchases.
- Total Add Fund Amount: Daily fund total.
- Total Add Fund Manually Amount: Daily manual fund total.
- Total Expense Amount: Daily purchase total.
- Total Expense Manually Amount: Daily manual purchase total.
4. Using House Accounts on the POS
Perform real-time transactions and manage accounts directly from the POS interface.
4.1 Using House Account for Payment
Charge purchases to a House Account during a sale.
Steps:
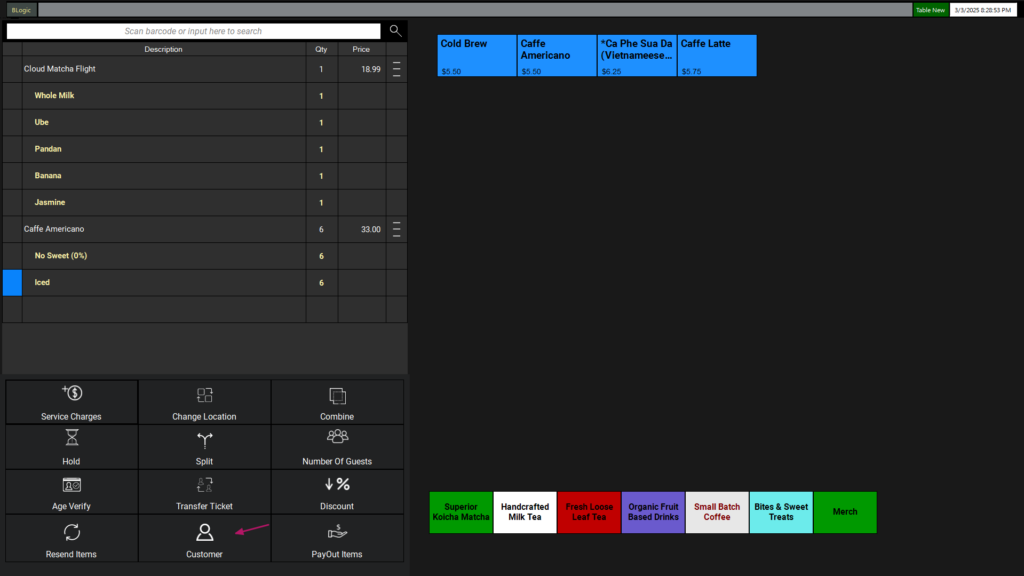
- Start a Sale: On the POS Sales Screen, select items as usual.
- Enter Customer Info: Input the customer’s phone number in the designated field.
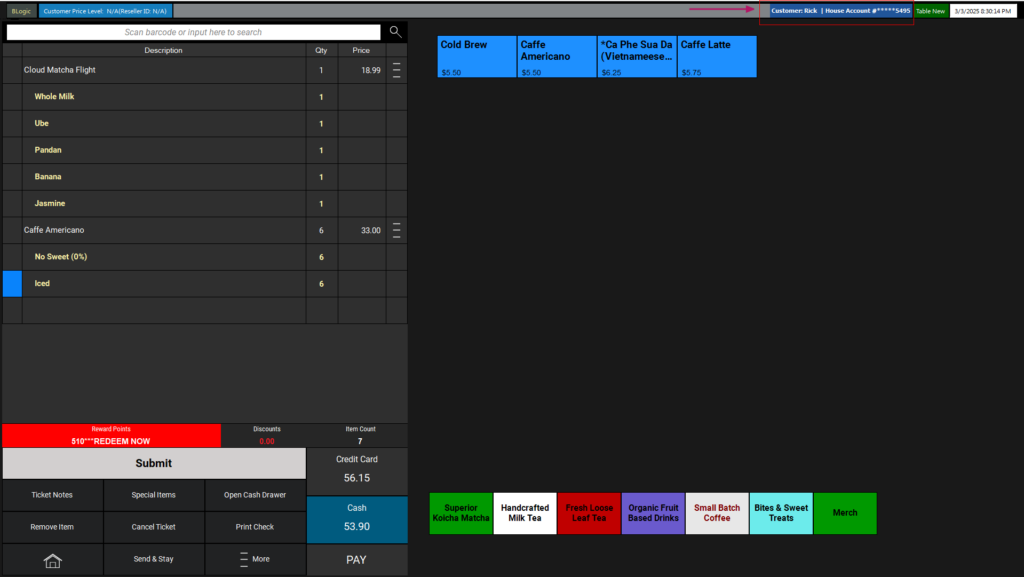
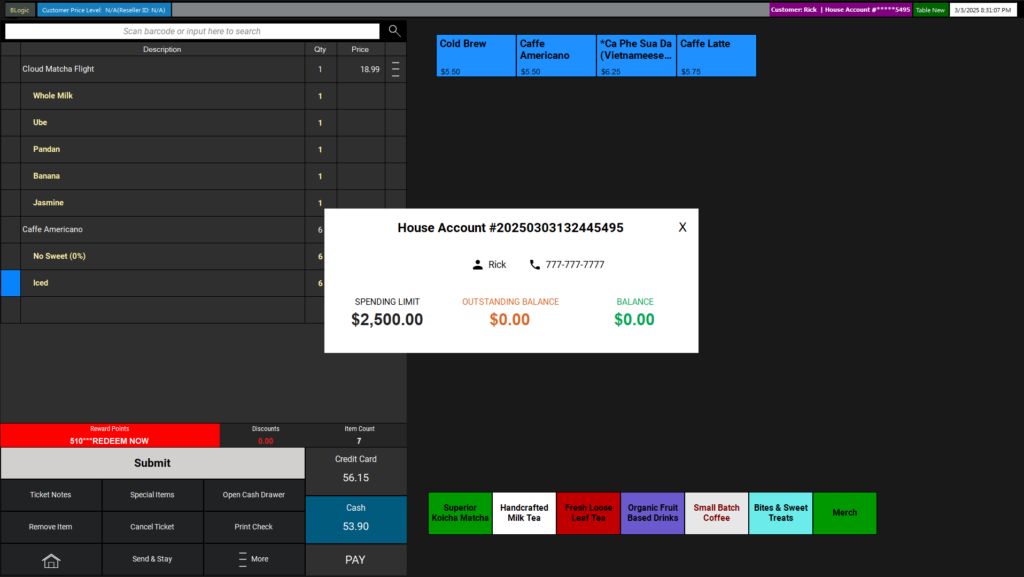
- View House Account Details: If valid, the top-right corner displays:
- Spending Limit: Maximum credit.
- Outstanding Balance: Debt owed.
- Current Balance: Available credit.
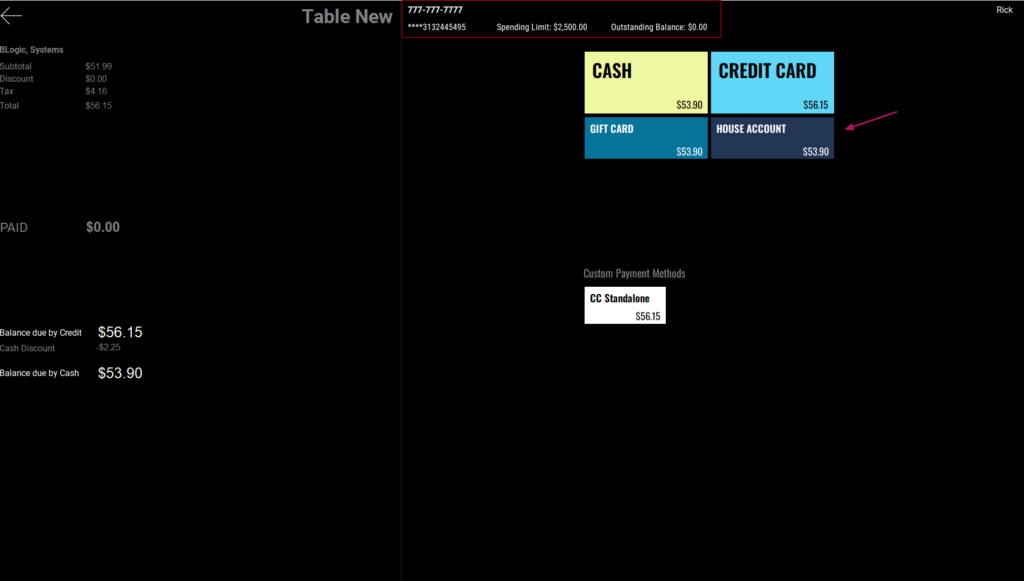
- Proceed to Payment: Click “Pay” to open the Payment Screen.
- Select House Account:
- A “House Account” section appears in the top-right corner with:
- House Account Number
- Spending Limit
- Outstanding Balance
- Click the dark blue “House Account” button.
- A “House Account” section appears in the top-right corner with:
- Confirm Payment: Ensure the amount doesn’t exceed the Spending Limit or Balance, then confirm.
- Print Receipt: A House Account Receipt (Type: Expense) prints with:
- Transaction Date
- House Account #
- Transaction #
- Ticket #
- Server Name
- Previous Balance
- Transaction Amount
- New Balance
Notice: Applying Custom Fee & Cash Discount for House Account Purchases
To configure the Custom Fee and Cash Discount settings when purchasing a House Account, follow these steps:
- Go to Settings -> Configurations -> Merchant.
- Look for the Custom Fee section.
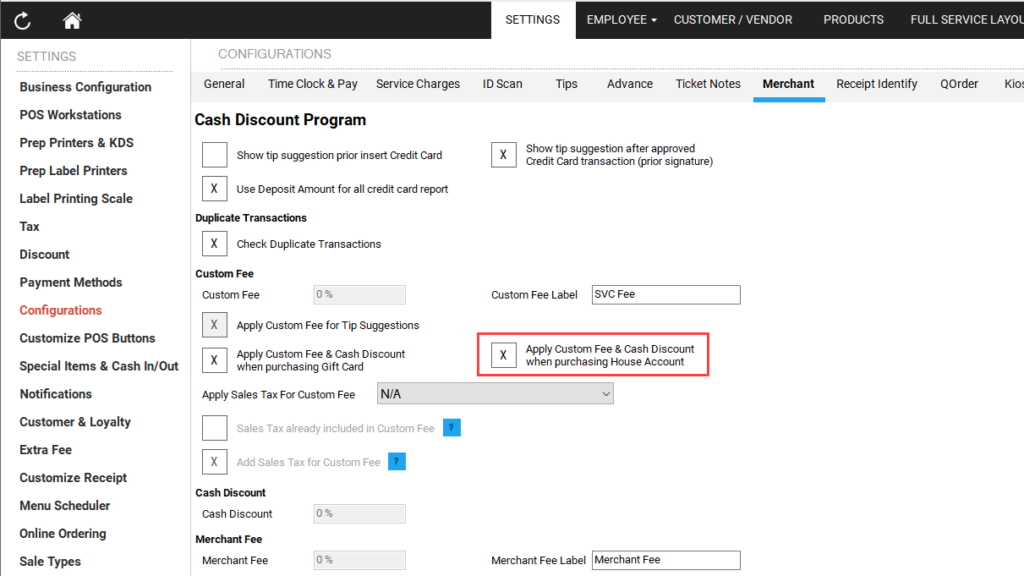
Apply Custom Fee & Cash Discount when purchasing House Account:
- Unchecked: The custom fee and cash discount will not be applied to House Account purchases.
- Checked: The custom fee and cash discount will be applied to House Account purchases.
Enter Customer Info
View House Account Details: Click it to view detail
Proceed to Payment

4.2 Managing House Accounts in POS
Access and update accounts directly from the POS.
Steps:
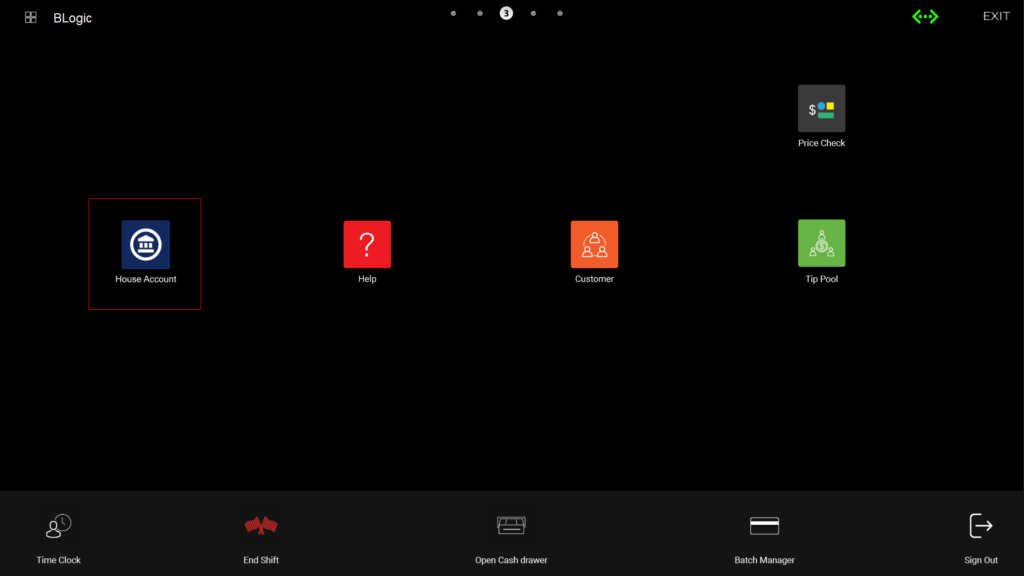
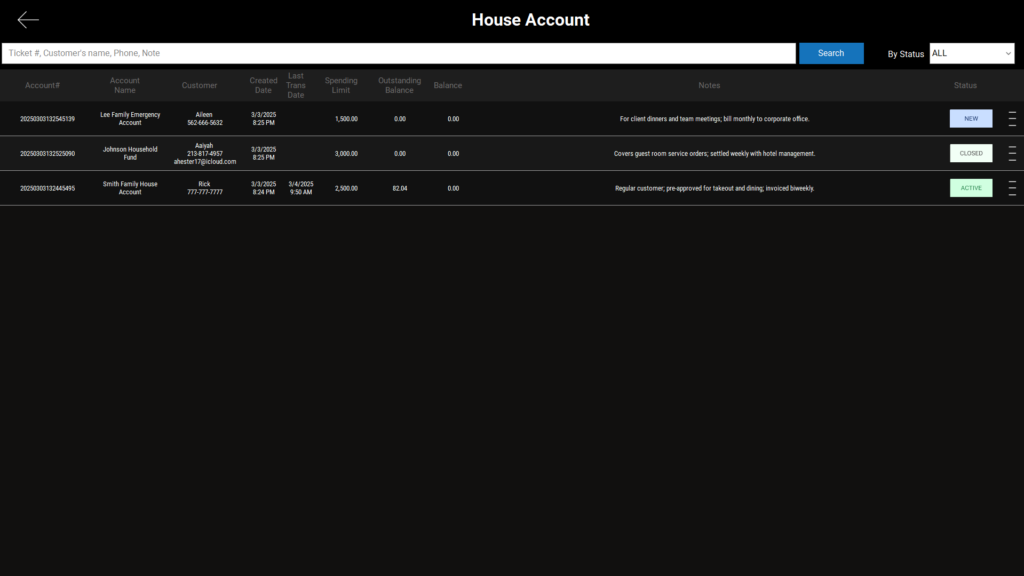
- Open House Account List: Click the “House Account” icon on the POS main screen.
- Search and Filter:
- Search: Enter Ticket #, Customer Name, Phone, or Note.
- Filter: Select status (All, New, Active, Overdue, Closed).
- View Table: Columns include:
- Account #, Name, Customer, Created Date, Last Transaction Date, Spending Limit, Outstanding Balance, Balance, Status.
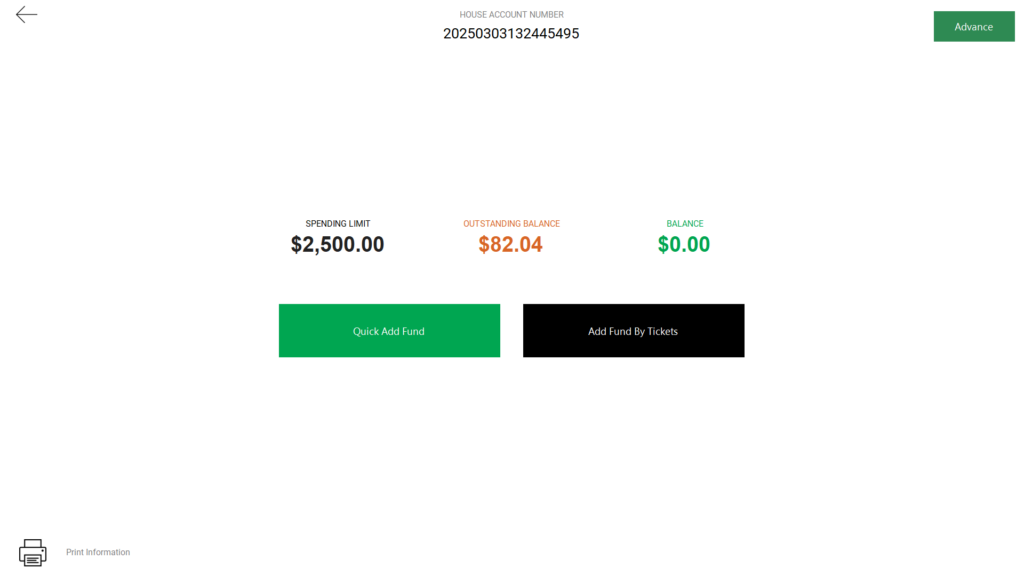
- Select an Account: Click the action menu to open the House Account Detail Screen showing:
- Account Number
- Basic Info (Spending Limit, Out Standing Balance, Balance)
- Action Buttons: Quick Add Fund, Add Fund By Tickets, Add Fund Manually, Expense Manually
Open House Account List
View List House Account
House Account Detail Screen
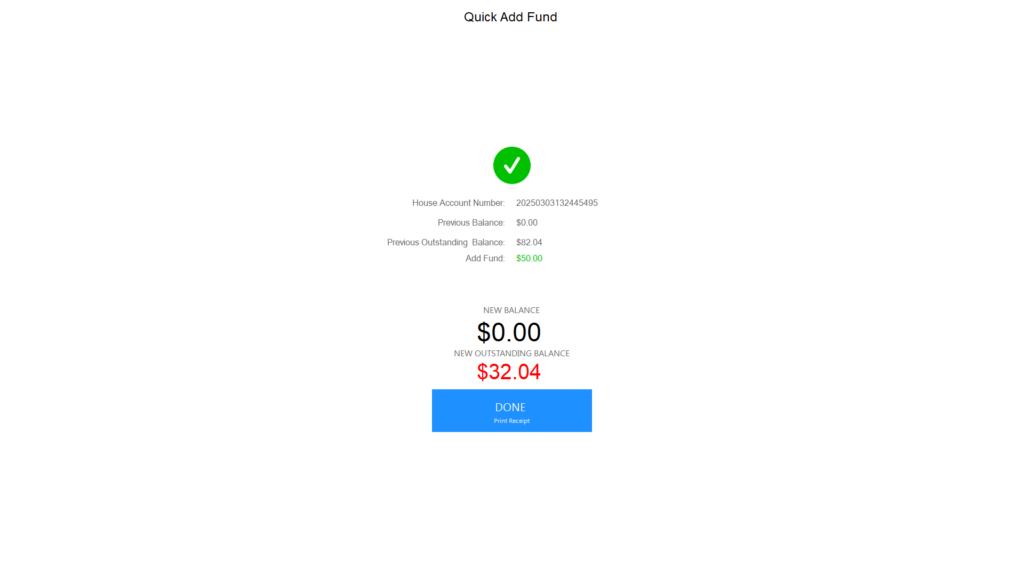
🟡 Quick Add Fund
Add funds to an account quickly.
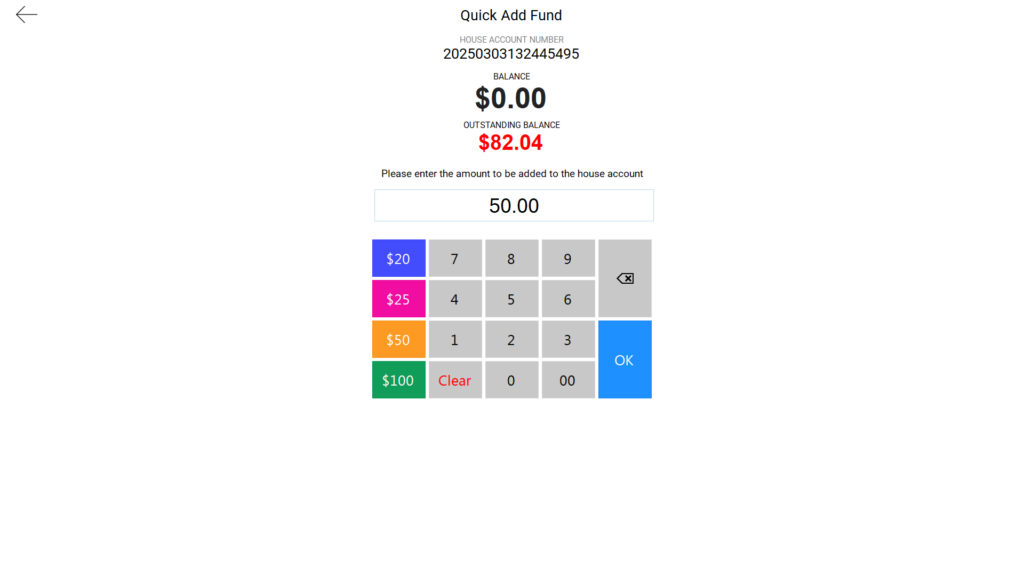
Steps:
- Click Quick Add Fund on the Detail Screen.
- View Details: The screen shows:
- House Account Number
- Current Balance
- Outstanding Balance
- Enter Amount: Input the fund amount.
- Funds first reduce the Outstanding Balance.
- Any remainder increases the Balance.
- Select Payment Method: Choose Cash, Credit, etc.
- Confirm: Process the payment.
- Print Receipt: A Receipt (Type: Add Fund) prints with:
- Date
- House Account #
- Transaction #
- Ticket #
- Server
- Previous Balance
- Amount
- New Balance

🟠 Add Fund By Tickets
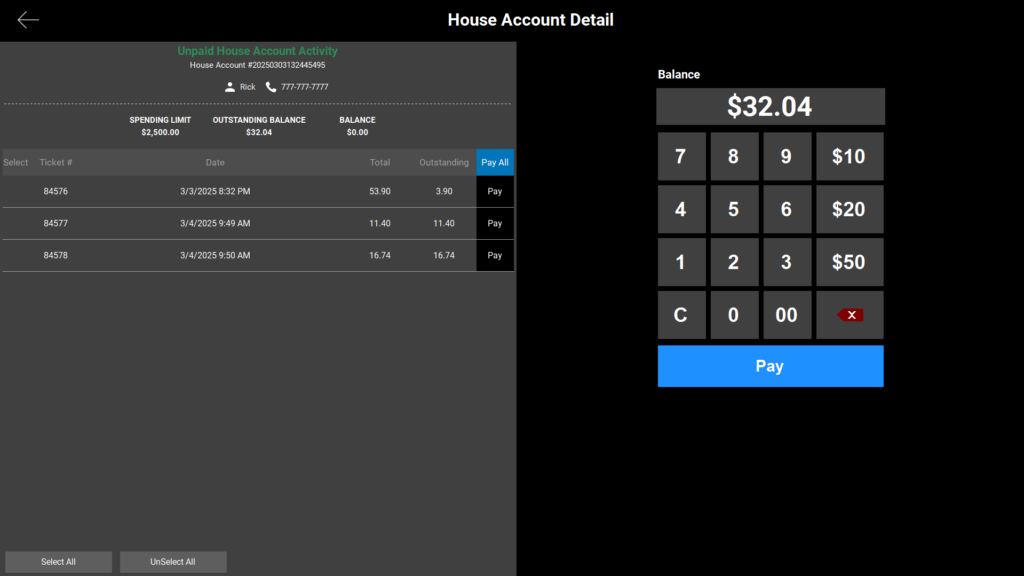
Pay off specific unpaid tickets.
Steps:
- Click Add Fund By Tickets.
- Review Details: Displays:
- House Account Number
- Customer Name & Phone
- Unpaid Ticket Table (Ticket #, Date, Amount).
- Choose Payment:
- Select Pay All to settle all tickets.
- Or check specific tickets to pay individually.
- Process Payment: Select a payment method and confirm.
- Print Receipt: A Receipt (Type: Add Fund By Tickets) prints with similar details to Quick Add Fund.
5. Viewing House Account Reports on POS
House Account transactions are fully integrated into POS reports for comprehensive tracking.
5.1 Sales Summary Report


Details:
- Liabilities Section:
- Adds “House Account Issued” and “House Account Tips” below Gift Card Issued.
- Includes a subsection listing payment types (e.g., Credit, Cash).
- Payment Type Section: Adds “House Account” below Gift Card.
- Credit Card Section: Lists House Account Sales and Tips below Gift Card.
- Cash Section: Lists House Account Sales and Tips below Gift Card.
- Tips by Sale Type: Adds a “House Account” line.
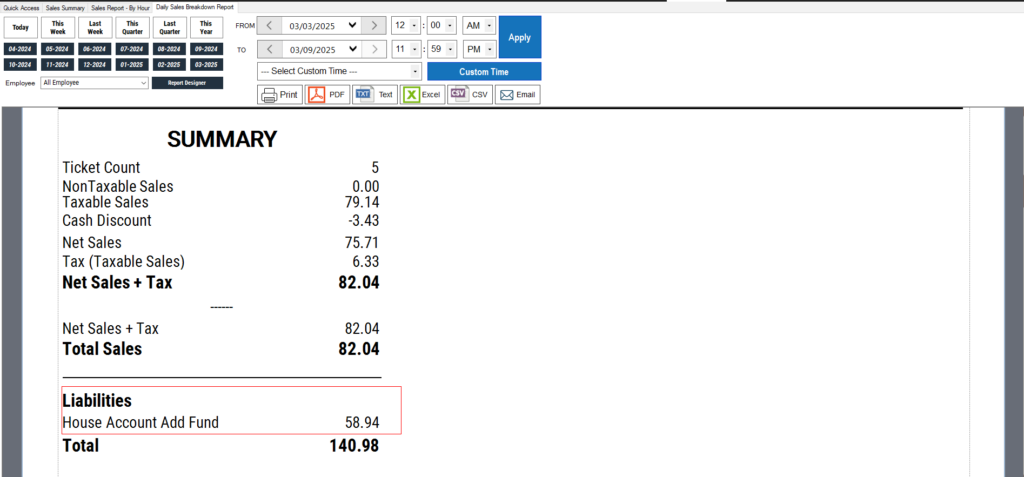
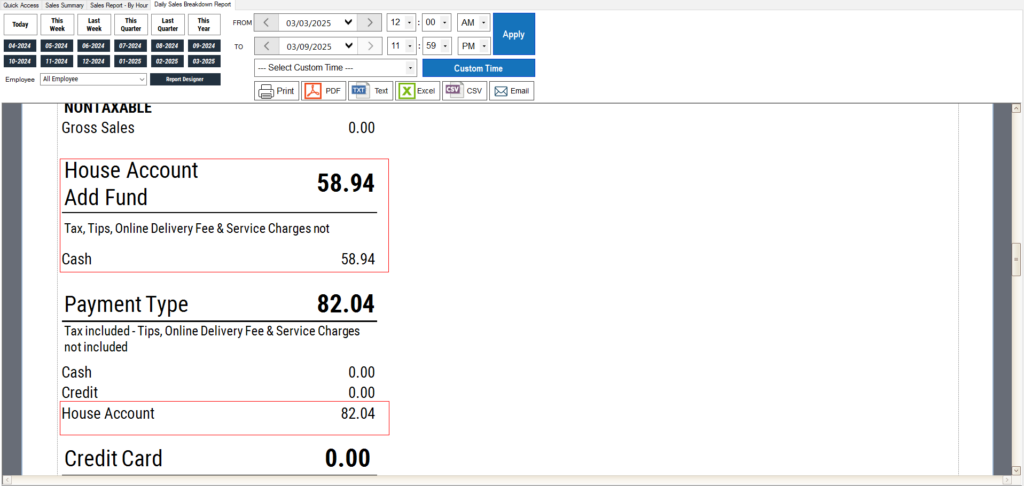
5.2 Daily Sales Breakdown Report
Details:
- Liabilities Section: Adds “House Account Issued” and “Tips” below Gift Card Issued, with a payment-type breakdown.
- Payment Type Section: Adds “House Account” below Gift Card.
- Credit & Cash Sections: Includes House Account Sales and Tips.
- Tips by Sale Type: Adds “House Account.”
5.3 Shift and Detail Shift Reports


Details:
- Adds “House Account Issued,” “Sales,” and “Tips” in Liabilities, Payment Type, and Credit/Cash sections.
- Includes a “House Account Issued” subsection grouped by payment method.
5.4 Employee Reports (Summary and Detail)
Details:
- Adds “House Account Issued” and “Tips” in Liabilities and Payment sections.
- Groups transactions by payment type.
6. Step-by-Step Procedures
Using House Account Payment Method in POS
- Enter Customer Info: On the Sales Screen, type the customer’s phone number.
- Verify Details: Confirm the House Account info (Spending Limit, Outstanding Balance, Balance) in the top-right corner.
- Add Items: Select products or services for the sale.
- Go to Payment: Click “Pay” to access the Payment Screen.
- Choose House Account: In the top-right “House Account” section, click the dark blue “House Account” button.
- Finalize: Confirm the transaction.
- Print Receipt: Receive a House Account Receipt (Type: Expense).
Managing House Accounts and Payments
- Access List: Tap the “House Account” icon on the POS.
- Find Account: Use search (e.g., Phone) or filter (e.g., Active) to locate an account.
- View Details: Select the action menu to open the Detail Page.
- Perform Actions:
- Quick Add Fund: Enter amount, choose payment method, confirm, and print receipt.
- Add Fund By Tickets: Select tickets, pay, and print receipt.
This guide ensures you can confidently manage House Accounts on your POS system. For additional support, contact our help desk team.