Introduction
- Managing a time clock is an essential task for ensuring accurate tracking of employee work hours, breaks, and payroll data.
- A time clock system helps businesses maintain punctuality, monitor attendance, and streamline payroll processes.
- This guide provides step-by-step instructions on setting up and managing a time clock using the POS Dashboard software.
- Whether you’re configuring rules, reviewing reports, or adjusting entries, this guide will help you navigate the system efficiently.
Table of Contents
- What is a Time Clock?
- Setting Up the Time Clock in POS Dashboard
2.1 Configuring Rounding Rules
2.2 Setting Up Time Clock for Employees
2.3 Configuring Rest and Meal Breaks - Managing Time Clock Entries
3.1 Accessing Time Clock Reports
3.2 Adding a New Time Clock Entry
3.3 Editing an Existing Time Clock Entry
3.4 Deleting a Time Clock Entry
3.5 Adjusting Rest and Meal Breaks - Using the POS App for Clocking In and Out
- Best Practices for Time Clock Management
1. What is a Time Clock?
- A time clock is a device or system used to record when employees start and end their work shifts. Its primary purpose is to track work hours for payroll, attendance, and compliance purposes.
- In the POS Dashboard software, the time clock feature allows you to automate and manage employee time tracking effectively.
2. Setting Up the Time Clock in POS Dashboard
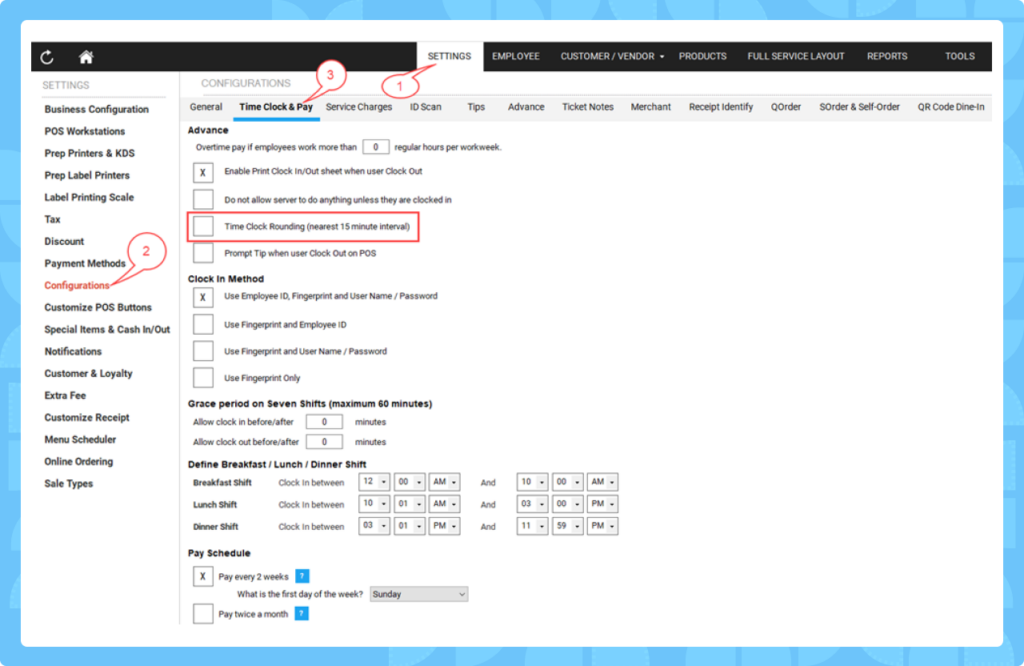
To begin using the time clock feature, you need to configure it through the POS Dashboard software. Follow these steps:
2.1 Configuring Rounding Rules
Rounding rules simplify time tracking by adjusting clock-in and clock-out times to standardized intervals. Here’s how the system rounds time:
- 0 to 7 minutes: Round down to the previous quarter-hour (e.g., 8:02 AM becomes 8:00 AM).
- 8 to 22 minutes: Round to the nearest quarter-hour (e.g., 8:10 AM becomes 8:15 AM).
- 23 to 37 minutes: Round to the next quarter-hour (e.g., 8:30 AM remains 8:30 AM).
- 38 to 52 minutes: Round to the next quarter-hour (e.g., 8:40 AM becomes 8:45 AM).
- 53 to 59 minutes: Round up to the next hour (e.g., 8:55 AM becomes 9:00 AM).
Set these rules in the POS Dashboard under the time clock configuration settings and communicate them to employees.
2.2 Setting Up Time Clock for Employees
To configure time clock settings for individual employees:
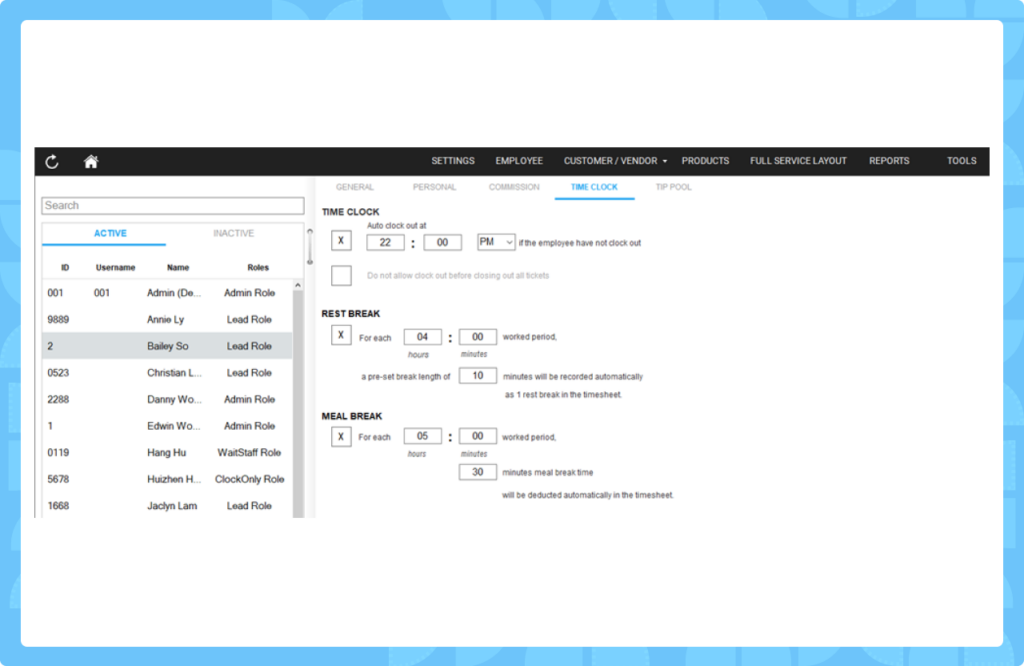
- Go to Menu > Employee > Manage Employee.
- Select an employee from the list on the left.
- Click the “Time Clock” tab.
- Configure the following options:
- Auto Clock-Out: Set a specific time (e.g., 10:00 PM) for the system to automatically clock out the employee if they forget. This ensures accurate shift-end tracking.
- Restrict Clock-Out: Enable the option “Do not allow clock out before closing out all tickets” to ensure employees complete their tasks before leaving.
- Save the settings.
2.3 Configuring Rest and Meal Breaks
Automate rest and meal breaks to comply with labor policies:
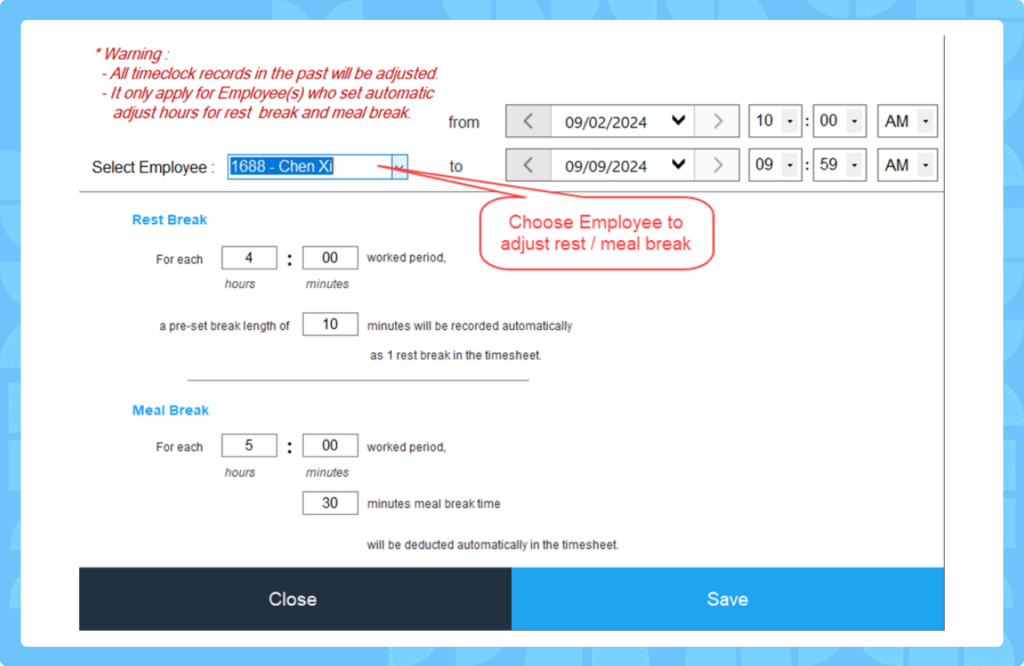
- Rest Break: For every set period worked (e.g., 4 hours), assign a preset break length (e.g., 10 minutes).
- Example: After 4 hours, a rest break from 2:00 PM to 2:10 PM is recorded.
- Meal Break: For every set period worked (e.g., 5 hours), deduct a meal break duration (e.g., 30 minutes).
- Example: After 5 hours, a meal break from 3:00 PM to 3:30 PM is deducted. Set these in the “Time Clock” tab under each employee’s profile.
3. Managing Time Clock Entries
Once the time clock is set up, you can manage entries through the POS Dashboard.
3.1 Accessing Time Clock Reports
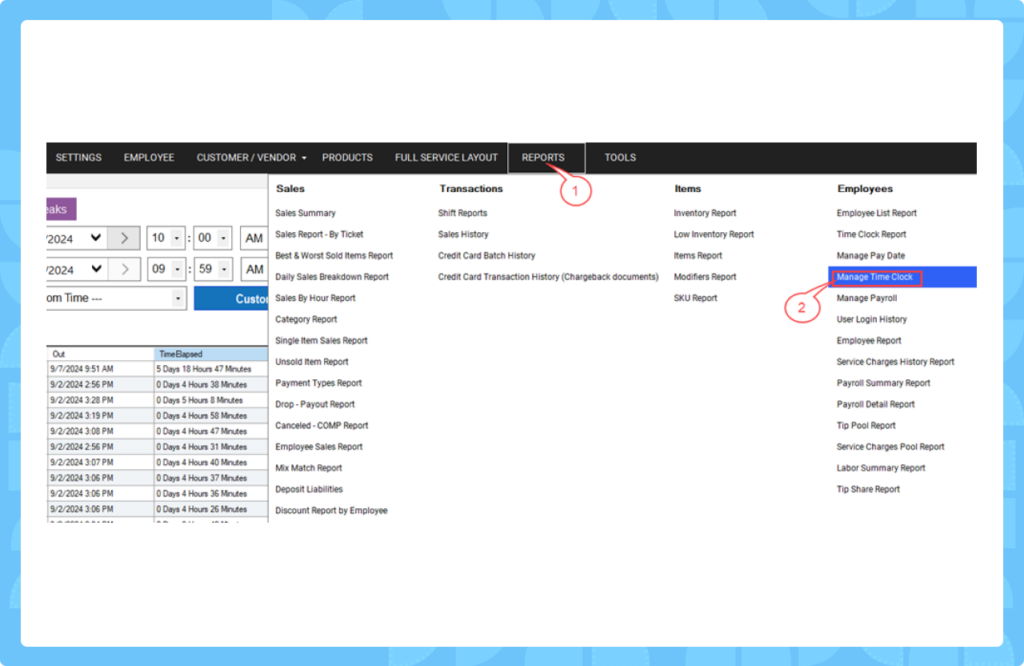
- Navigate to POS Dashboard > Reports > Employees > Manage Time Clock.
- Select a time period to view (e.g., a week or month).
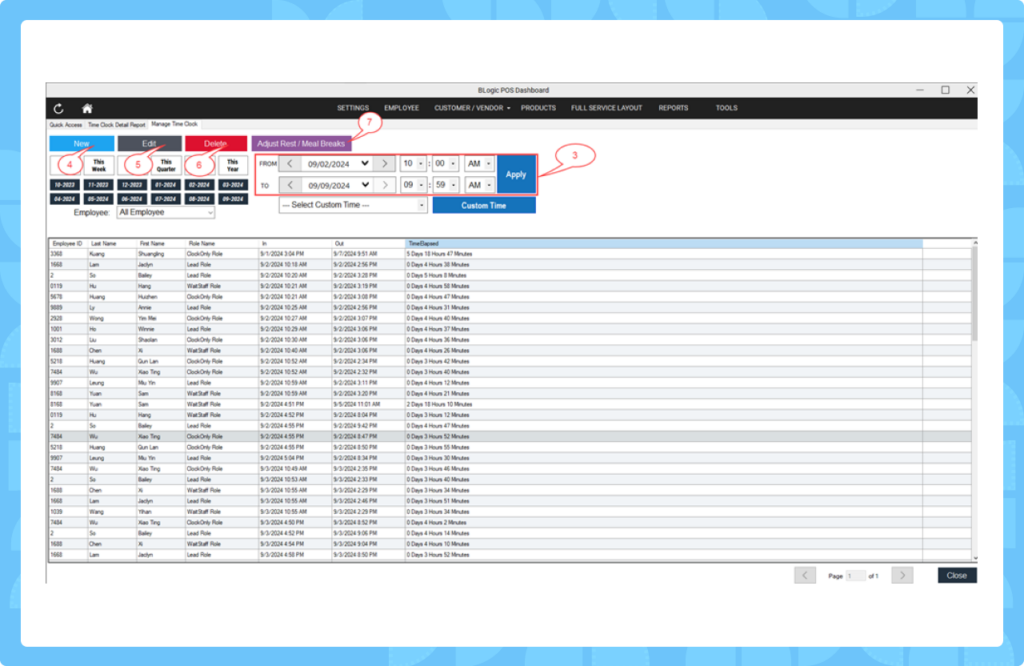
- Review the data grid, which displays:
- Employee ID, Last Name, First Name, Role Name.
- Clock-In Time, Clock-Out Time, and Time Elapsed (Out – In).
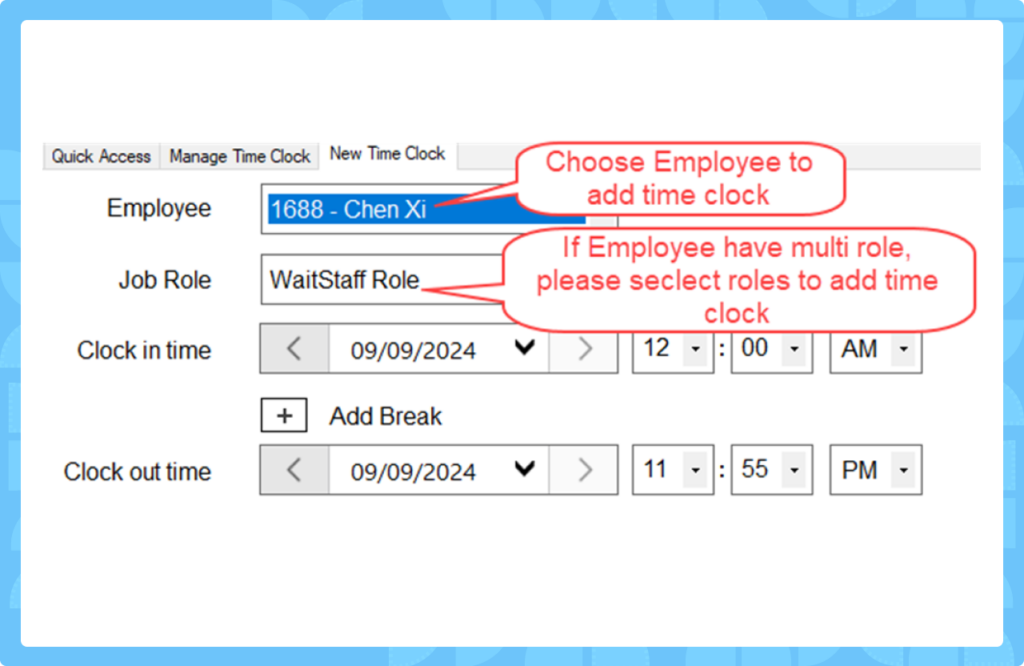
3.2 Adding a New Time Clock Entry
- In the Manage Time Clock screen, click the “New” button.
- Enter the employee’s clock-in and clock-out times manually.
- Save the entry to add it to the timesheet.
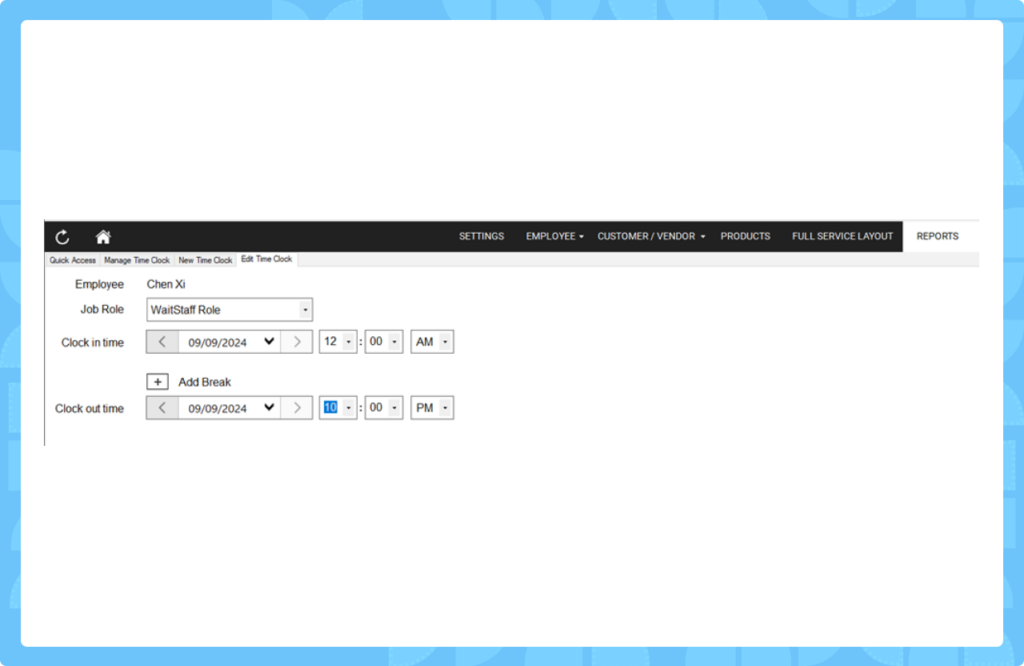
3.3 Editing an Existing Time Clock Entry
- Select the employee’s record in the data grid.
- Click the “Edit” button.
- Update the clock-in or clock-out time as needed.
- Click “Save” to apply changes.
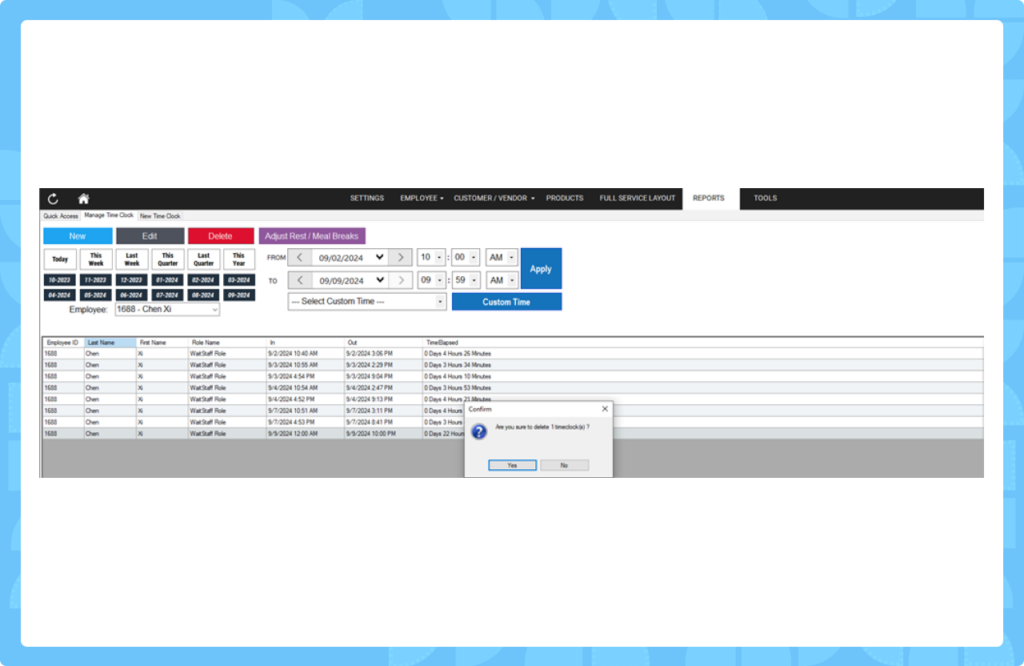
3.4 Deleting a Time Clock Entry
- Select the record you want to remove.
- Click the “Delete” button.
- A confirmation box will appear:
- Click “Yes” to delete the record.
- Click “No” to cancel the action.
* Remove a Clock-Out Entry (Removable Only in Manage Payroll)
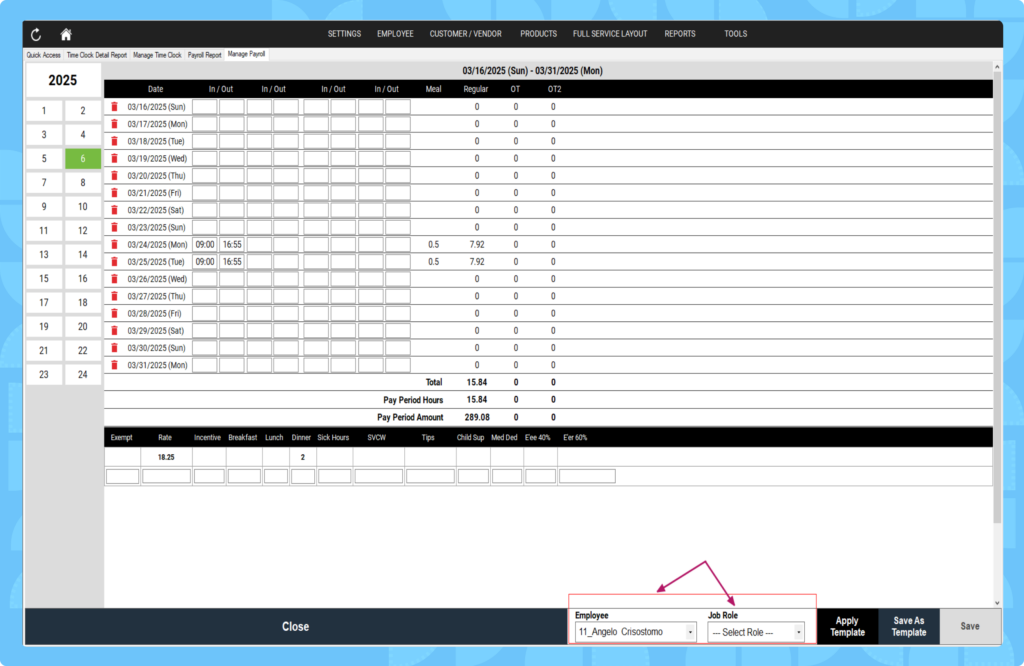
- Open the POS Dashboard.
- Click on Reports.
- In the Employees section, select Manage Payroll.
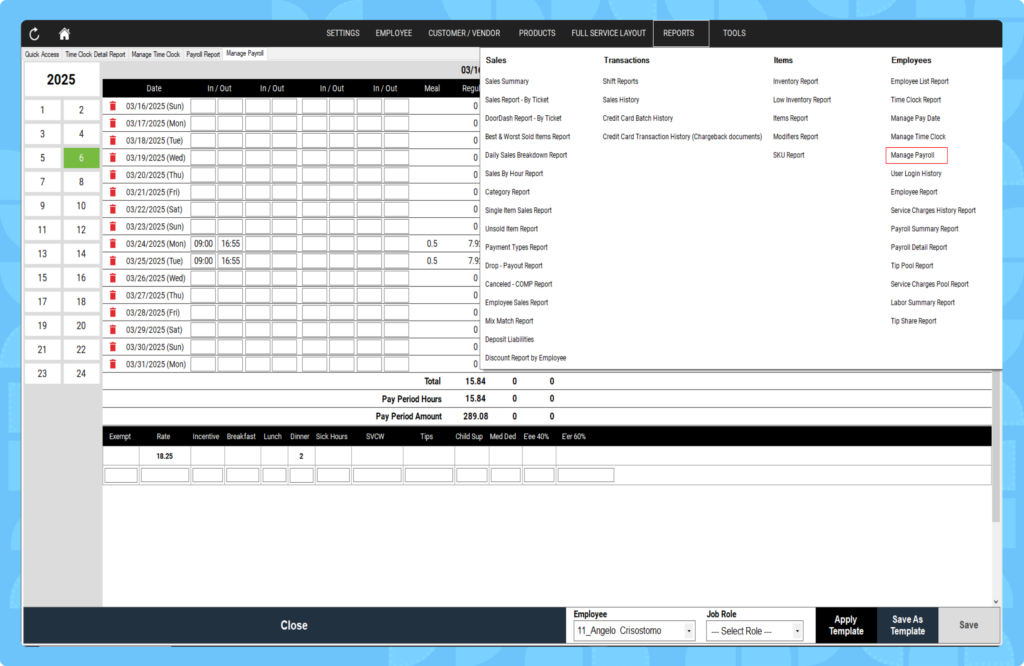
- Choose the employee whose clock-out entry you need to remove.
- Set the Job Roles as needed – this will display a list of time clock in/out data for the selected employee.
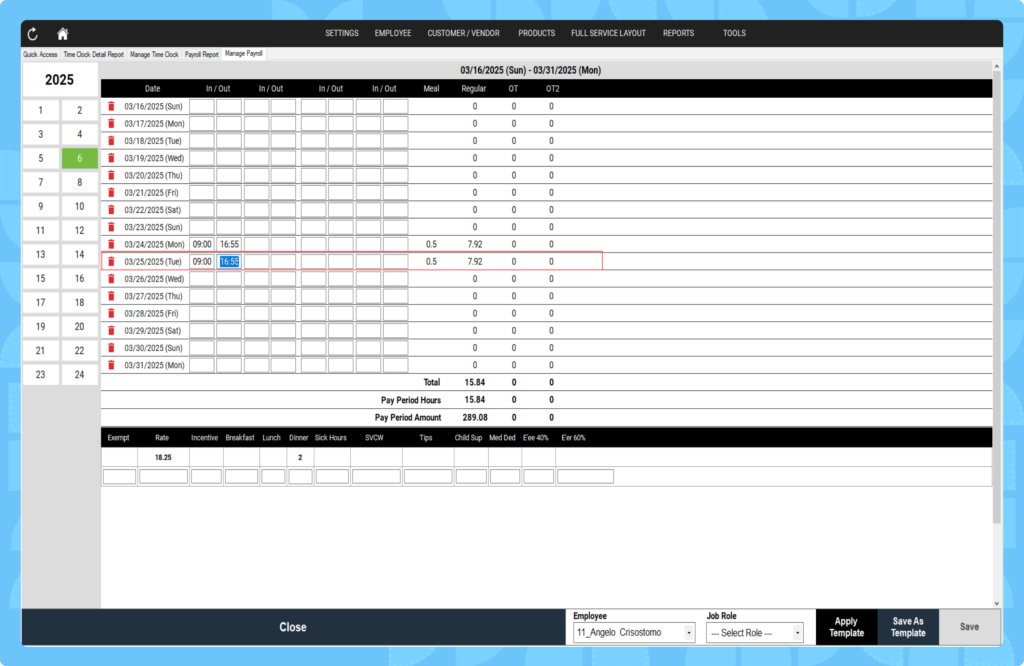
- Find the row with the date you want to edit.
- In the Out column of that row, remove the clock-out data.
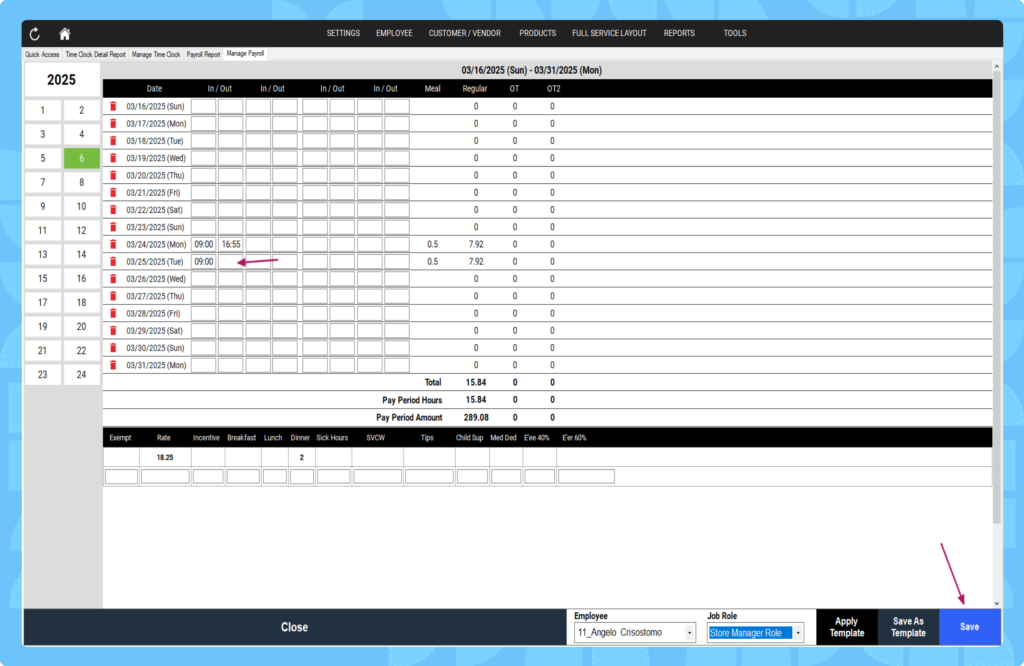
- Click Save to confirm the changes.
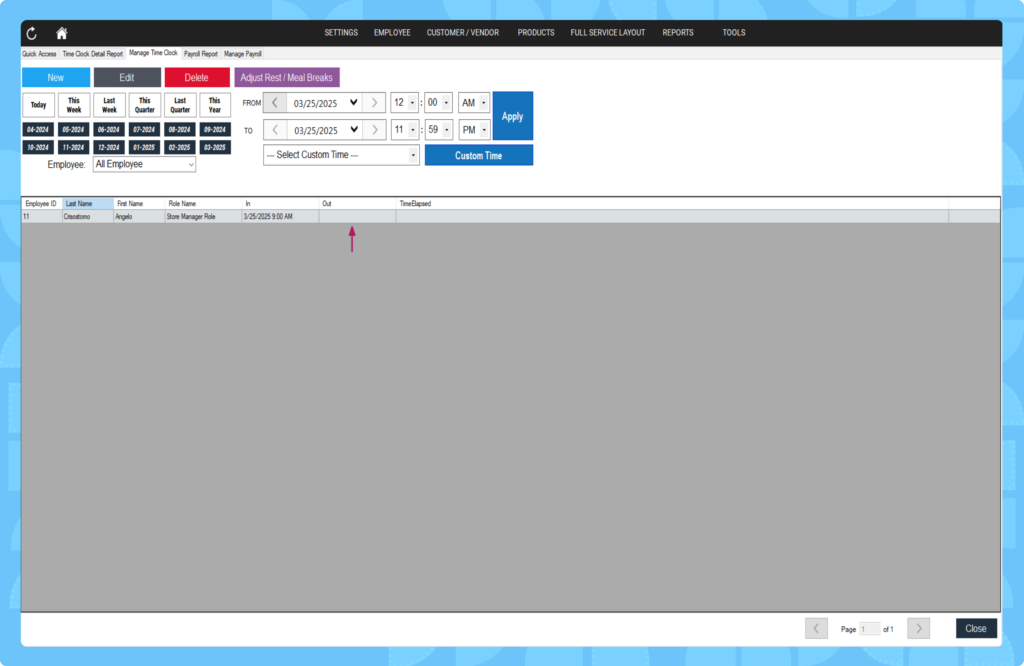
- To verify, go to Reports > Manage Time Clock.
- View the results to confirm the clock-out entry has been removed.
3.5 Adjusting Rest and Meal Breaks
- Select the employee’s record.
- Click “Adjust Rest / Meal Breaks”.
- Modify break details:
- Add or remove breaks.
- Adjust the duration or start/end times.
- Click “Save” to update the timesheet.
- Review the data grid to ensure accuracy.
4. Using the POS App for Clocking In and Out
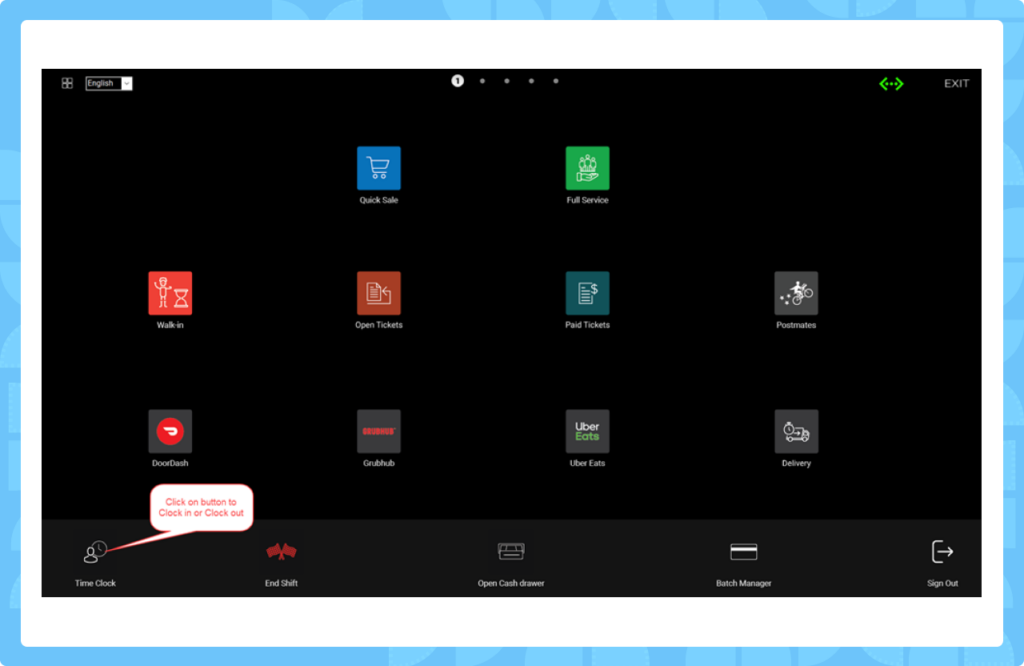
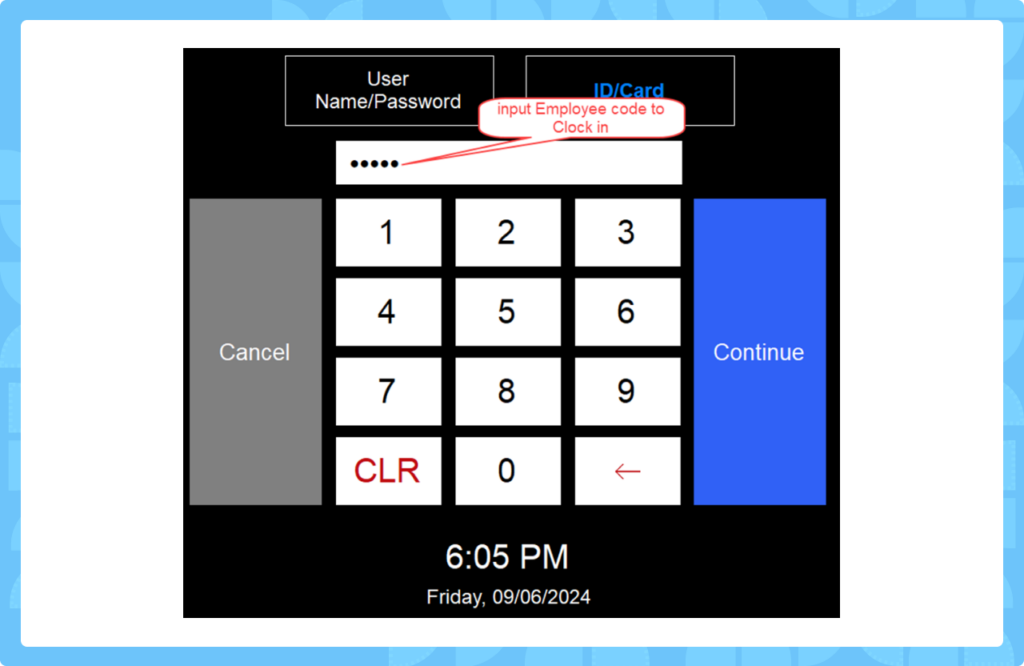
Employees can clock in and out directly through the POS app:
- Open the POS app (or Sorder/Qorder app).
- Select Clock In to start the shift and choose a role (if applicable).
- Select Clock Out to end the shift. The system will record these times and apply any configured rules (e.g., rounding, auto clock-out).
5. Best Practices for Time Clock Management
- Regularly review time clock reports to ensure compliance and accuracy.
- Communicate rounding rules, break policies, and clock-out procedures to all employees.
- Use the auto clock-out feature to avoid payroll discrepancies.
- Adjust entries promptly to reflect actual work hours or breaks.
Result
By following this guide, you can successfully set up and manage a time clock system in the POS Dashboard software. Employees’ work hours, rest breaks, and meal breaks will be accurately tracked, ensuring efficient payroll processing and compliance with workplace policies. The system’s automation features, such as rounding and auto clock-out, reduce manual effort and improve productivity.
FAQ
Q1: What happens if an employee forgets to clock out?
A1: If you’ve set an auto clock-out time (e.g., 10:00 PM), the system will automatically record the clock-out at that time.
Q2: Can I prevent employees from clocking out early?
A2: Yes, enable the “Do not allow clock out before closing out all tickets” option in the employee’s time clock settings.
Q3: How do I fix an incorrect break time?
A3: Go to Manage Time Clock, select the employee, click “Adjust Rest / Meal Breaks”, update the details, and save.
Q4: Why are times rounded in reports?
A4: The system applies rounding rules (e.g., 0-7 minutes rounds down) to standardize time entries. Check the configuration in the POS Dashboard.
Q5: Can I add a time clock entry for a past date?
A5: Yes, use the “New” button in the Manage Time Clock screen to manually add an entry for any date.