Introduction
- This guide provides step-by-step instructions for setting up a receipt printer for the QOrder Handheld device, a tool commonly used in restaurants and retail environments to streamline order processing and receipt printing.
- Two methods are available: configuring the printer directly on the QOrder Handheld or through the POS Dashboard.
- Whether you’re using a built-in printer or an external one, this guide ensures you can set up your printer efficiently. Designed for staff and administrators, it includes detailed steps, a practical outcome, and answers to common questions.
Table of Contents
Content
Method 1: Setup on QOrder Handheld
You can configure the receipt printer directly on the QOrder Handheld device. This method is ideal for quick setups or when using the device’s built-in printer.

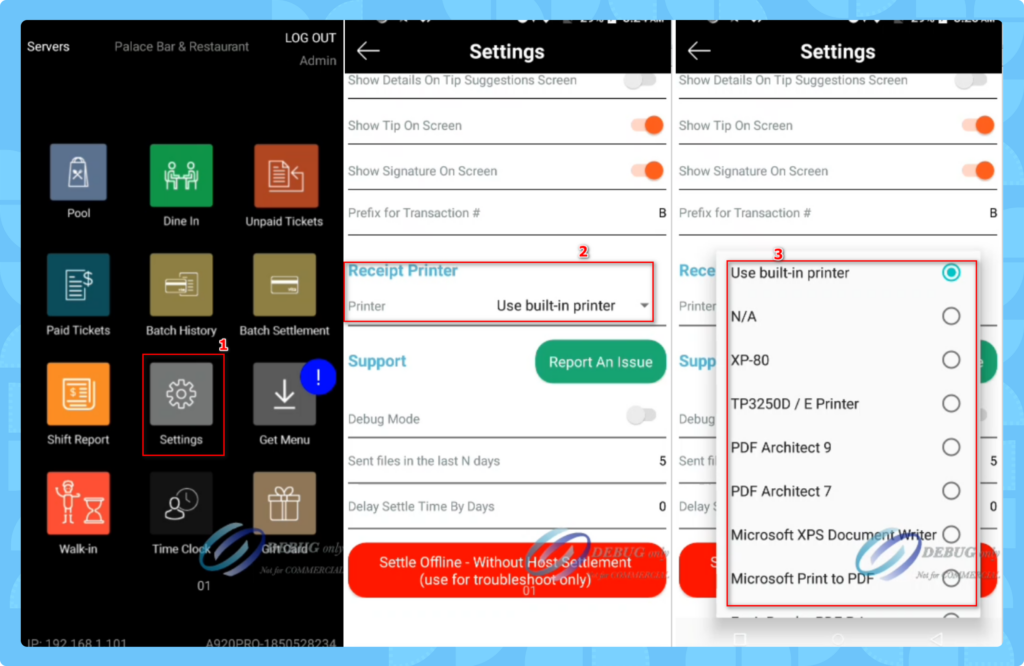
- Open Settings
- On the QOrder Handheld, locate and tap the Settings icon. This is typically found on the home screen.
- Navigate to Receipt Printer Section
- Scroll through the Settings menu and find the Receipt Printer section. This area allows you to manage printer configurations for the device.
- Choose the Printer
- Tap Printer to view available printers.
- Select the printer you need from the list. Options may include:
- Built-in Printer: Choose this to print receipts directly from the QOrder Handheld’s integrated printer (if equipped).
- External Printer: Select a connected external printer.
- Test the Setup
- After selecting the printer, print a test receipt to ensure it works.
Note: Ensure the printer is powered on, connected (if external), and loaded with receipt paper before testing.
Method 2: Setup on POS Dashboard
For centralized management or when configuring multiple devices, you can set up the printer via the POS Dashboard. This method syncs the settings across all connected QOrder Handheld devices.

- Open POS Dashboard
- Log in to the POS Dashboard on your computer or administrative terminal. This is the main interface for managing your POS system.
- Access Settings
- Click the Settings option, usually located in the top menu of the dashboard.
- Navigate to POS Workstations
- On the left side of the Settings menu, find and click POS Workstations. This section lists all devices linked to your POS system.
- Locate the Workstation Table
- In the POS Workstations area, look for the Workstation Table. This table displays all registered devices, including your QOrder Handheld.
- Find the QOrder Device
- Scroll or search the table to find the specific QOrder Handheld device you need to set up.
- Assign the Printer
- In the row for your QOrder device, locate the Printer column.
- Click the dropdown in this column and select the printer you want to assign.
- Push Data to Devices
- Go to the top menu and click TOOLS.
- Click Push Data.
- In the Push Data window, click the Push Data to All Devices button. This syncs the printer settings to all connected devices, including your QOrder Handheld.
- Verify the Update
- Return to the QOrder Handheld and check if the printer is now recognized. Print a test receipt to confirm the setup.
Tip: Ensure all devices are online and connected to the POS network before pushing data.
FAQ
Below are common questions and answers about setting up a receipt printer for the QOrder Handheld, presented as a list for easy reference:
- Which method should I use—QOrder or POS Dashboard?
Use the QOrder Handheld method for quick, individual setups or when using the built-in printer. Use the POS Dashboard method for managing multiple devices or ensuring consistent settings across your system. - What if my printer doesn’t appear in the list?
Ensure the printer is powered on and connected (e.g., via Bluetooth, Wi-Fi, or USB). For QOrder, refresh the printer list in Settings. For POS Dashboard, verify the printer is added under hardware settings before assigning it to the workstation. - Can I use the built-in printer and an external printer together?
No, you must choose one printer per setup. The QOrder Handheld will use either its built-in printer or a single external printer, as selected in the Receipt Printer settings. - What if the receipt doesn’t print after setup?
Check the printer for paper, power, and connection issues. On QOrder, confirm the correct printer is selected. On POS Dashboard, ensure the printer is assigned to the right workstation and data was pushed. Test again after troubleshooting. - Can I change the printer later?
Yes, repeat either method to select a new printer. On QOrder, update it in Settings > Receipt Printer. On POS Dashboard, reassign it in the Workstation Table and push data again.