Introduction
This article shows you how to schedule the Modifier Report on BLogic View so it is generated and emailed to your team automatically. You will learn how to set up a schedule, apply filters, and confirm the report has been sent. Scheduling saves time by removing the need to open BLogic View and export the report manually every day, week, or month.
Version Support
| Product / Module | Supported Version |
|---|---|
| POS | 07.24.2026 or later |
Note: If you do not see the Modifier Report option inside Schedule Report, please contact Support to confirm your store is on a supported version.
Table of Contents
- Before You Start
- Configure Schedule for the Modifier Report
- Apply Filters (Modifier Group, Modifier, Category)
- Where to View or Confirm the Result
- FAQ
Before You Start
Make sure you have the following:
- A BLogic View account with permission to access Schedule Report.
- At least one recipient email address ready to receive the report.
- Your Modifier Groups, Modifiers, and Categories already set up in Back Office so they appear in the filter list.
ℹ️ Note: The Modifier Report schedule follows the same general rules as the Sale Summary Report schedule (frequency, time, recipients, file format). If you already know how to schedule Sale Summary, the flow will feel familiar.
Configure Schedule for the Modifier Report
Step 1: Open the Schedule Report screen
- Log in to BLogic View.
- Go to Setup > Report Scheduler.
- In the Reports menu, select Sale by Modifier.
Step 2: Set the schedule frequency and recipients
- Select the Frequency (daily, weekly, or monthly) and the Send Time.
- Add the Recipient Emails who should receive the report.
- Choose the File Format for the attachment if the option is available.
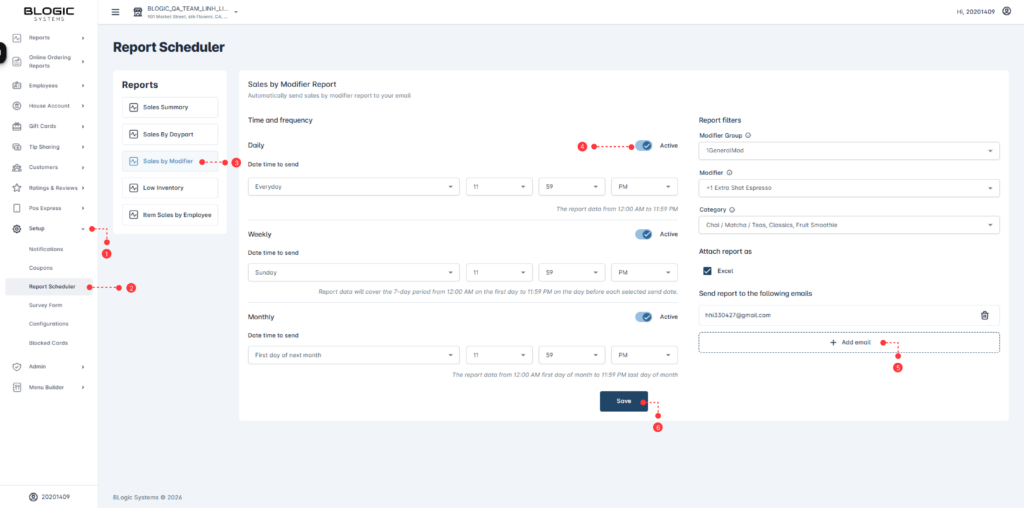
✅ Tip: Use a shared mailbox or a distribution list as the recipient so the report keeps arriving even if a team member leaves.
Apply Filters (Modifier Group, Modifier, Category)
The Modifier Report scheduler lets you narrow down what appears in the report.
Step 1: Open the filter section on the schedule form
You will see three filters:
- Modifier Group
- Modifier
- Category
Step 2: Select the values you want
- Click a filter to open its list.
- Select one or more values — all three filters support multiple selection.
- Leave a filter as All if you do not want to narrow it down. All is the default value for every filter.
Step 3: Save the schedule
- Review the schedule details, filters, frequency, and recipients.
- Click Save.
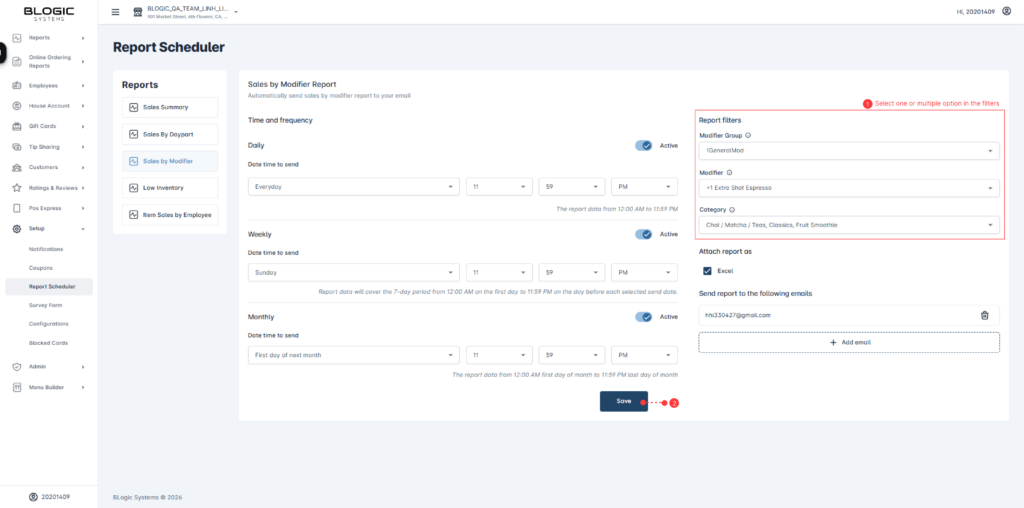
ℹ️ Note: The report emailed to recipients is the report with your filters already applied. Recipients will not see data outside the selected Modifier Groups, Modifiers, or Categories.
Where to View or Confirm the Result
You can confirm the schedule is working in :
- Recipient’s mailbox — the Modifier Report arrives as an email attachment at the scheduled send time, with the filters already applied.
✅ Tip: Send yourself a test copy first by adding your own email as a recipient and picking a near-term send time. Once confirmed, remove your address or leave it in.
FAQ
1. Why can’t I see the Modifier Report option inside Schedule Report? Your store may not be on a supported version, or your user role may not have permission to access Schedule Report. Please contact Support if the option is not visible.
2. What happens if I leave all filters as “All”? The report will include every Modifier Group, Modifier, and Category. All is the default value for each filter.
3. Do the filters affect the report data that recipients see? Yes. The report emailed to recipients is the report after filters are applied. Recipients will only see the data that matches your selected filters.
4. What should I do if the scheduled email does not arrive? Check that the schedule is still active, that the recipient email address is correct, and that the email did not land in the spam folder. Confirm your store is on a supported version and contact Support if the issue continues.
Closing
If you still need help, please contact Support for further assistance.