Introduction
This article explains how to use the Report Scheduler in BLogic View to have reports generated and emailed to you automatically.
You will learn how to pick a report, set how often it is sent, choose the file format, and manage the list of email recipients.
The same steps apply to every report available in the Report Scheduler, so you only need to learn this process once.
Version Support
| Product / Module | Supported Version |
|---|---|
| POS / Modifier Report | 07.24.2026 or later |
| POS / Category Report | 07.31.2026 or later |
Note: The list of reports available in the Report Scheduler depends on your version. If a report you need is missing, please contact Support to confirm your store is on a supported version.
Table of Contents
- Open the Report Scheduler and Choose a Report
- Set the Time and Frequency
- Choose the File Format and Recipients
- Where to View or Confirm the Result
- FAQ
Open the Report Scheduler and Choose a Report
Step 1: Open the Report Scheduler
- Log in to BLogic View.
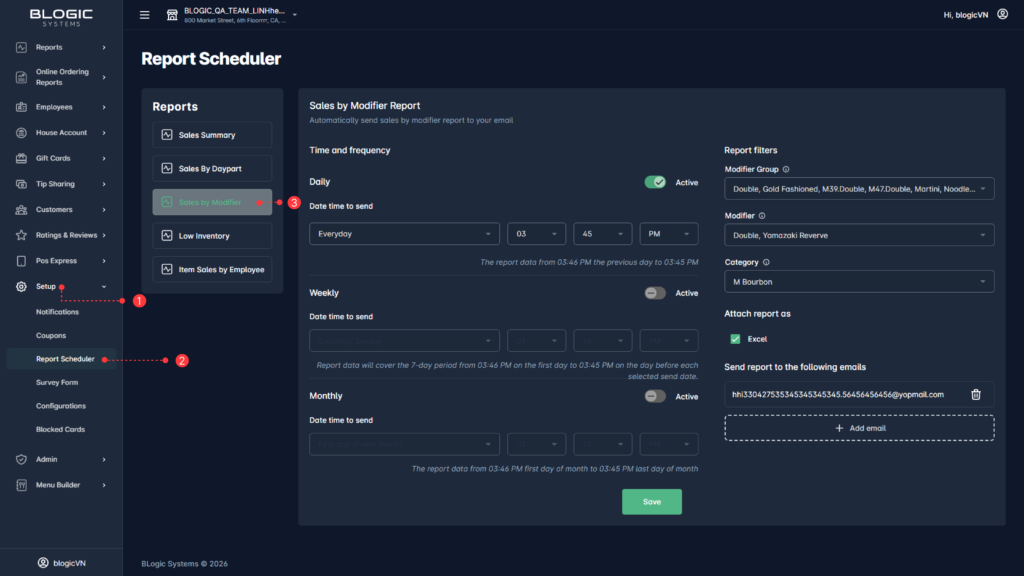
- In the left menu, go to Setup > Report Scheduler.
Step 2: Select the report you want to schedule
- In the Reports panel on the left, select a report — for example Sales Summary, Sales By Daypart, Sales by Modifier, Low Inventory, or Item Sales by Employee, …
- The settings for that report open on the right, with a short description of what it sends.
ℹ️ Note: Each report keeps its own schedule settings. Selecting a different report in the list does not change the schedule you already saved for another report.
ℹ️ Note: A few reports also let you choose which data to include (for example, filter options such as Category, Items Type, or Items). Only one set of these options can be saved per report.
Set the Time and Frequency
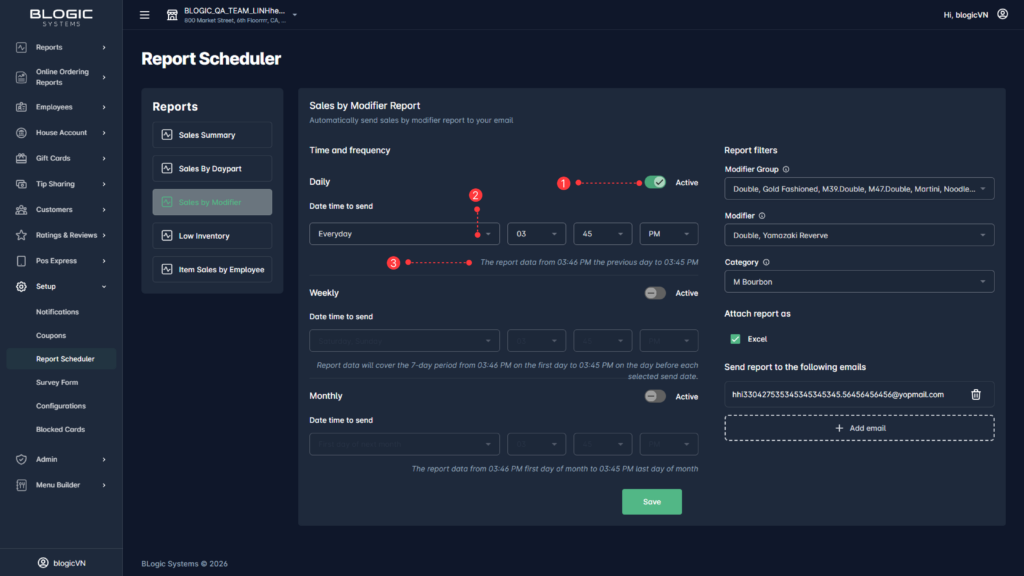
The Time and frequency section has three options — Daily, Weekly, and Monthly. Each one has its own Active toggle and its own send time.
Step 1: Turn on the frequency you want
- Find the frequency you want to use: Daily, Weekly, or Monthly.
- Switch its toggle to Active. The fields below it become editable.
Step 2: Set the date and time to send
- Under Date time to send, use the first dropdown to choose the day:
- Daily — for example, Everyday
- Weekly — the day of the week, for example Sunday
- Monthly — for example, First day of next month
- Use the next dropdowns to set the hour, the minute, and AM or PM.
Step 3: Check the data period
- Read the italic text under each frequency. It tells you exactly which period the report data will cover, for example:
- Daily — from 11:00 PM the previous day to 10:59 PM
- Weekly — the 7-day period from 12:00 AM on the first day to 11:59 PM on the day before each send date
- Monthly — from 12:00 AM on the first day of the month to 11:59 PM on the last day of the month
- Adjust the send time if the period does not match what you need.
✅ Tip: The data period follows the send time you choose, so setting a late send time gives you a fuller day of sales.
Choose the File Format and Recipients
Step 1: Choose how the report is attached
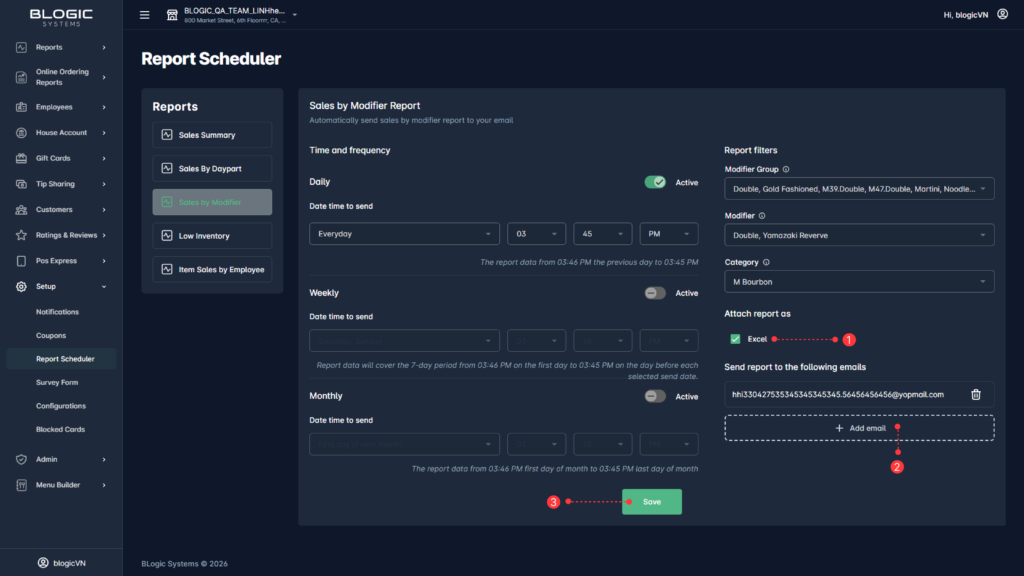
- Under Attach report as, tick the format you want — for example Excel.
Step 2: Add the email recipients
- Under Send report to the following emails, enter an email address in the field.
- Select + Add email to add another recipient.
- To remove a recipient, select the trash icon next to that address.
Step 3: Save the schedule
- Select Save.
- Your settings for that report are stored and the report starts sending at the next scheduled time.
⚠️ Warning: Changes are not applied until you select Save. If you switch to another report in the list before saving, your changes may be lost.
Where to View or Confirm the Result
You can confirm your schedule in these places:
- Setup > Report Scheduler — reopen the report and check that the frequency toggles, send time, format, and email list are saved correctly.
- Your email inbox — at the scheduled time, confirm the report arrives as an attachment in the format you selected.
- The report page in Reports — compare the figures in the emailed file with the same date range on screen.
FAQ
1. Why can’t I see Report Scheduler, or a report I need? You may not be on a supported version, or your user role may not have permission to open Setup. Please contact Support if the menu or report is not visible.
2. Can I send the same report daily and monthly at the same time? Yes. Daily, Weekly, and Monthly each have their own Active toggle, so you can turn on more than one for the same report.
3. How do I stop a scheduled report? Open the report in the Report Scheduler, switch the frequency toggle off so it is no longer Active, and select Save.
4. Does scheduling a report change my data? No. A schedule only controls when the report is generated and who receives it. Your sales data is not modified.
5. What should I do if the report does not arrive? Check that the frequency is set to Active, that the send time has already passed, and that the email address is correct. Also check your spam folder. If the report still does not arrive, please contact Support.
Closing
If you still need help, please contact Support for further assistance.