General Settings
Introduction
This feature enables you to easily add, edit, and manage text on your kiosk’s start screen, allowing you to display important information or promotions to your customers. Additionally, you can customize how product categories, items, and modifiers appear on the menu screen.
1. Display Additional Text on Start Screen
1.1 Purpose:
Show extra information such as promotions, instructions, or restaurant details to customers when they first interact with the kiosk.
1.2 Steps:
- Enable/Disable:
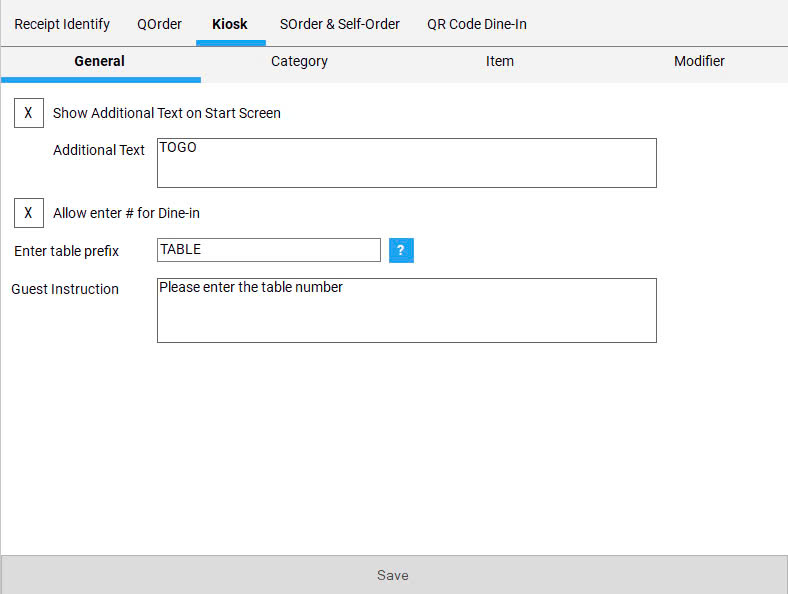
Check the box next to “Show Additional Text on Start Screen”. - Enter Text:
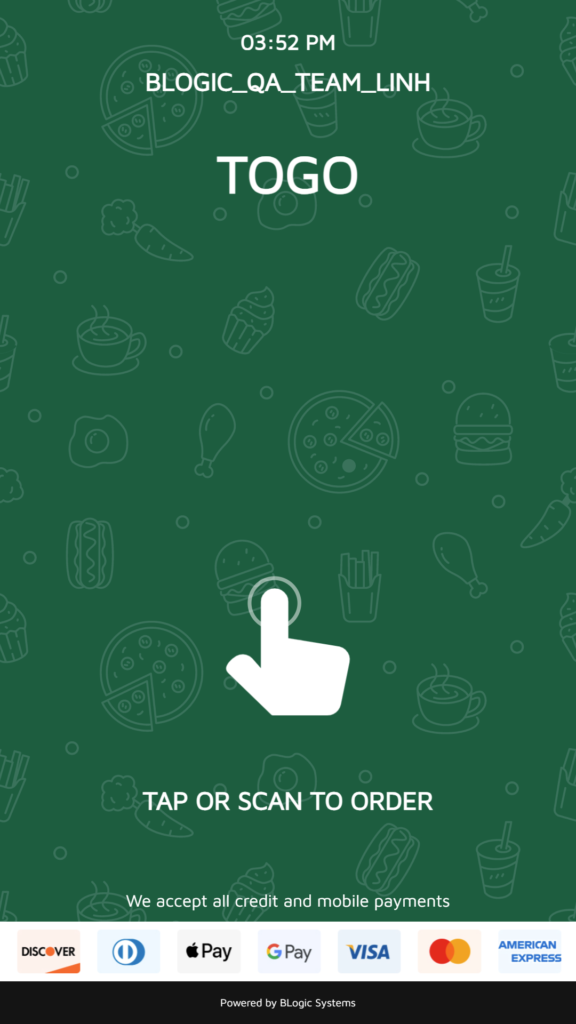
Type the content you want displayed in the “Additional Text” field.
Example:- “Enter discount code to enjoy 10% off.”
- “Please select your items and pay at the counter.”


2. Allow entering table number for dine-in customers:
2.1 Purpose:
Allows customers to enter their table number for dine-in orders, helping staff easily allocate orders.
2.2 Steps:
- Enable/Disable:
Check the box next to “Allow enter # for Dine-in”. - Enter Table Prefix:
In the “Enter table prefix” field, input a prefix like “Table” or “Seat”.
Example: “Table 1”. - Guest Instructions:
In the “Guest Instruction” field, write clear directions for customers.
Example: “Please enter your table number.”

3. Customizing Product Categories, Items, and Modifiers on the Menu Screen
Introduction:
This feature allows you to customize the appearance of categories and products on the menu. You can adjust fonts, sizes, and display styles to create a more professional and user-friendly interface.
| Key Options – Visible From: Select the category you want to customize. – How to do it: + Click the dropdown arrow in the “Visible From” field. + Select the category you wish to edit. – Style: Choose how the category name will appear. + Bold: Makes the font bold. + Italic: Italicizes the font. – Size: Select the font size for the category name. Adjust the slider or enter a number (between 12 and 24). – Transform: Choose how to format the text in the category name. + Uppercase: Displays all text in capital letters. + Capitalize First Letters: Capitalizes the first letter of each word. |  |
How to Apply These Customizations
- Select Category:
Choose the category you want to customize using the dropdown in the “Visible From” field. - Customize Font Style:
Select the font style (Bold, Italic) by checking the boxes. - Choose Font Size:
Use the slider or type in the font size value. - Select Text Transformation:
Choose the option for how the text should appear (Uppercase, Capitalized). - Save Changes:
After making your selections, click the “Save” button.
Viewing Changes on the Kiosk
