Introduction
This article shows you how to set up automated rating requests for your customers, redirect happy customers to leave a Google Review, and reply to reviews from one place. You will learn how to configure the SMS and Email channels, set up auto-reply messages, and read the Rating & Review report. Collecting feedback automatically helps you build your online reputation and respond to customers quickly.
Table of Contents
- Set Up the SMS Channel
- Set Up the Email Channel
- Set Up Google Review Redirect
- Set Up Auto-Reply After Rating
- Customers Submit a Rating
- View the Rating & Review Report
- Reply to a Review by Email
- FAQ
Set Up the SMS Channel
The SMS channel sends a rating request by text message after a customer completes an order.
Step 1: Open the Ratings & Reviews settings
- Log in to your Sensa Booking account.
- Go to Settings > Ratings & Reviews.
Step 2: Turn on SMS and write your message
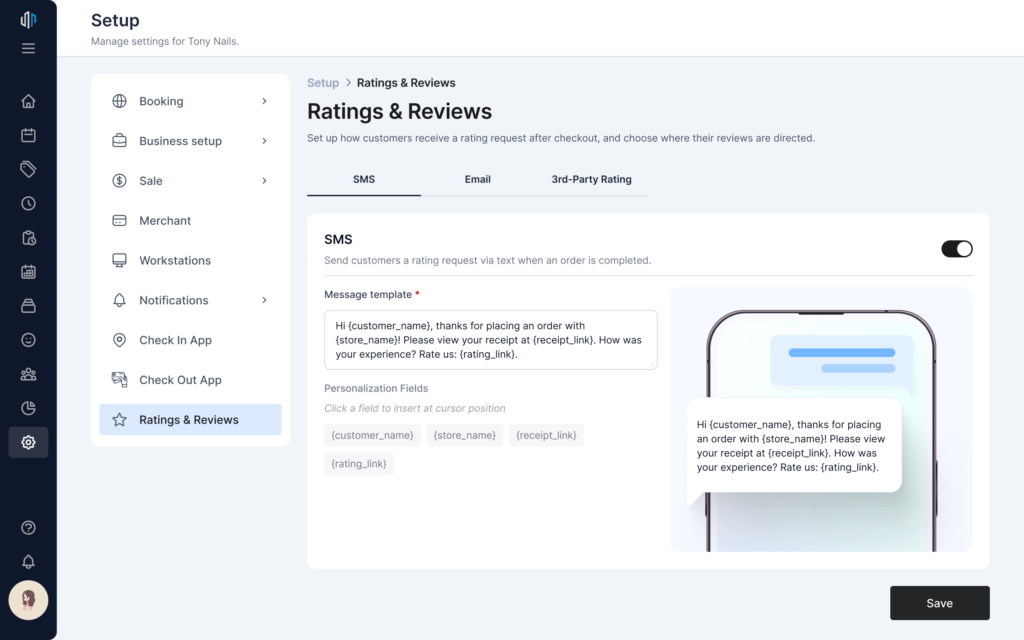
- Find the SMS card and turn the toggle ON.
- In Message template, type the text you want customers to receive.
- Click any shortcode to insert it at your cursor:
{customer_name},{store_name},{rating_link},{order_id}. - Check the preview bubble below to see how your message will look.
Set Up the Email Channel
The Email channel sends a branded rating request email after a customer completes and pays for an order. Email is turned ON by default.
Step 1: Turn on Email and edit the template
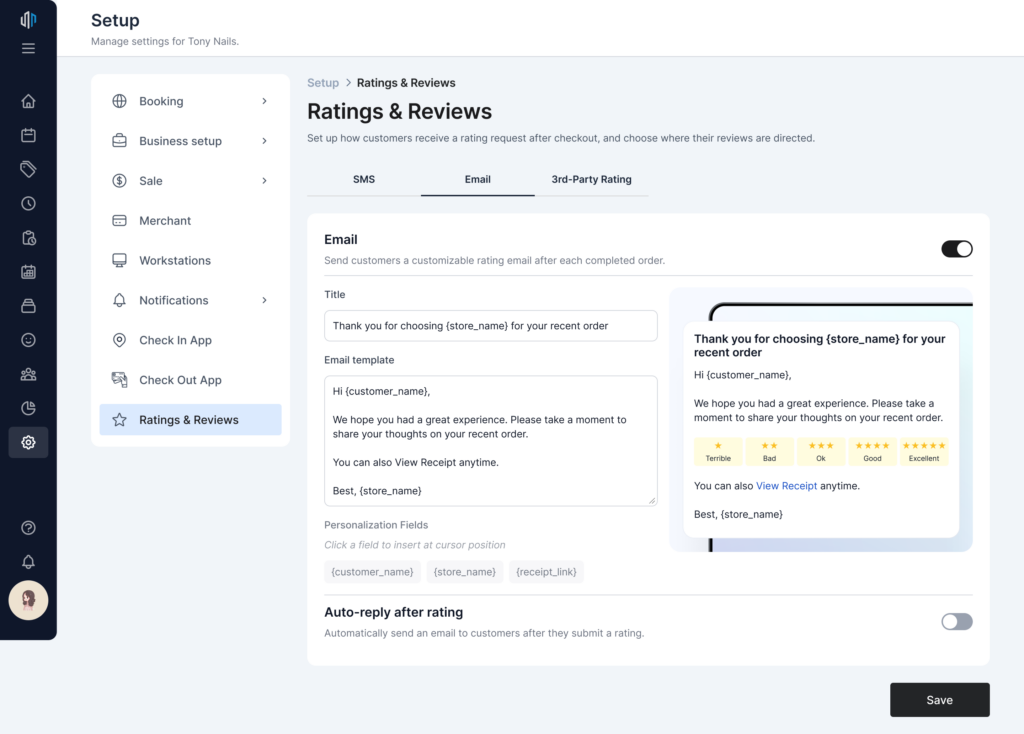
- In Settings > Ratings & Reviews, find the Email card.
- Make sure the toggle is ON.
- Edit the Subject line and Body message.
- Click any shortcode to insert it:
{store_name},{customer_name},{order_date},{receipt_link}.
Step 2: Insert a personalization field
- Click inside the template where you want the field to appear.
- When the field is active, click a personalization chip (for example,
{customer_name}). - The field is inserted at your cursor position.
ℹ️ Note: Personalization chips only work when your cursor is inside the template box. Click into the template first, then click the chip.
Set Up Google Review Redirect
Google Review redirect is an add-on inside the Email card. When a customer clicks a star rating in the email, high-rating customers are sent to your Google Review page. Lower ratings stay in the app as private feedback.
ℹ️ Note: Google is the only review platform supported in this version.
Step 1: Turn on the redirect
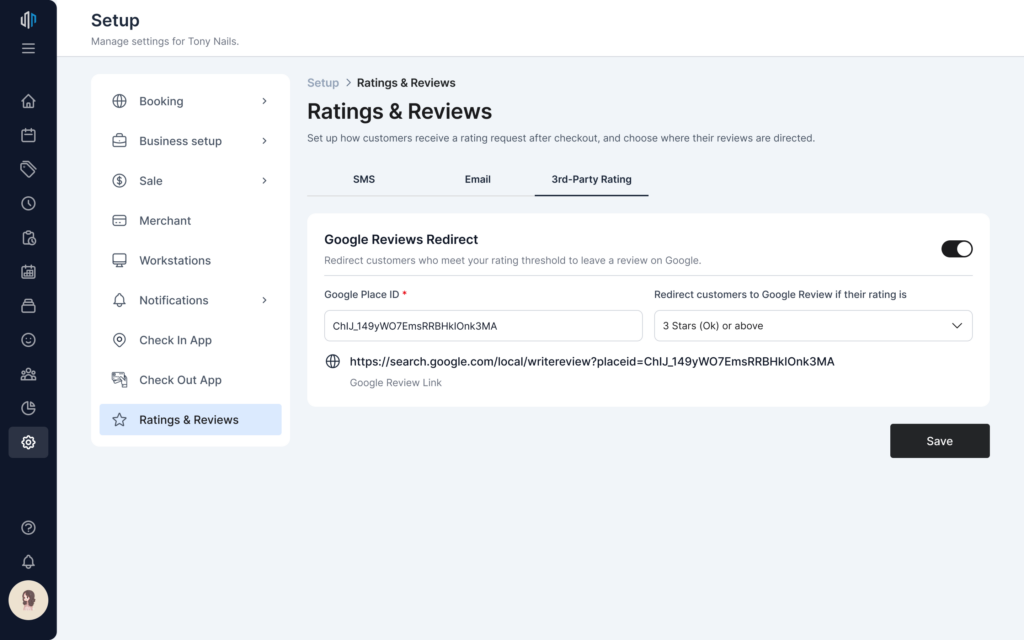
- In the Email card, find Google Review redirect.
- Turn the toggle ON.
Step 2: Enter your Google Place ID
- In the Google Place ID field, paste your store’s Place ID.
- This field is required when the redirect is on.
Step 3: Choose the redirect threshold
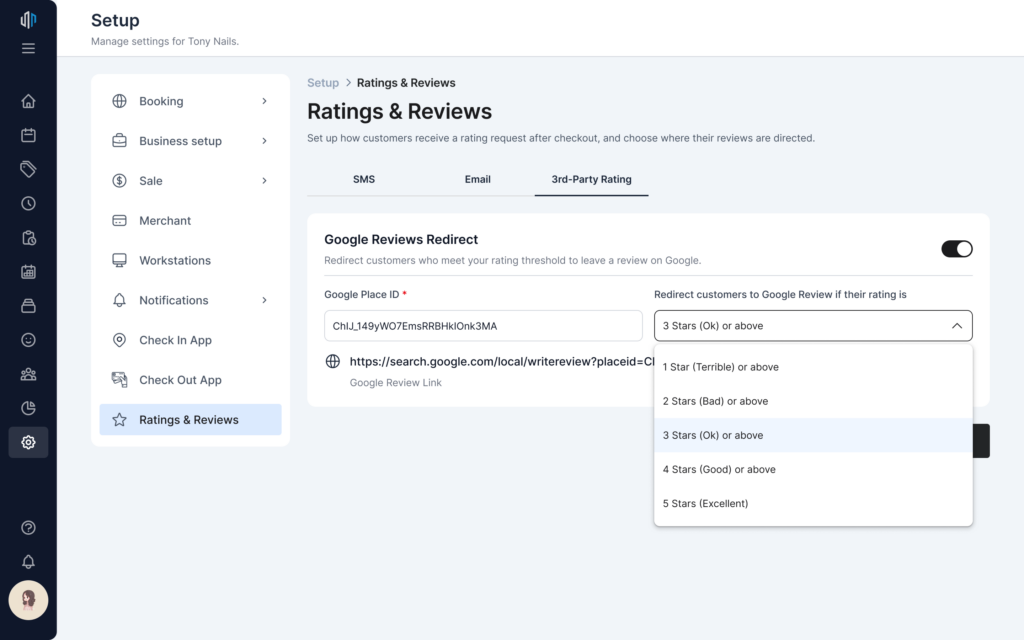
- Under Redirect threshold, select the minimum star rating.
- Stars below the threshold appear in red — these ratings stay in the app.
- Stars at or above the threshold appear in green — these customers are redirected to Google.
- The summary line updates automatically, for example: “Ok (3★) or above → redirect to Google Review.”
✅ Tip: A threshold of 4★ or above is a common choice — it sends only your happiest customers to Google while keeping constructive feedback private.
Set Up Auto-Reply After Rating
Auto-reply sends an automatic email response based on the customer’s rating. You set one reply message for each rating type.
Step 1: Open the auto-reply setup
- In the Email card, find the Auto-reply after rating row.
- Click Set up auto-reply. A popup window opens.
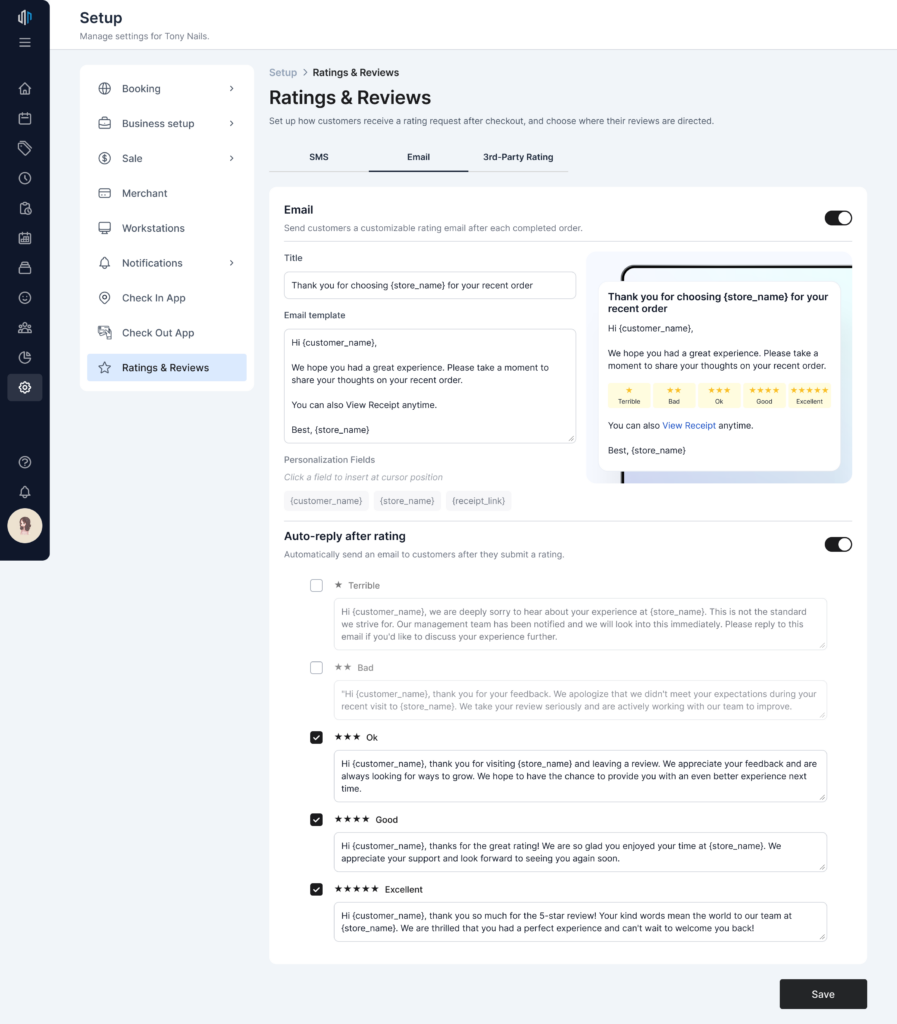
Step 2: Configure a reply for each emotion
- The popup shows five rating types: Terrible, Bad, Ok, Good, Excellent.
- Turn on the toggle for each rating you want to reply to.
- Type your reply message (maximum 140 characters per rating).
- Click Save.
ℹ️ Note: After saving, the button shows how many replies you have set up, for example “3 of 5 configured.”
Customers Submit a Rating
After a successful check-out, the customer receives your rating request by SMS or Email. This section explains what the customer sees and does — useful to know so you can support customers who have questions.
Step 1: Open the rating link
- The customer receives the SMS or Email you set up.
- They tap the rating link (SMS) or click a star in the email.
- The Give Feedback page opens in their browser.
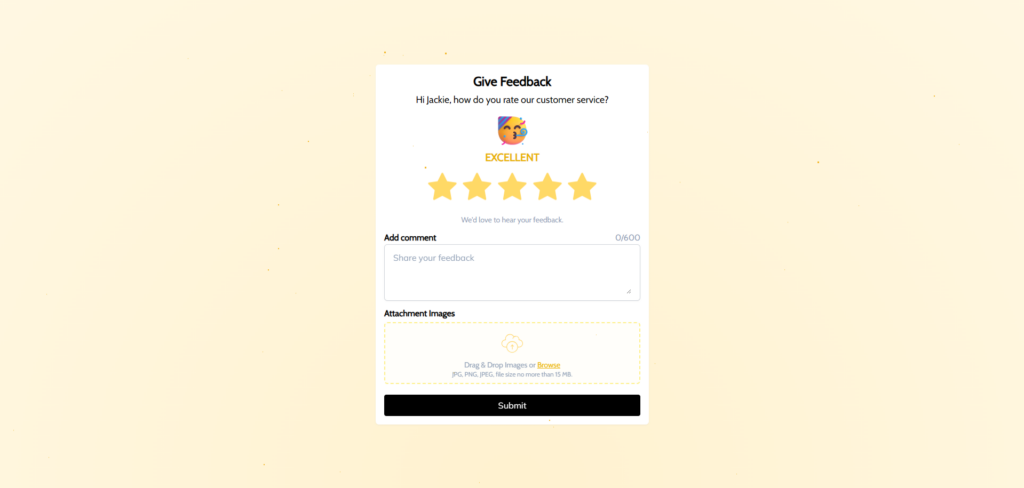
Step 2: Choose a star rating
- The customer selects a star rating from 1 to 5.
- The page shows the matching emotion label — for example, “EXCELLENT” for 5 stars.
Step 3: Add a comment and photos (optional)
- The customer can write a comment (up to 600 characters).
- They can attach images by drag & drop or Browse (JPG, PNG, JPEG, no more than 15 MB each).
Step 4: Submit the rating
- The customer clicks Submit.
- Based on your setup in Set Up Google Review Redirect, if the rating is at or above your chosen threshold, the customer is redirected to your Google Review page.
- Ratings below the threshold are saved as private feedback and do not go to Google.
ℹ️ Note: After a customer submits their rating, it cannot be edited or submitted again. The rating link works only once.
View the Rating & Review Report
All rating data and reviews are in one report with two tabs: Summary and Details.
Step 1: Open the report
- Go to Reports > Ratings & Reviews > Rating & Review.
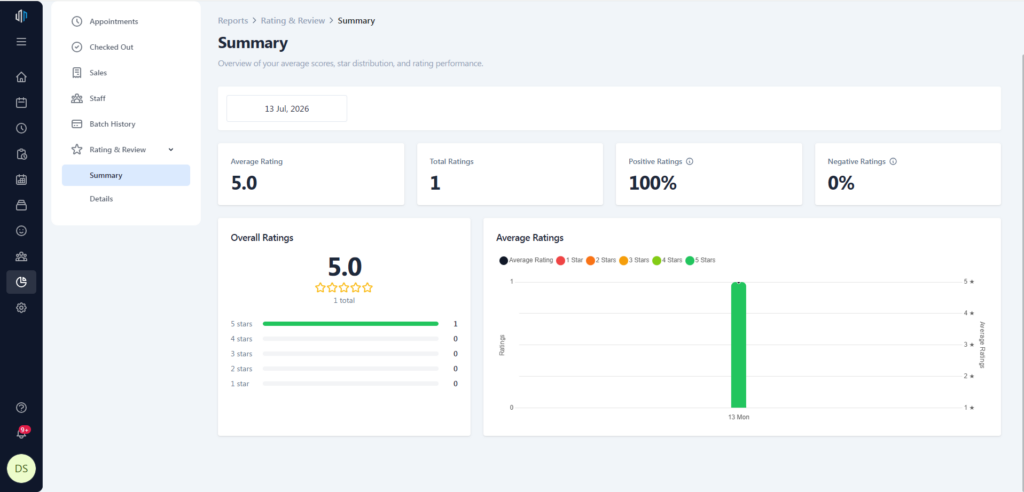
Step 2: Read the Summary tab
- The Summary tab opens by default.
- Review the KPI cards: Average Ratings, Total Ratings Received, Positive Reviews, Negative Reviews.
- View the Overall Ratings breakdown, Customer Feelings, and the Review vs. Average Ratings chart.
- Use the Time Period filter to change the date range — all widgets refresh.
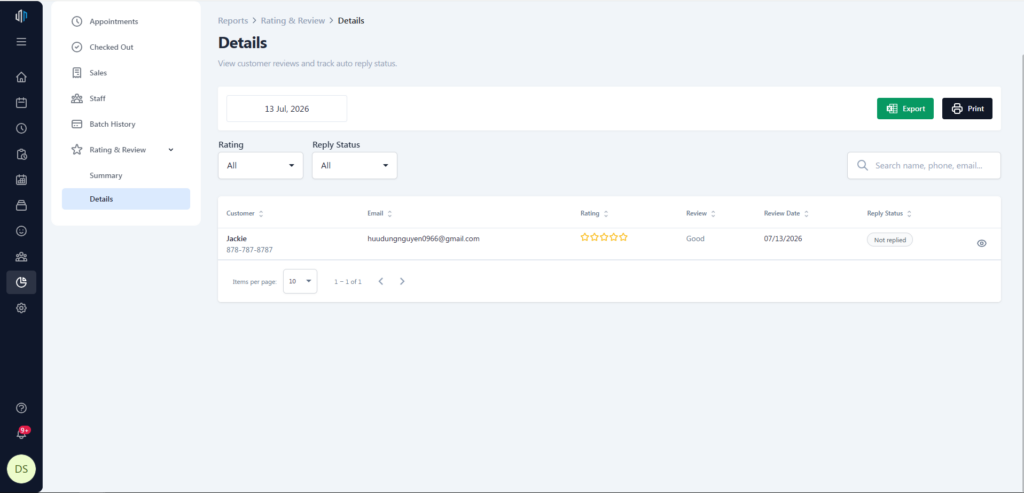
Step 3: Read the Details tab
- Click the Details tab.
- The table shows Customer, Review, Rating, Review Date, and Reply Status.
- Use the date filter and rating filter to narrow the list.
- Click Export to download the data, or Print to print the table.
Reply to a Review by Email
You can send a personal email reply to a customer directly from the review details.
Step 1: Open a review
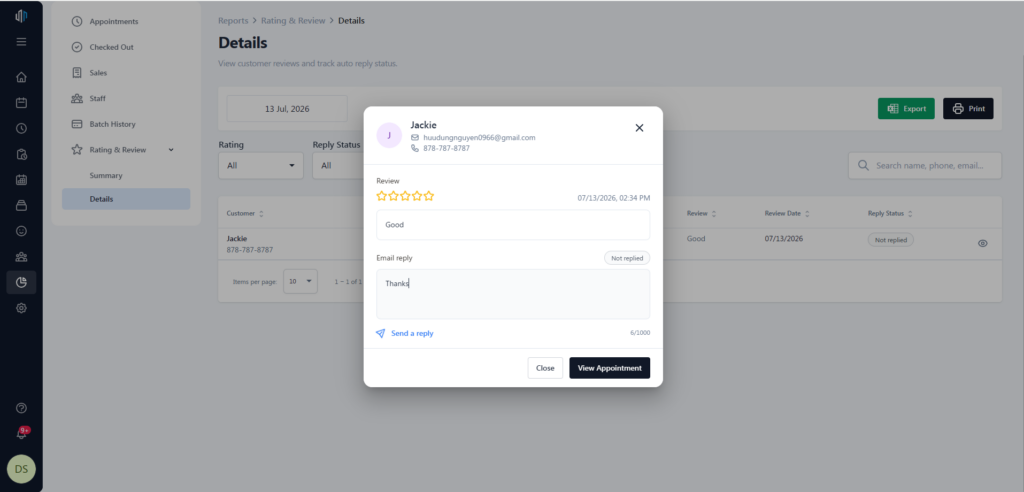
- In the Details tab, click Details on any review row.
- The review detail window opens, showing the full review, rating, and any customer photos.
Step 2: Send your reply
- In the Email reply section, type your message in the text box.
- Click Send a reply.
- The message is emailed to the customer.
- The text box becomes locked, the status changes to Replied, and the send time is shown.
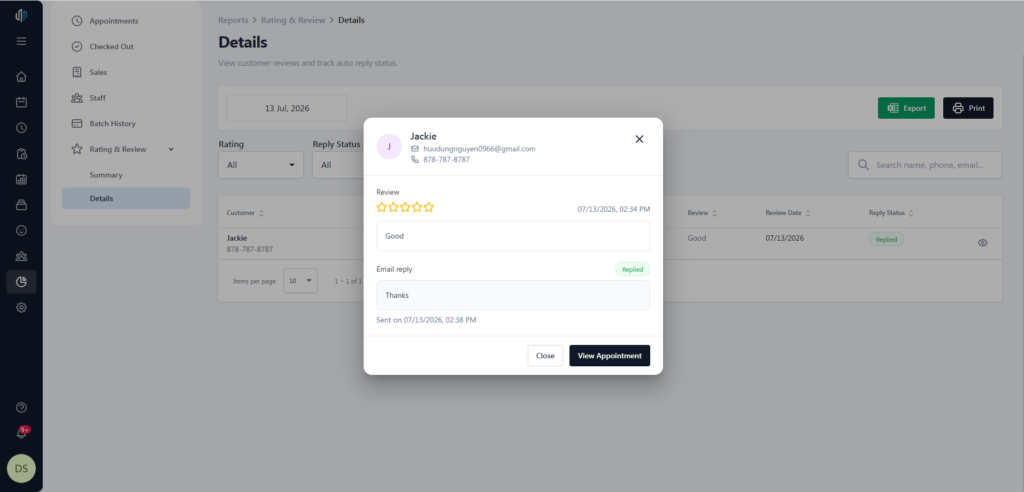
ℹ️ Note: You can send only one reply per review. After sending, the reply cannot be edited or resent.
Where to View or Confirm the Result
You can confirm your setup and results in these places:
- Settings > Ratings & Reviews — confirm which channels and features are turned on.
- Reports > Rating & Review > Summary — see overall rating trends.
- Reports > Rating & Review > Details — see individual reviews and reply status.
- Customer’s inbox — the rating request email or SMS, and any reply you send.
FAQ
1. Why can’t I see this option? You may not be on a supported version, or your user role may not have permission to access this setting. Please contact Support if the option is not visible.
2. Does turning on a channel affect past orders? No. Rating requests and auto-replies apply only to new orders and ratings created after the feature is turned on. Past ratings are not affected.
3. Can I send more than one email reply to the same review? No. You can send only one reply per review. After it is sent, the reply is locked and cannot be edited or resent.
4. Why are some customers not redirected to Google? Only ratings at or above your chosen threshold are redirected to Google. Ratings below the threshold stay in the app as private feedback, so you can follow up privately.
5. What should I do if a rating request is not sent? Check that the channel (SMS or Email) is turned on, confirm the customer has a valid phone number or email on file, and confirm your store is on a supported version. Contact Support if the problem continues.
Closing
If you still need help, please contact Support for further assistance.