Introduction
When a cashier assigns a customer to a ticket, the POS asks for the customer’s phone number and then shows a screen to collect more customer details. This article shows you how to choose which of those detail fields appear, and which ones staff must fill in.
You will learn where to find the new Information Input section on POS Dashboard, how to show or hide each field for POS and for the Customer Facing Display (CFD), and how to set a field as Required or Optional. This is useful for busy stores that want to keep the customer step as short as possible.
Version Support
| Product / Module | Supported Version |
|---|---|
| POS | 09.04.2026 or later |
Note: If you do not see this option, please contact Support to confirm your store is on a supported version.
Table of Contents
- What You Can Configure
- Configure the Information Input Section
- Set a Field as Required or Optional
- What Staff See on POS and CFD
- FAQ
What You Can Configure
The Information Input section lets you control nine customer detail fields:
- First name
- Middle name
- Last name
- Birthday
- Address
- City
- State
- ZIP code
For each field you can decide two things:
- Show or hide it — separately for the POS screen and for the CFD screen.
- Required or Optional — whether staff must fill the field in before continuing.
ℹ️ Note: The phone number is not part of this configuration. Staff always enter the phone number first, on the screen before this one.
Configure the Information Input Section
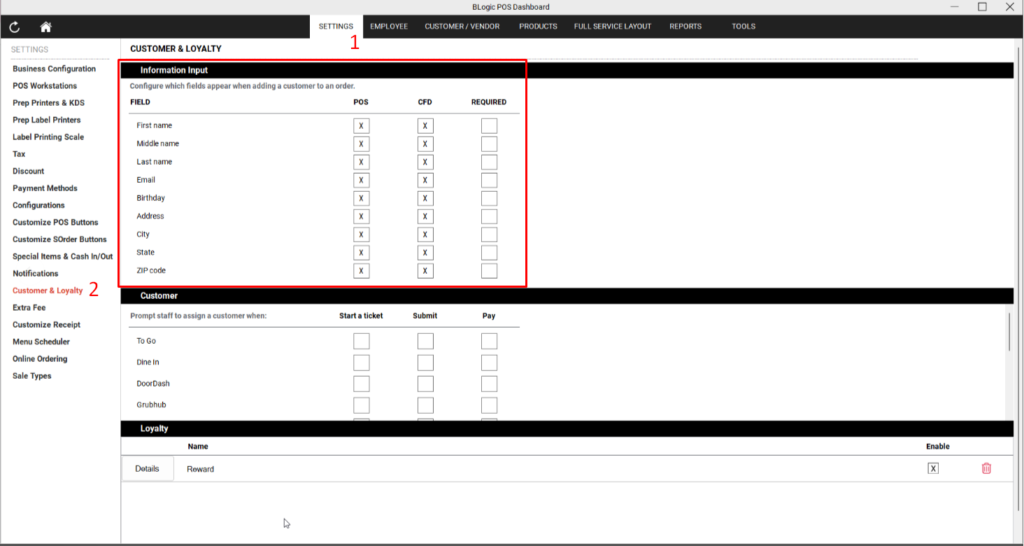
Step 1: Open the Information Input section
- Log in to your POS Dashboard.
- Go to Customer & Loyalty.
- Select Information Input.
Step 2: Choose which fields appear on POS
- In the POS column, turn each field ON to show it, or OFF to hide it.
- Repeat for every field you want to change.
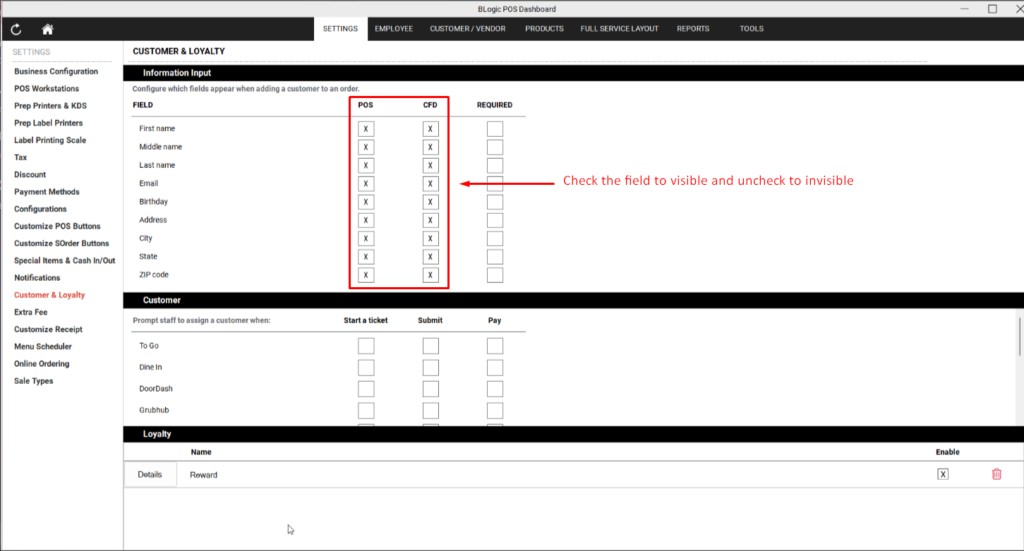
Step 3: Choose which fields appear on CFD
- In the CFD column, turn each field ON or OFF.
- The CFD list can be different from the POS list — for example, you can ask staff for the address on POS but not show it to the customer on the CFD.
Step 4: Save the configuration
- Select Save.
- Reload the POS app on each workstation so the new setting takes effect.
⚠️ Warning: If you turn all fields OFF, the customer information screen is skipped entirely. The customer is still saved to your database right after the phone number is entered. A warning appears when you save this configuration.
Set a Field as Required or Optional
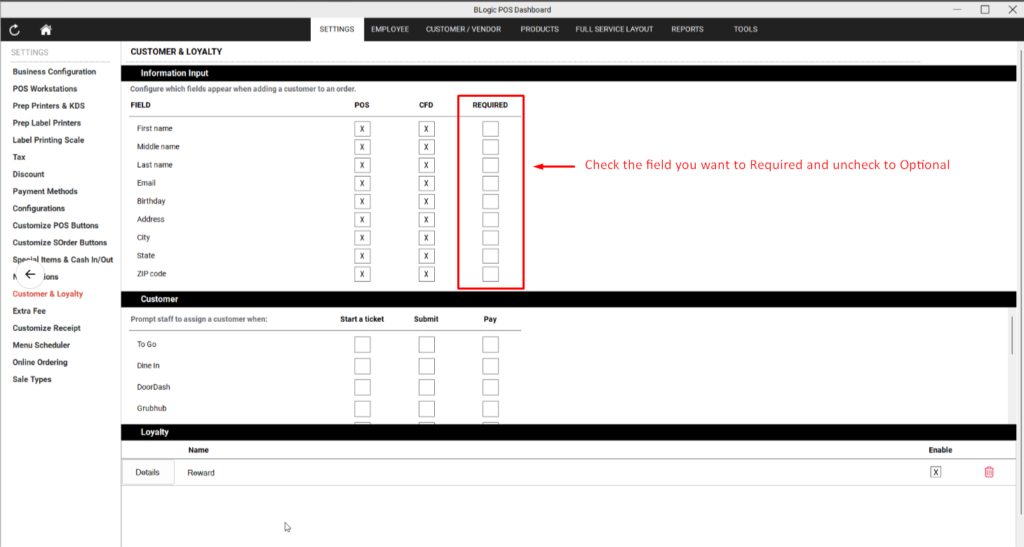
Step 1: Mark the field
- In Information Input, find the field you want to change.
- Tick Required if staff must fill it in, or leave it unticked to keep it Optional.
- Select Save.
What Staff See on POS and CFD
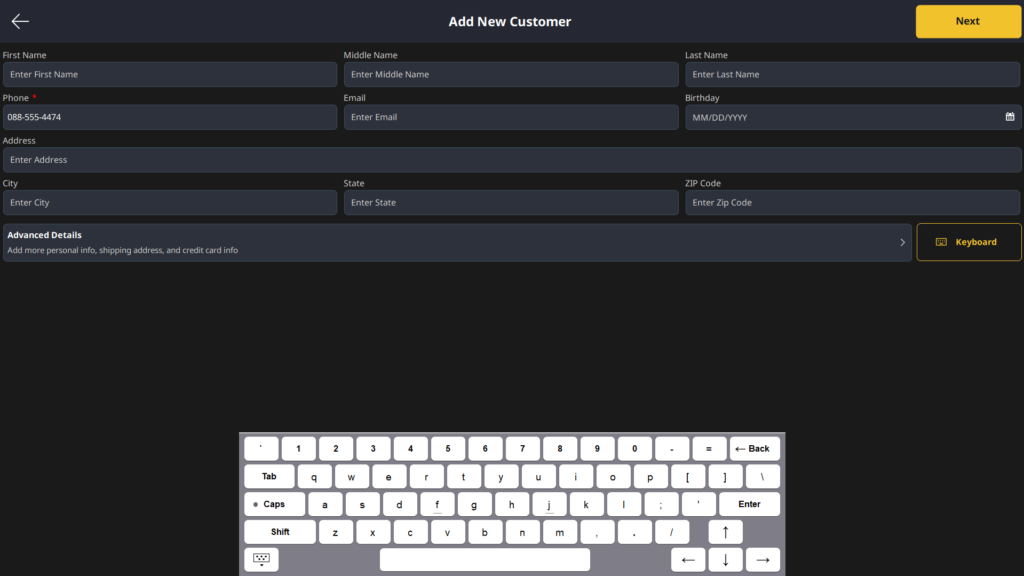
After the configuration is saved and the app is reloaded, the customer information screen only shows the fields you kept ON.
Step 1: Assign a customer
- On the POS, start assigning a customer to the ticket.
- Enter the customer’s phone number.
- Continue to the customer information screen.
Step 2: Fill in the visible fields
- Staff fill in the fields that are shown. Required fields must be completed before continuing.
- The remaining fields automatically stretch to fill the row, so the screen never shows empty gaps.
- If every field in a row is hidden, the rows below move up.
ℹ️ Note: Hiding a field only changes what appears on screen. Any data already stored for that field stays in the database and continues to appear in your reports as before.
FAQ
1. Why can’t I see the Information Input section? Your store may not be on a supported version, or your user role may not have permission to open POS Dashboard settings. Please contact Support if the section is not visible.
2. Will hiding a field delete the data I already collected? No. Hiding a field only removes it from the input screen. Existing customer data stays in the database and still appears in reports as before.
3. Do I need to set this on every workstation? No. The configuration is saved per store and shared by all workstations. Each workstation applies it after the POS app is reloaded.
4. What happens if I turn every field off? The customer information screen is skipped. The customer is saved automatically once the phone number is entered and confirmed, so no customer record is lost.
5. Why does the system stop me from hiding a field? That field is set to Required. A Required field must stay visible. Untick Required, save, and then hide the field.
6. What should I do if the fields have not changed on POS? Confirm that you saved the configuration, then reload the POS app on that workstation. If the fields still do not match, contact Support.
Closing
If you still need help, please contact Support for further assistance.