Introduction
This article explains how to view, add, edit, and delete time entries in BLogic View. You will learn how to manage employee clock-in/clock-out records and make manual adjustments when needed. Accurate time entries help ensure correct payroll calculations and staff labor reports.
Version Support
| Product / Module | Supported Version |
|---|---|
| BLogic View | 2026.06.10 |
Note: If you do not see this option, please contact Support to confirm your store is on a supported version.
Table of Contents
- Enable Time Entries Permission
- Access Time Entries in BLogic View
- View Time Entries
- Add a Manual Time Entry
- Edit an Existing Time Entry
- Delete a Time Entry
- FAQ
Enable Time Entries Permission
Before a user can access Time Entries in BLogic View, the correct permission must be enabled for their role.
Step 1: Go to Role & Permissions
- Log in to BLogic View as an Admin.
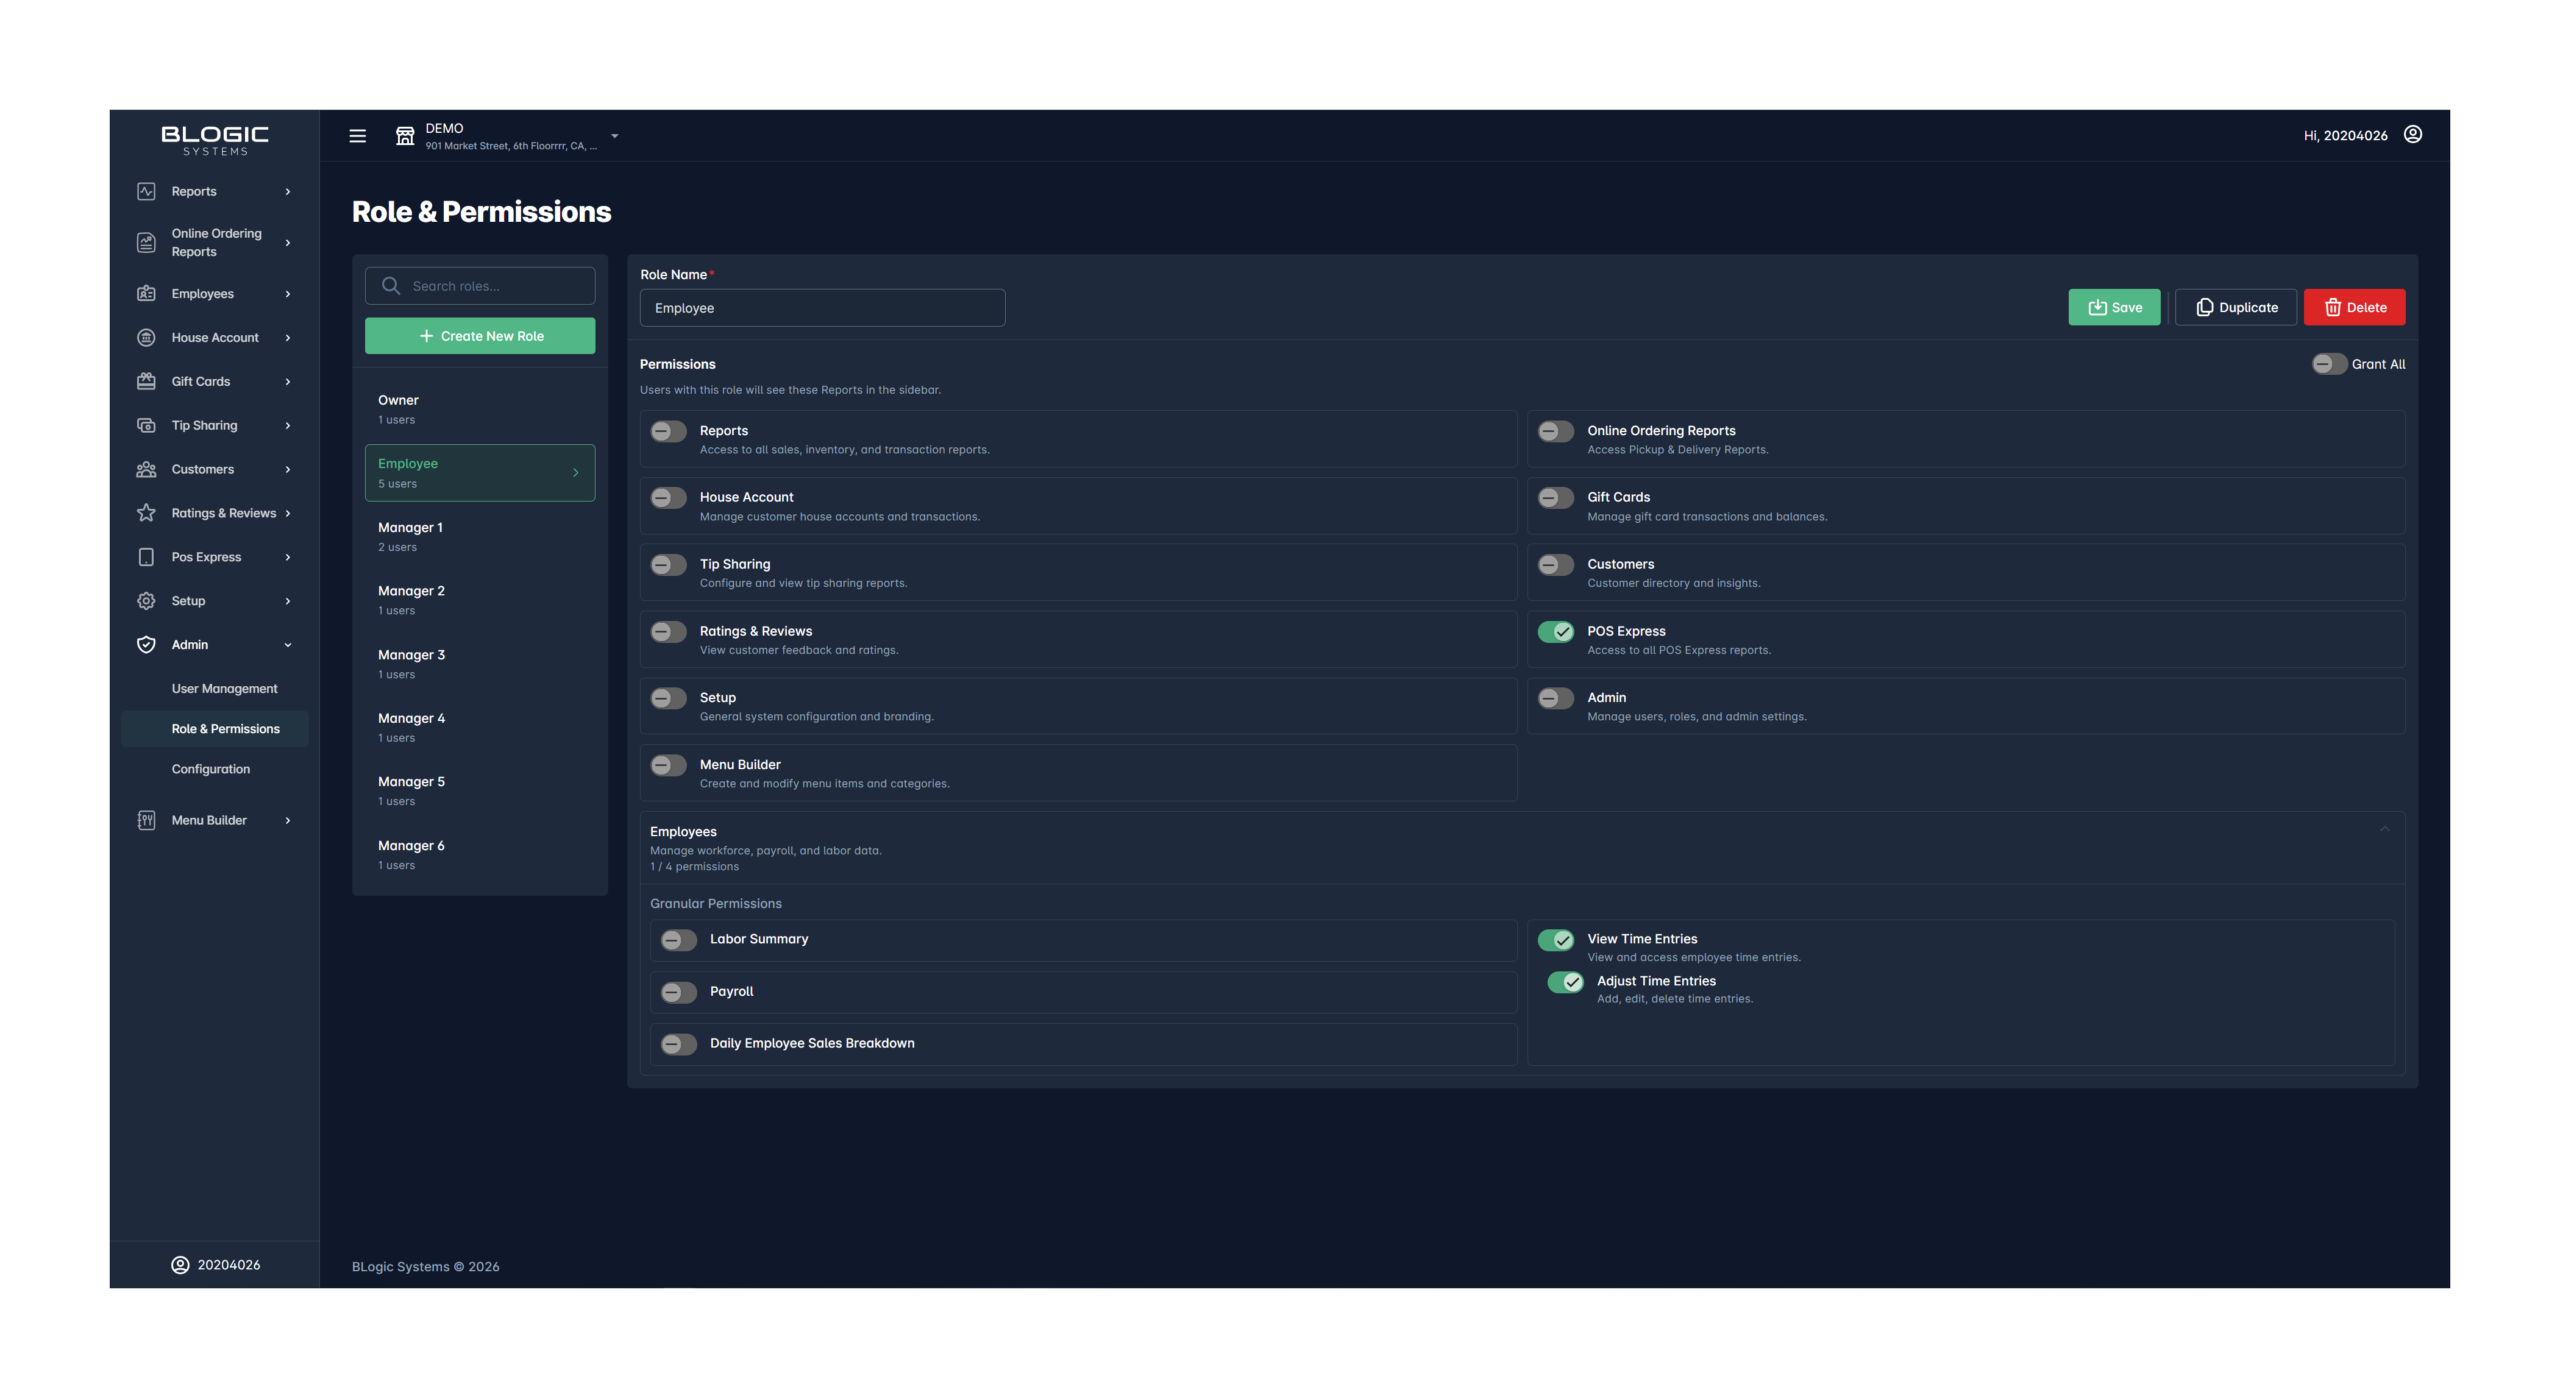
- From the sidebar, go to Admin > Role & Permissions.
- Select the role you want to configure (e.g., Store Manager, Accountant).
Step 2: Enable the Time Entries Permission
- Scroll down to the Employees section.
- Expand the Granular Permissions area.
- Toggle on Time Entries.
- Click Save to apply the changes.

ℹ️ Note: The Admin role has full system access and includes Time Entries by default. For other roles such as Store Manager or Accountant, this permission must be enabled manually.
Access Time Entries in BLogic View
Step 1: Log in and Navigate
- Log in to BLogic View with an account that has the Time Entries permission enabled.
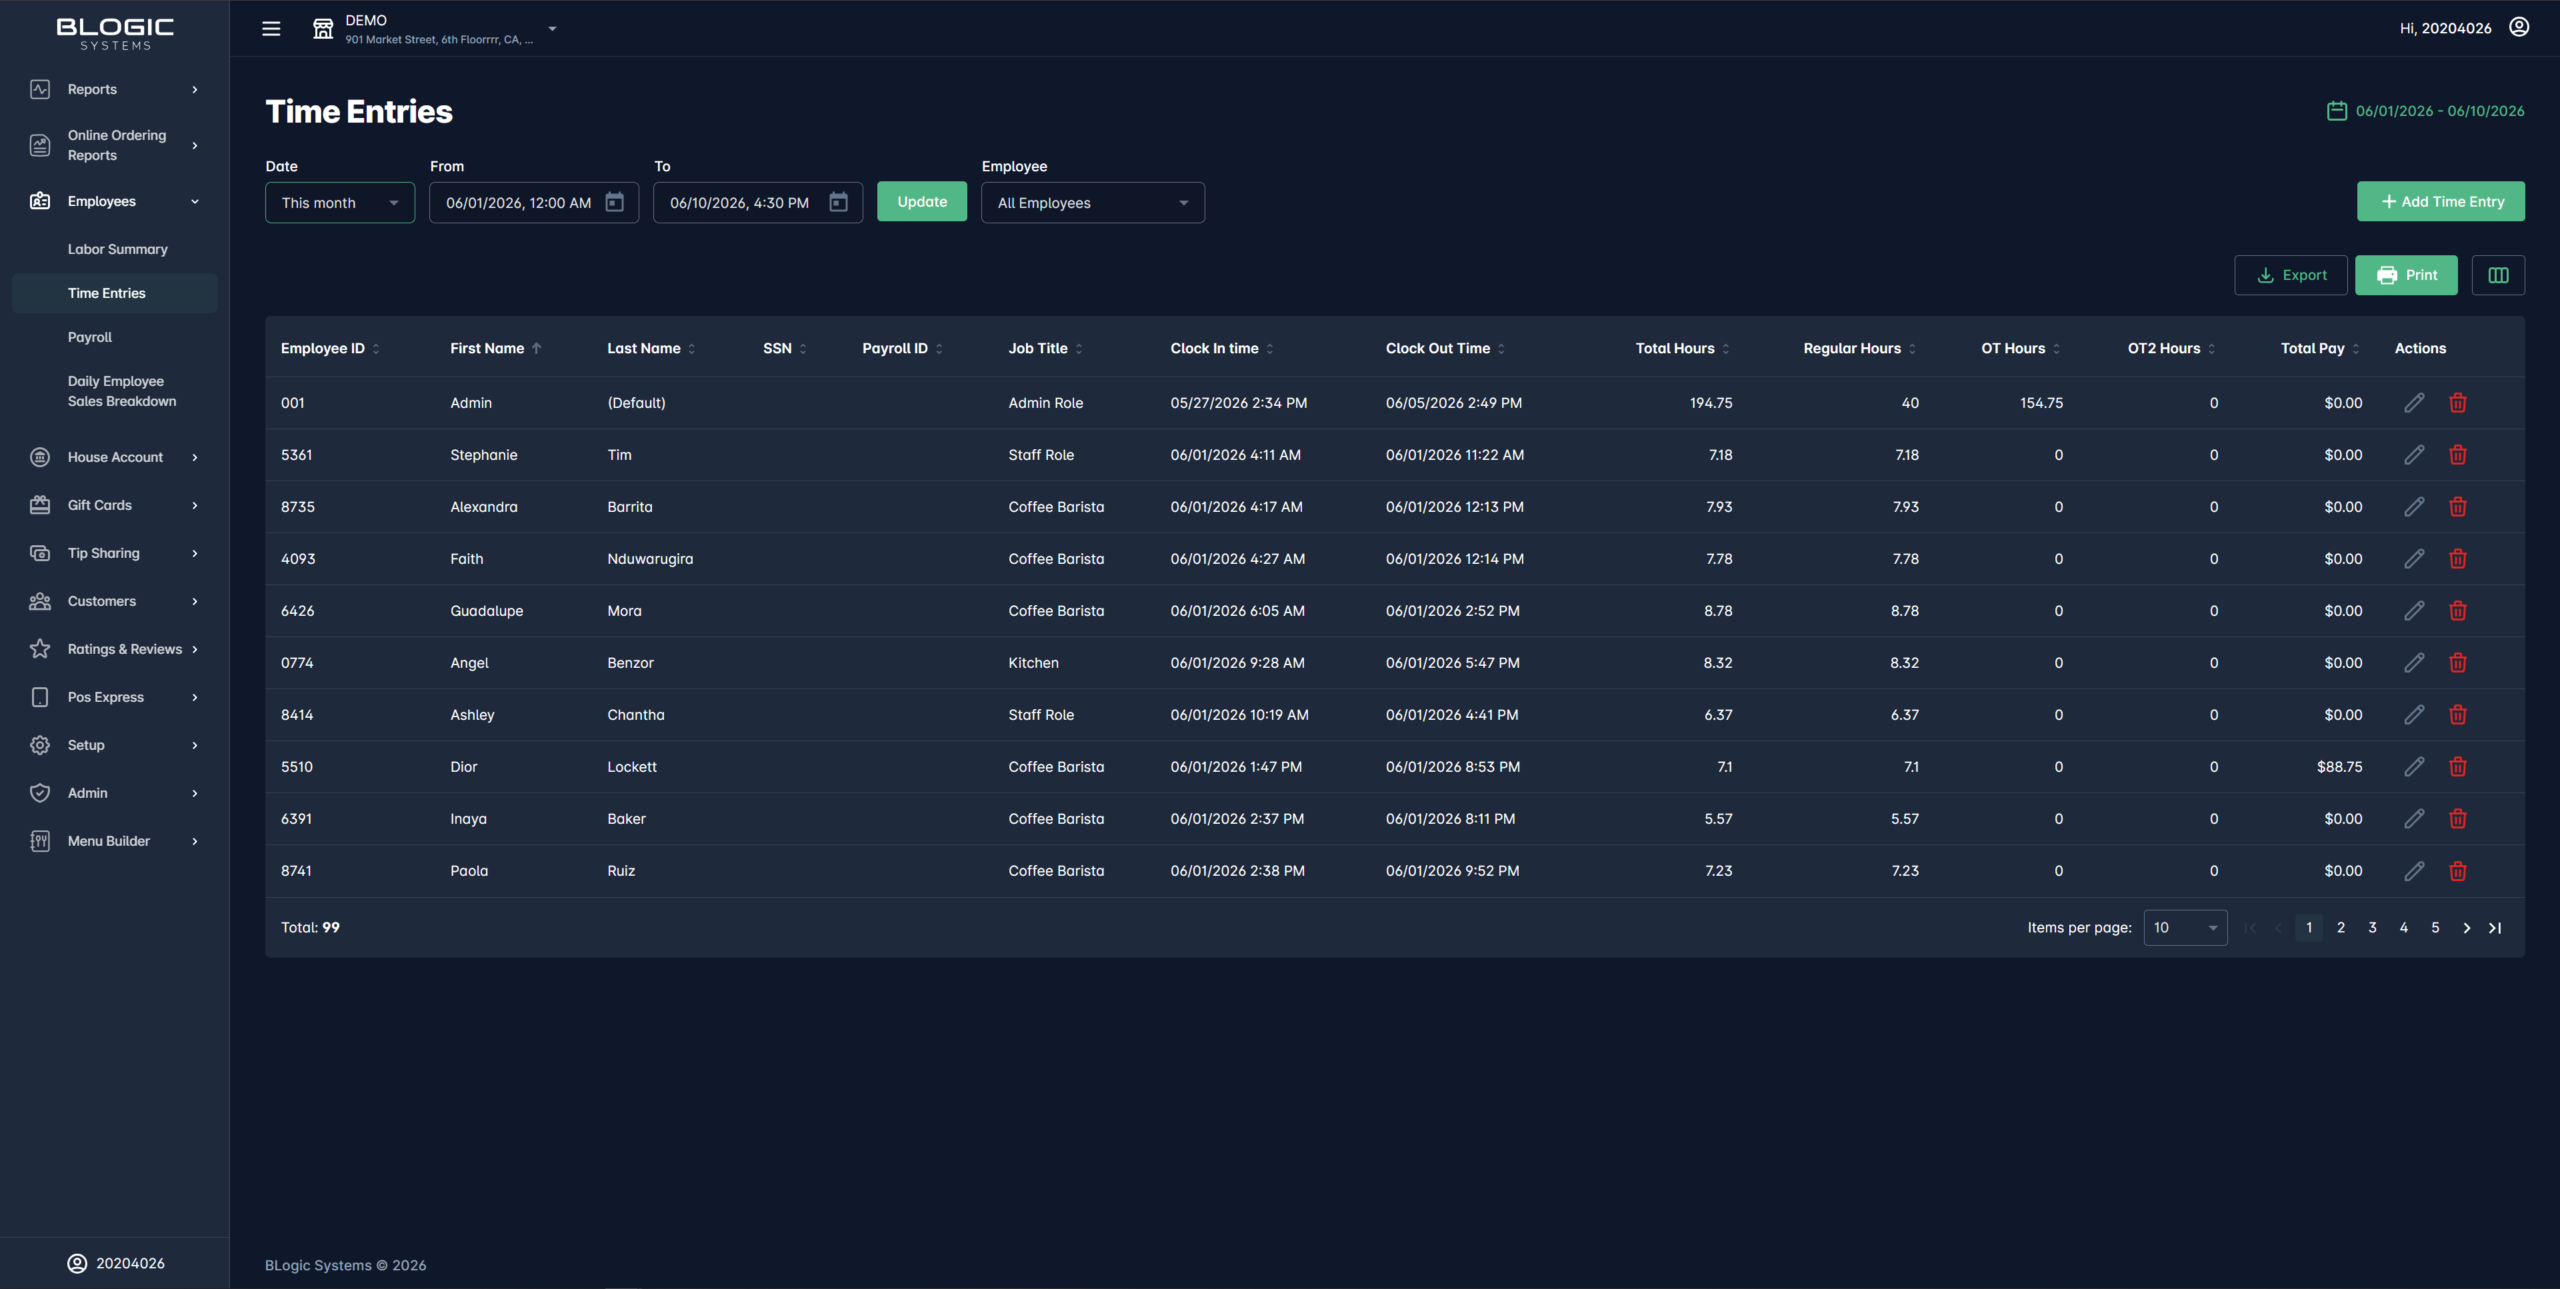
- From the sidebar, go to Employees > Time Entries.
View Time Entries
Step 1: Select a Date Range
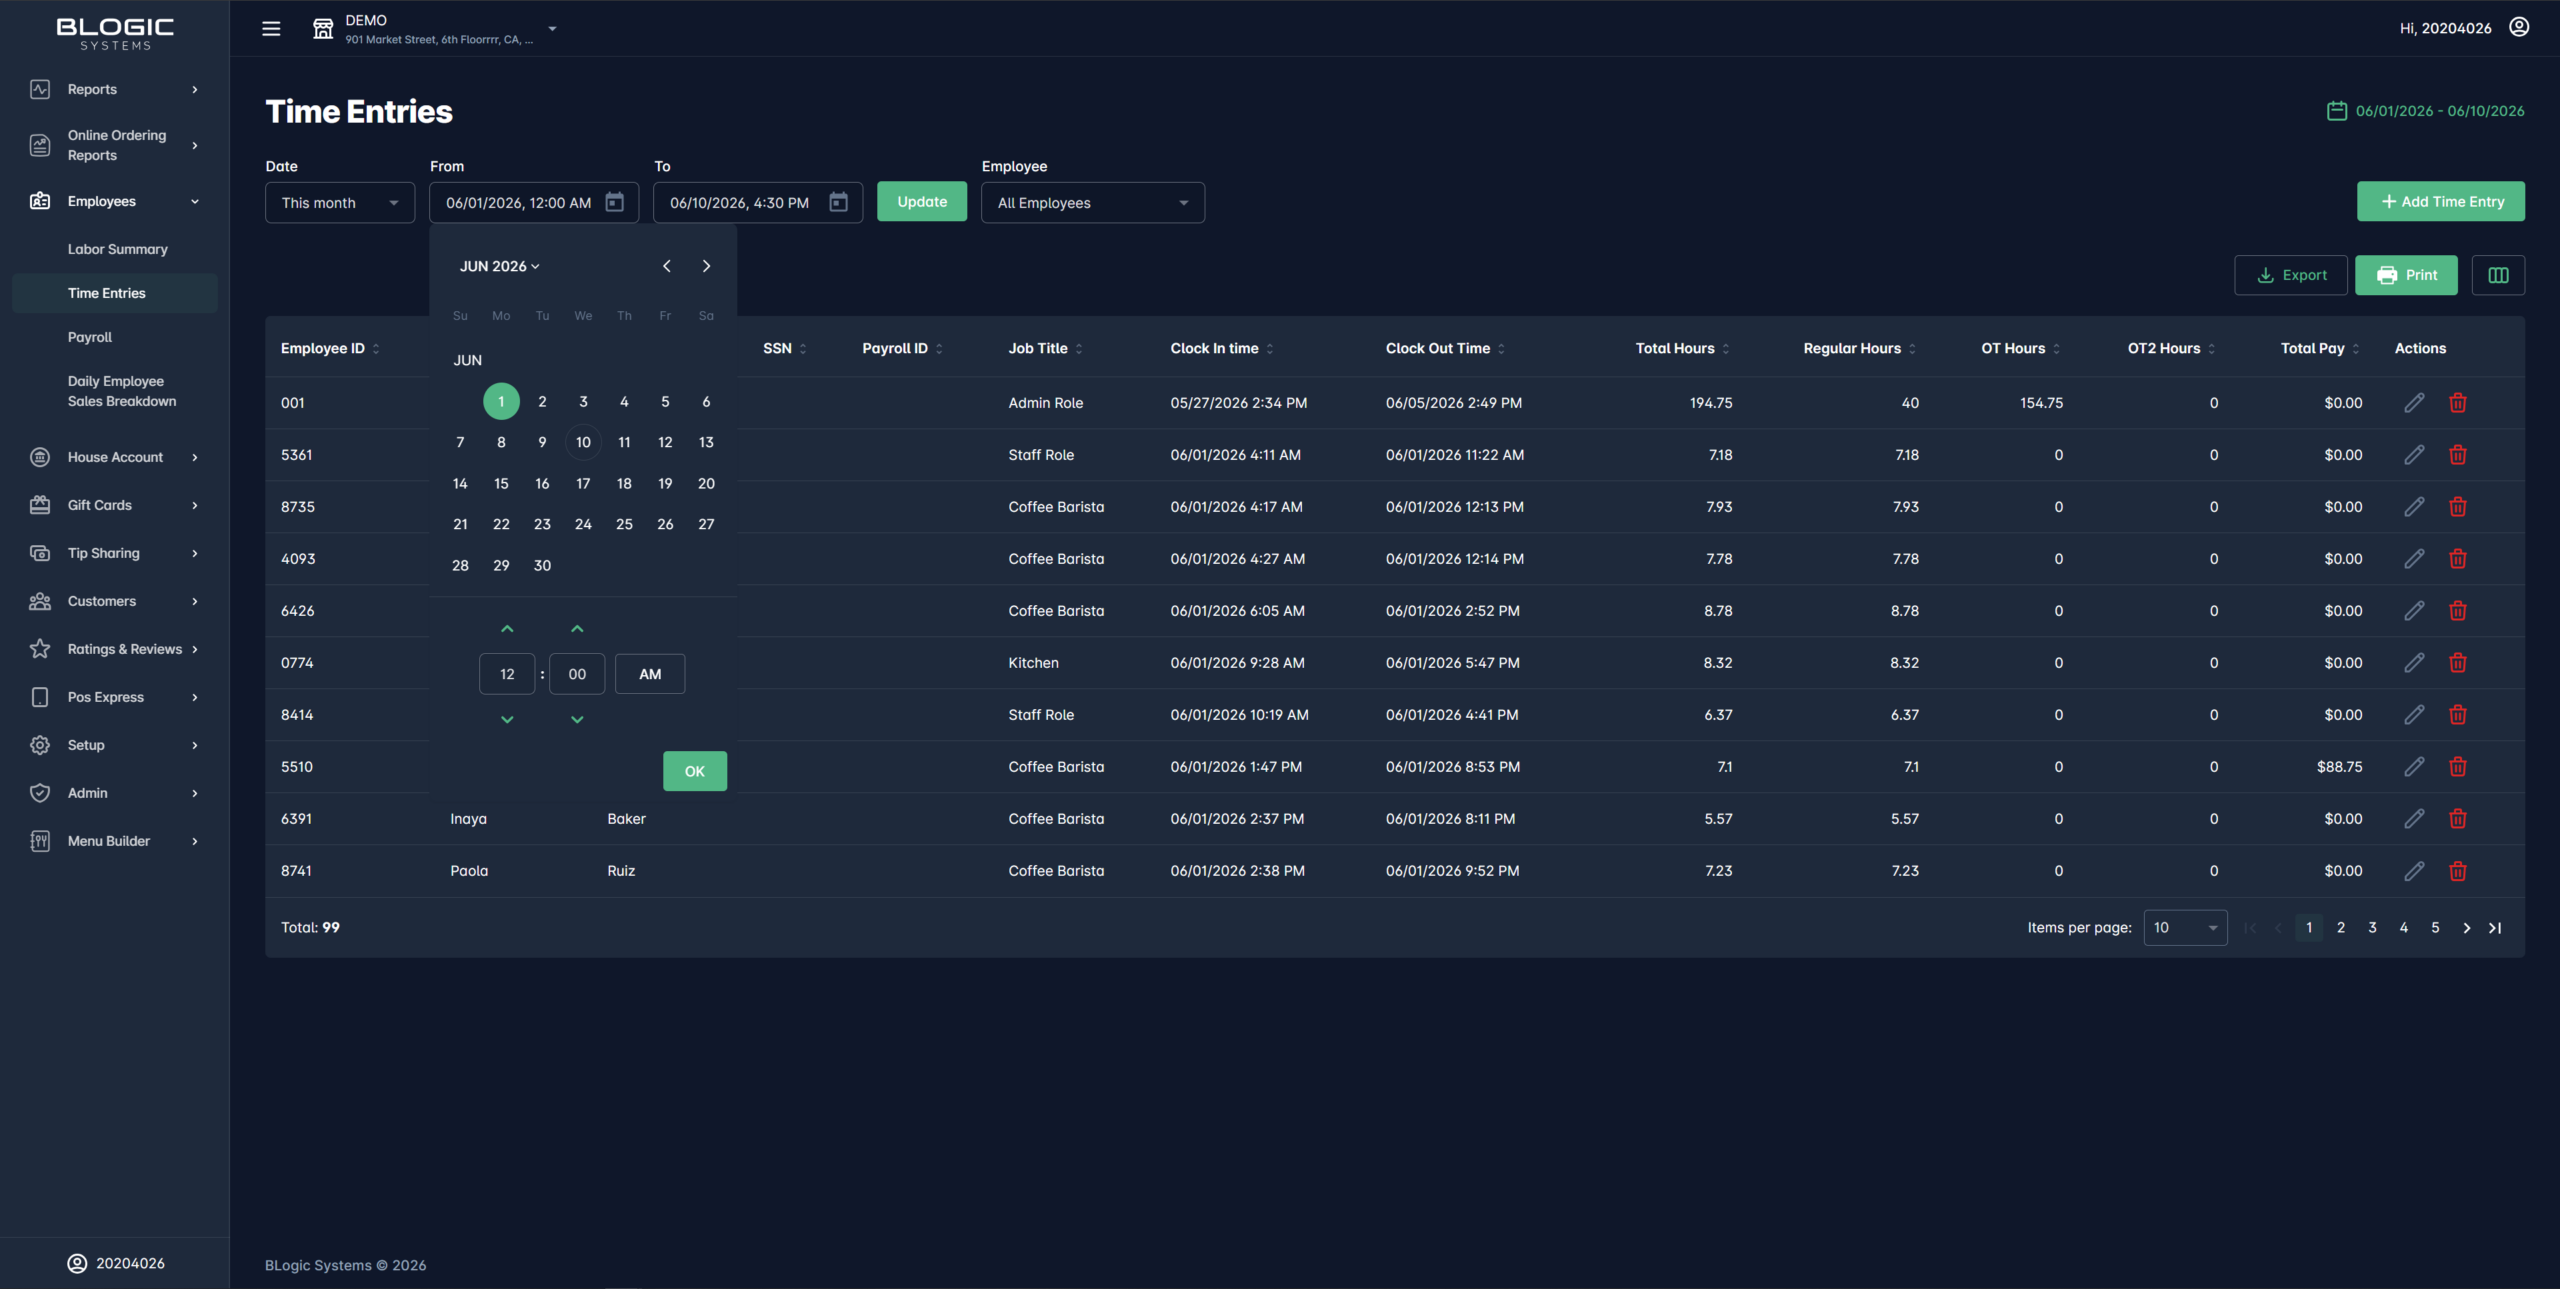
- On the Time Entries screen, locate the Date Range filter at the top of the page.
- Select the Start Date and End Date for the period you want to review.
- Click Apply or Search to load the results.
Step 2: Filter by Employee (Optional)
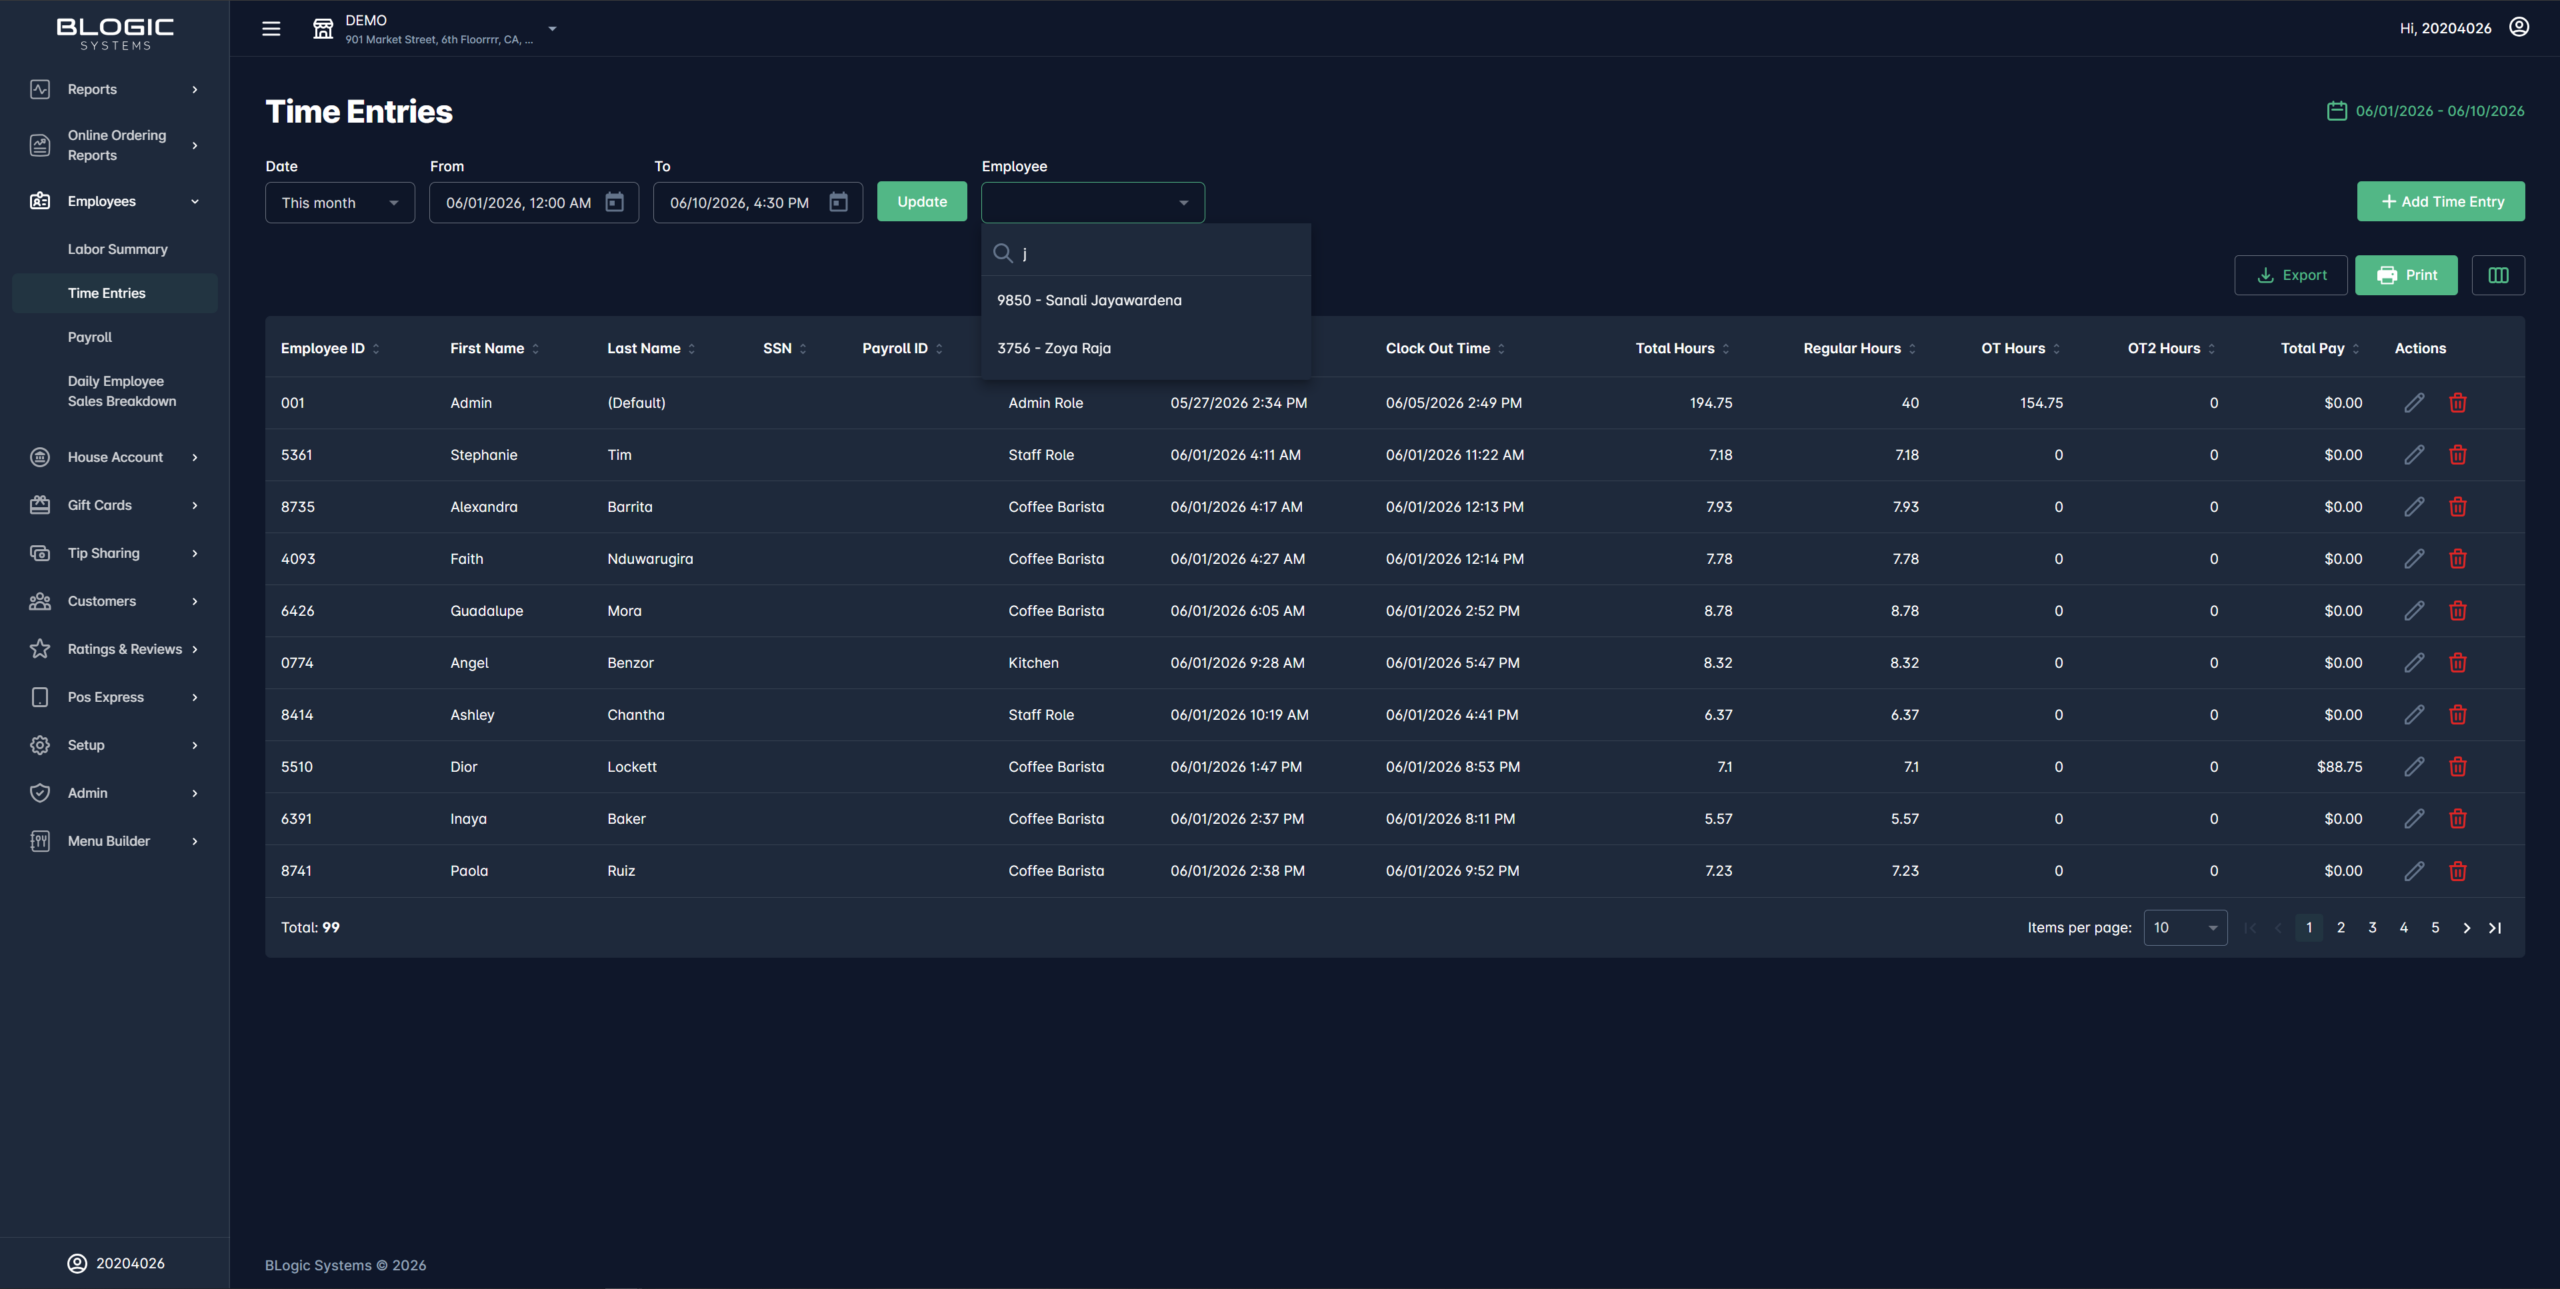
- Use the Employee dropdown to filter entries for a specific staff member.
- Leave it set to All to view entries for your entire team.
The list will display each entry with the employee name, date, clock-in time, clock-out time, and total hours worked.
Add a Manual Time Entry
Use this when an employee forgot to clock in or out, or when a correction is needed.
Step 1: Open the Add Entry Form
- On the Time Entries screen, click the + Add or New Entry button.
- A form will appear asking for the entry details.
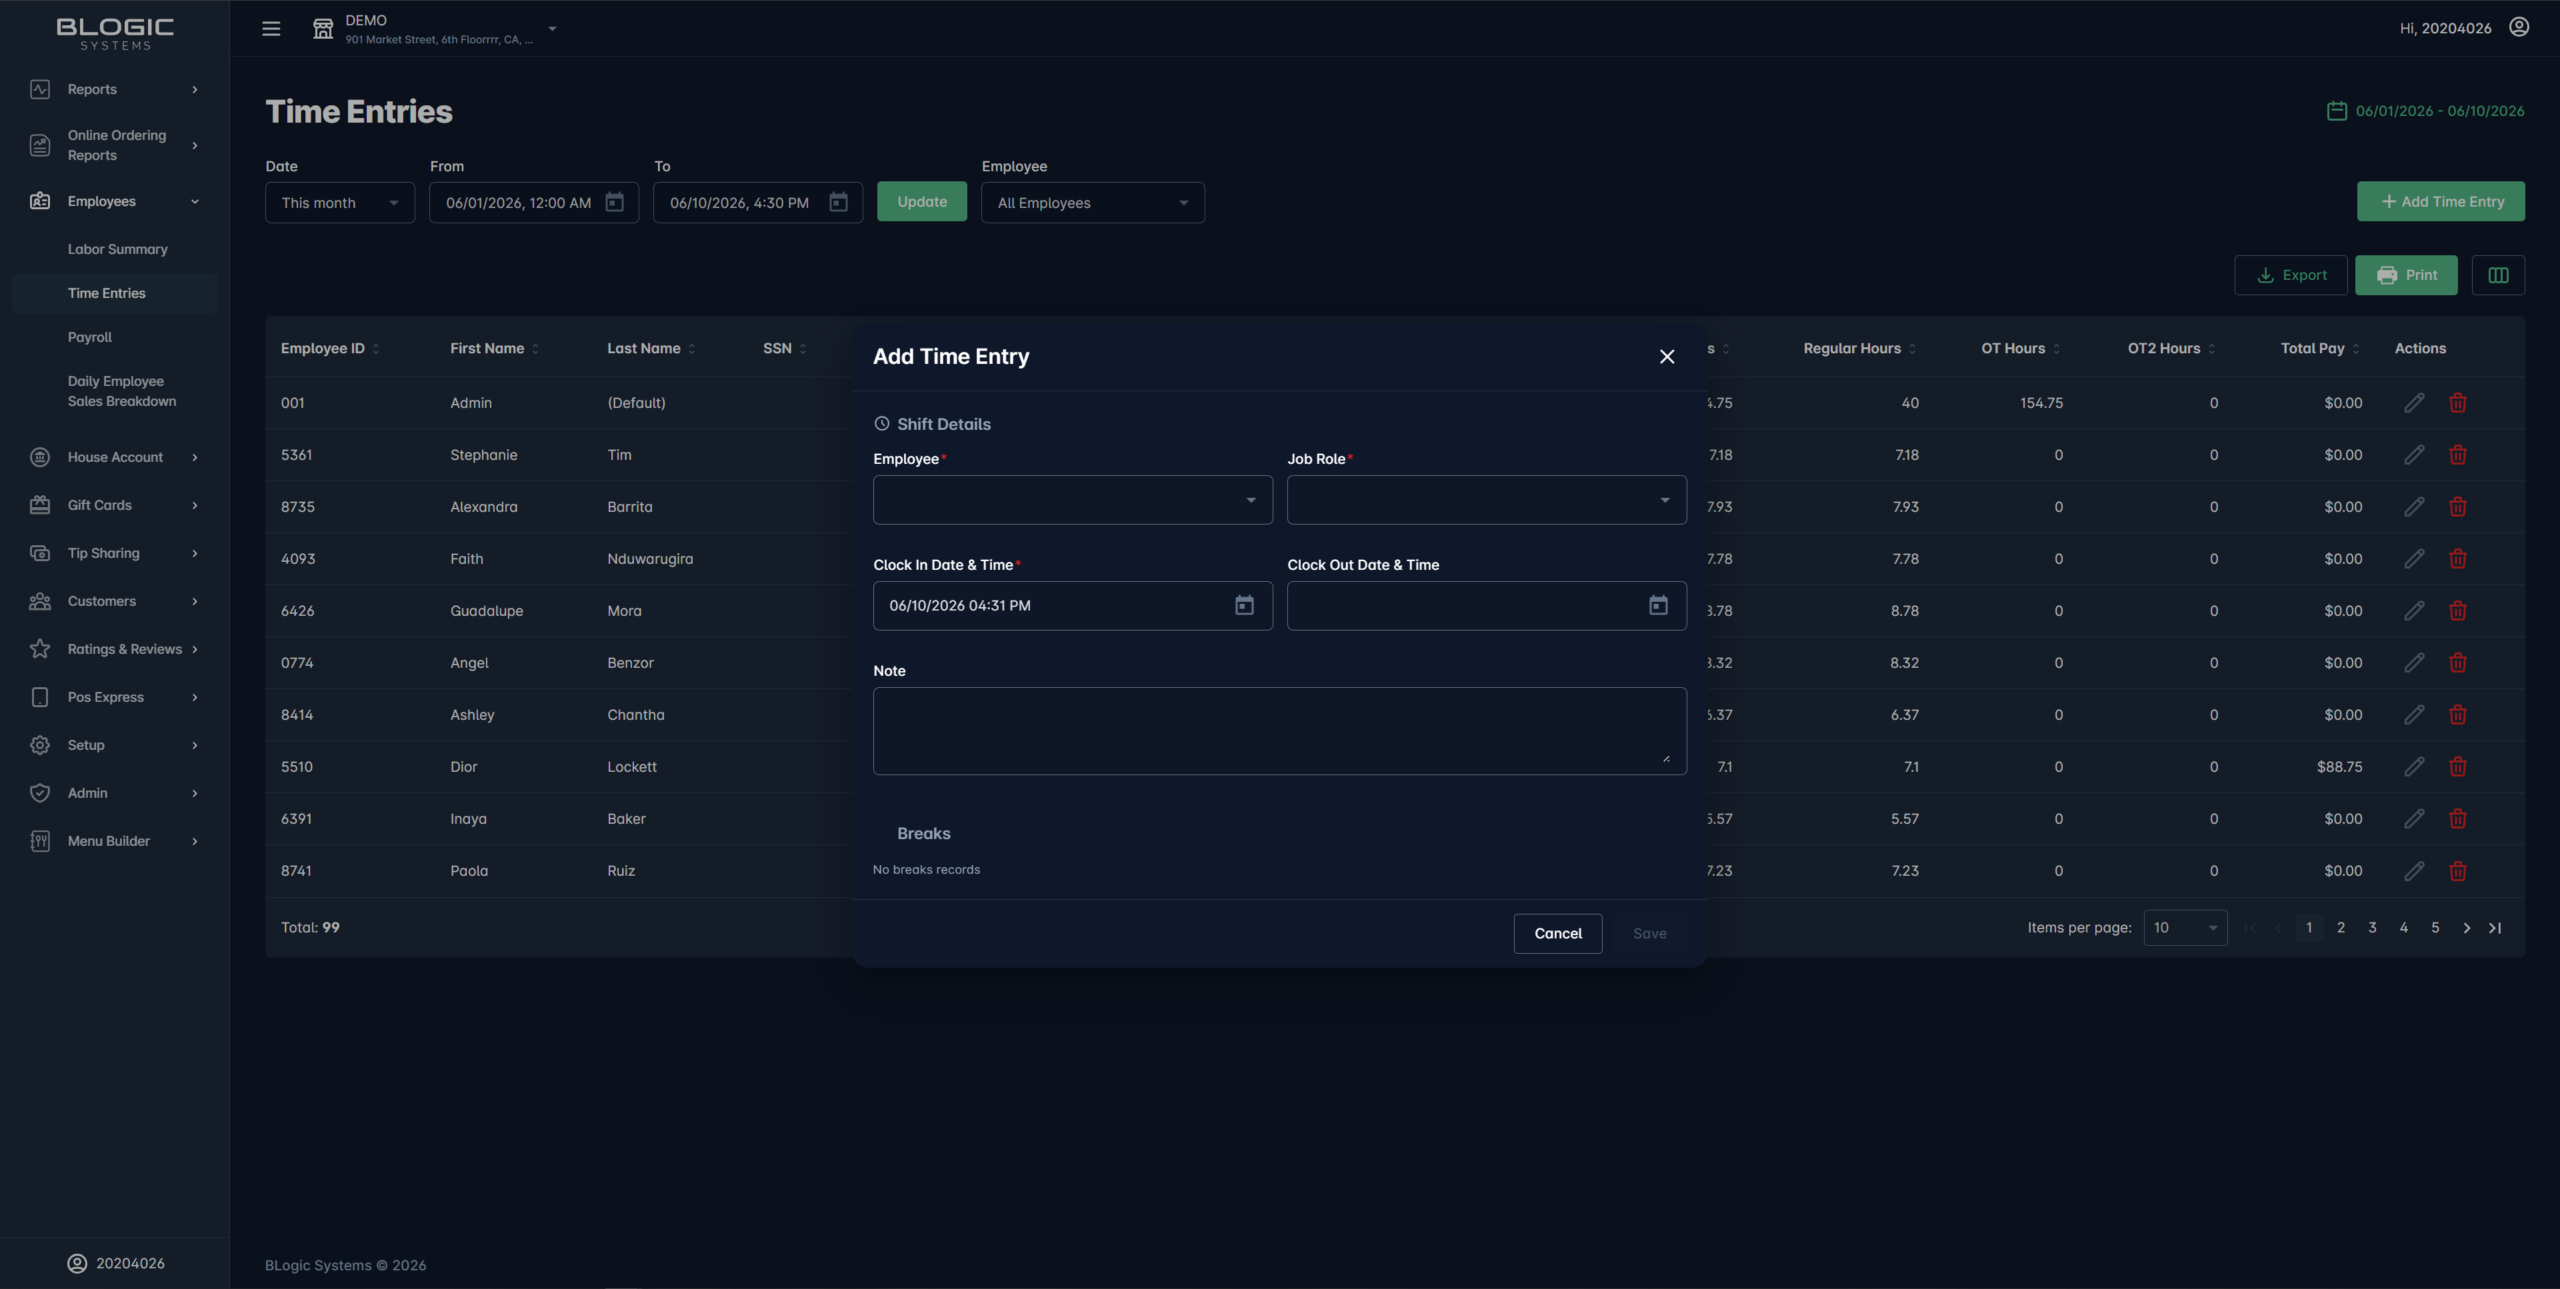
Step 2: Fill in the Entry Details
- Select the Employee from the dropdown list.
- Enter the Date of the shift.
- Enter the Clock-In Time and Clock-Out Time.
- Click Save to confirm.
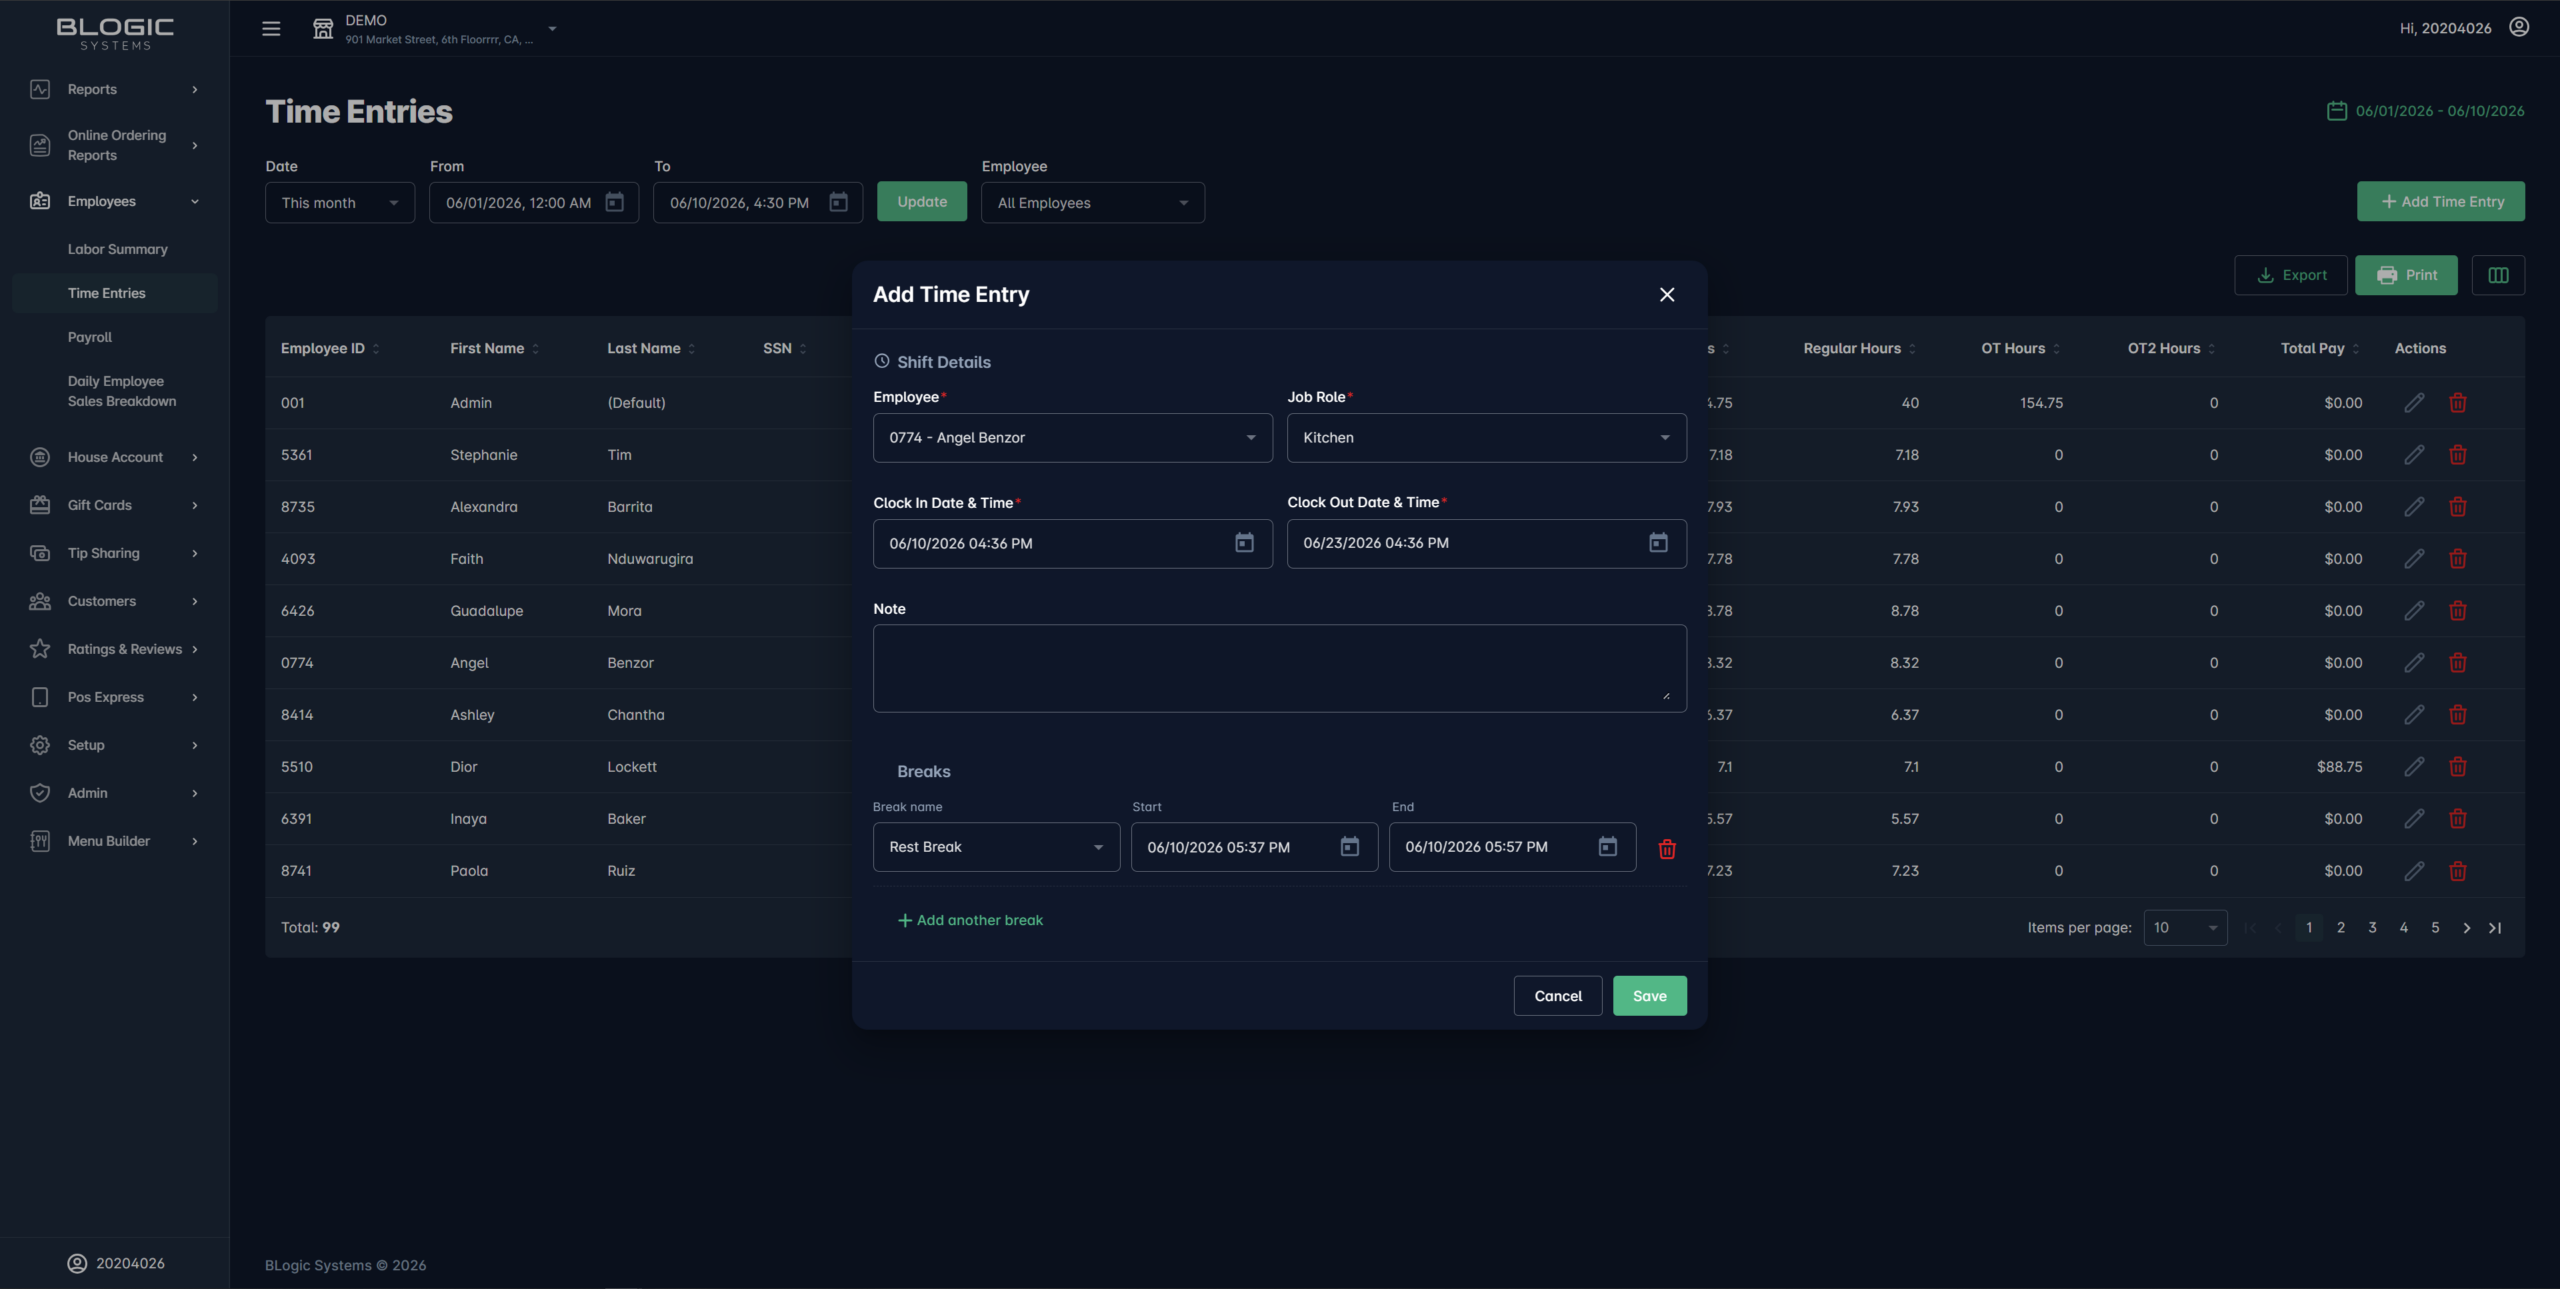
✅ Tip: After saving, the system will automatically recalculate payroll data based on the updated time entries.
Edit an Existing Time Entry
Step 1: Locate the Entry
- Use the date range and employee filters to find the entry you want to edit.
- Click on the entry row or select the Edit (pencil) icon next to it.
Step 2: Make Your Changes
- Update the Clock-In Time, Clock-Out Time, or any other field as needed.
- Click Save to apply the changes.
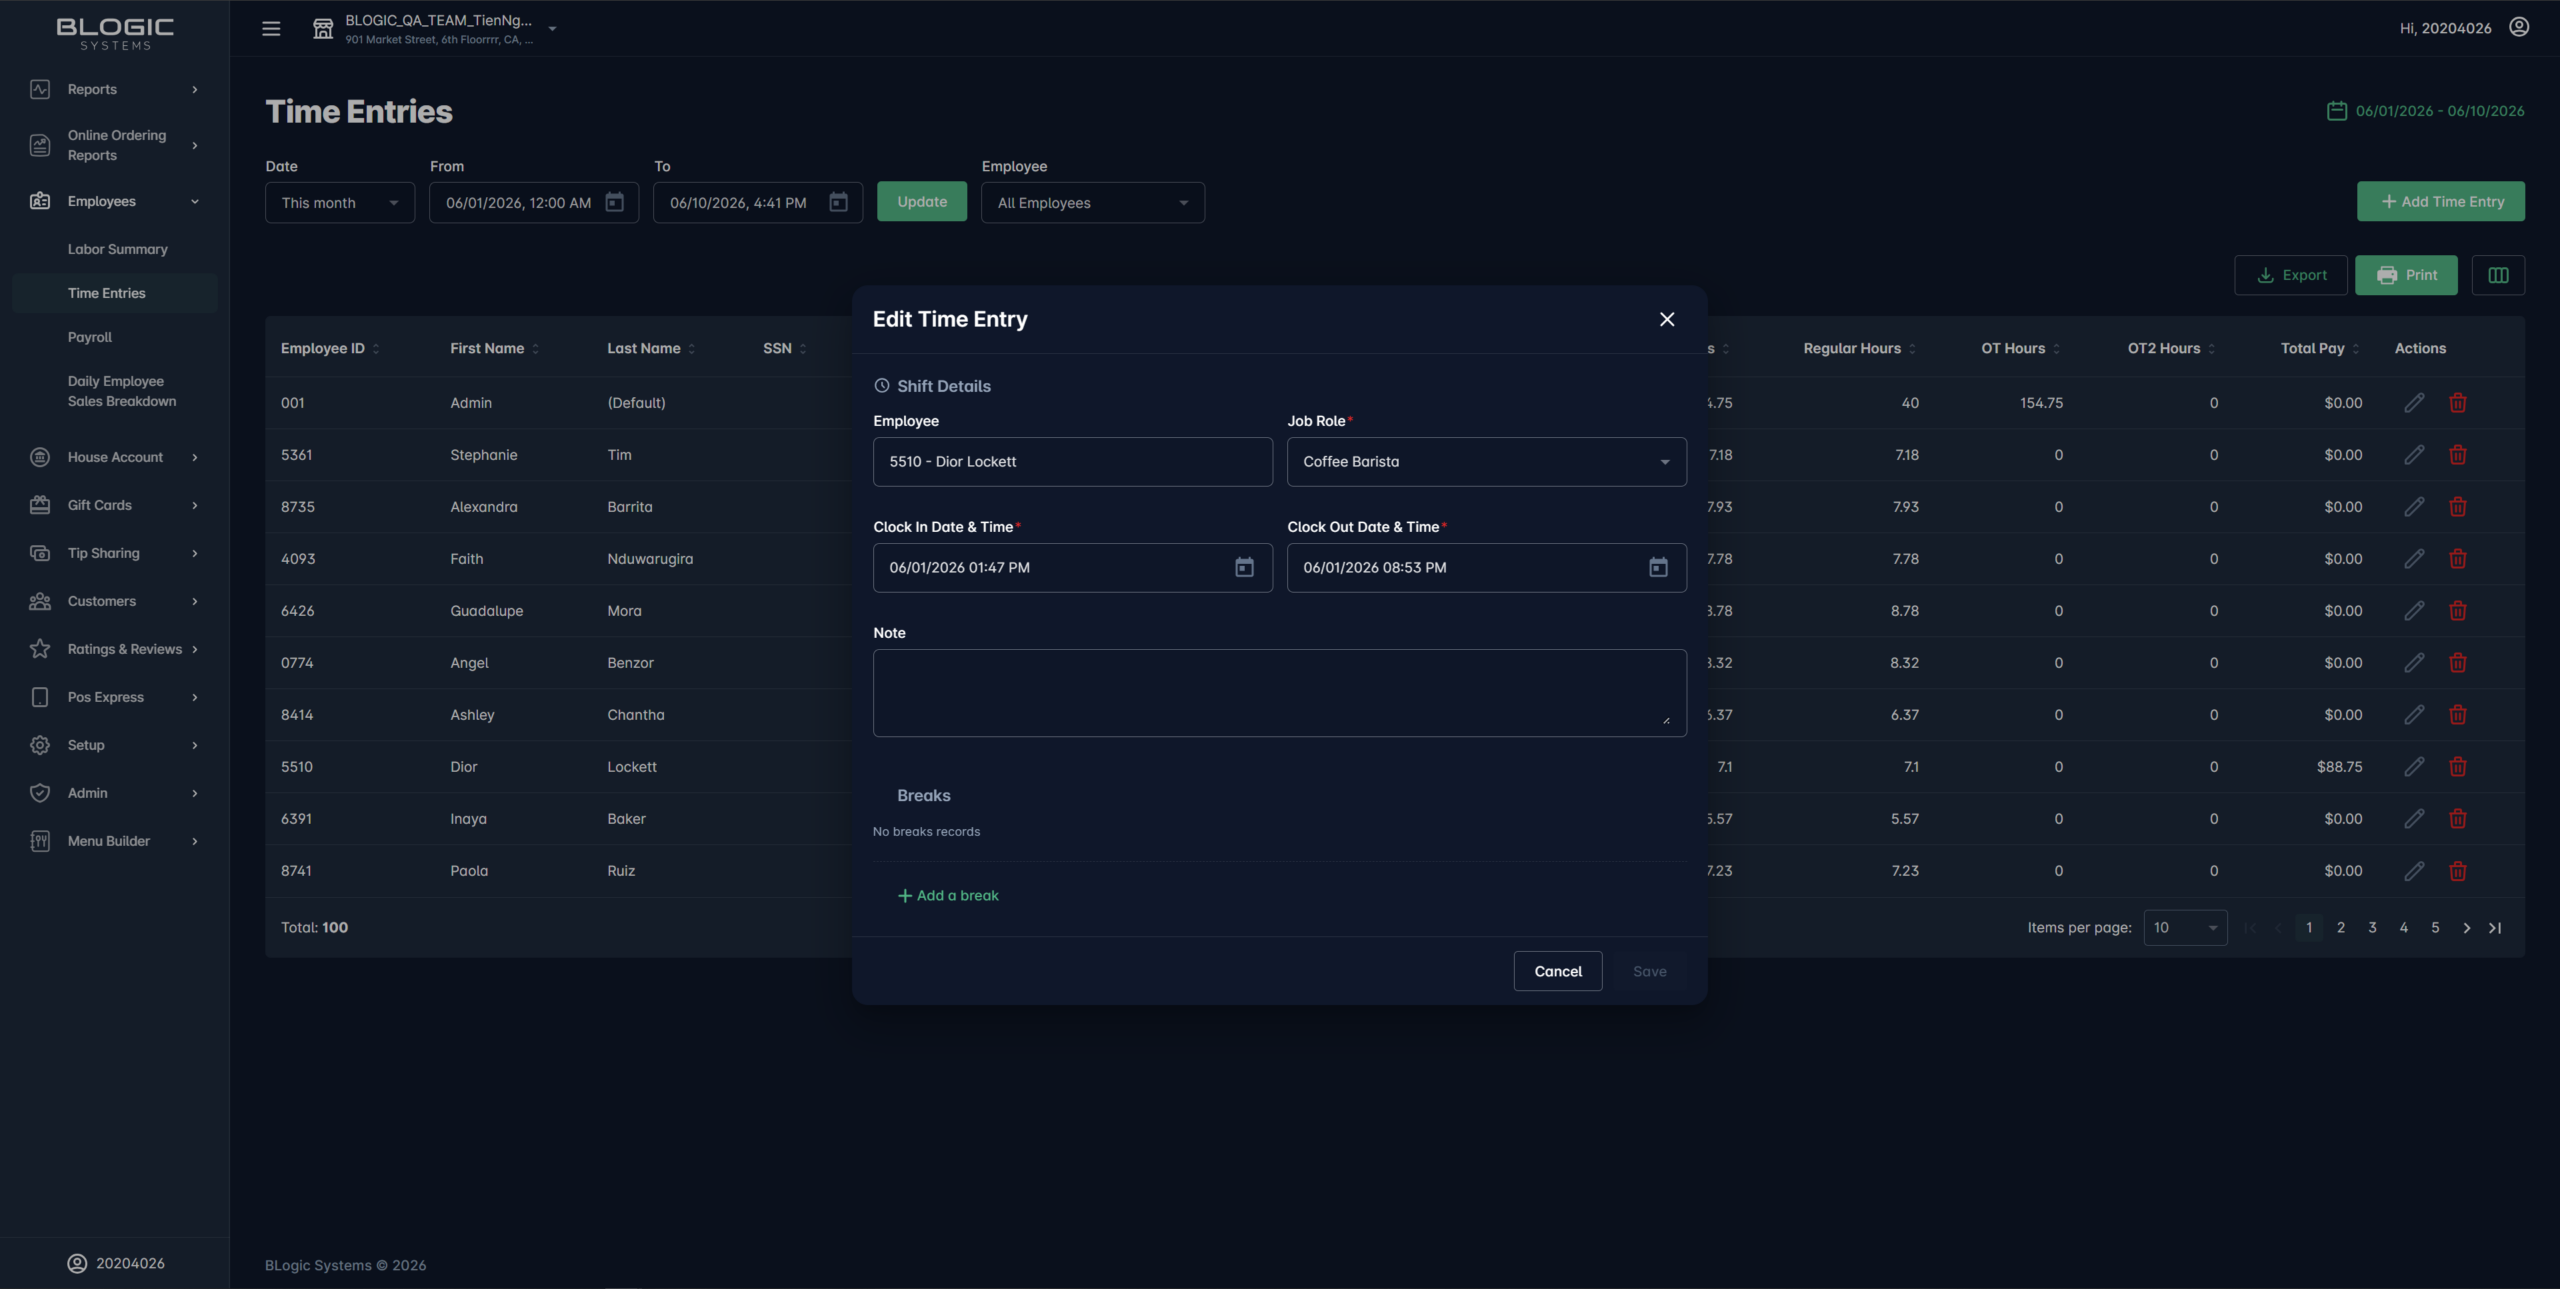
⚠️ Warning: Editing a time entry will override the original clock-in/clock-out data. The system will recalculate payroll automatically after the change is saved. Make sure the updated times are correct before saving.
Delete a Time Entry
Step 1: Locate the Entry
- Find the time entry you want to remove using the date and employee filters.
- Click the Delete (trash) icon next to the entry.
Step 2: Confirm Deletion
- A confirmation prompt will appear.
- Click Yes, Delete (or Confirm) to remove the entry.
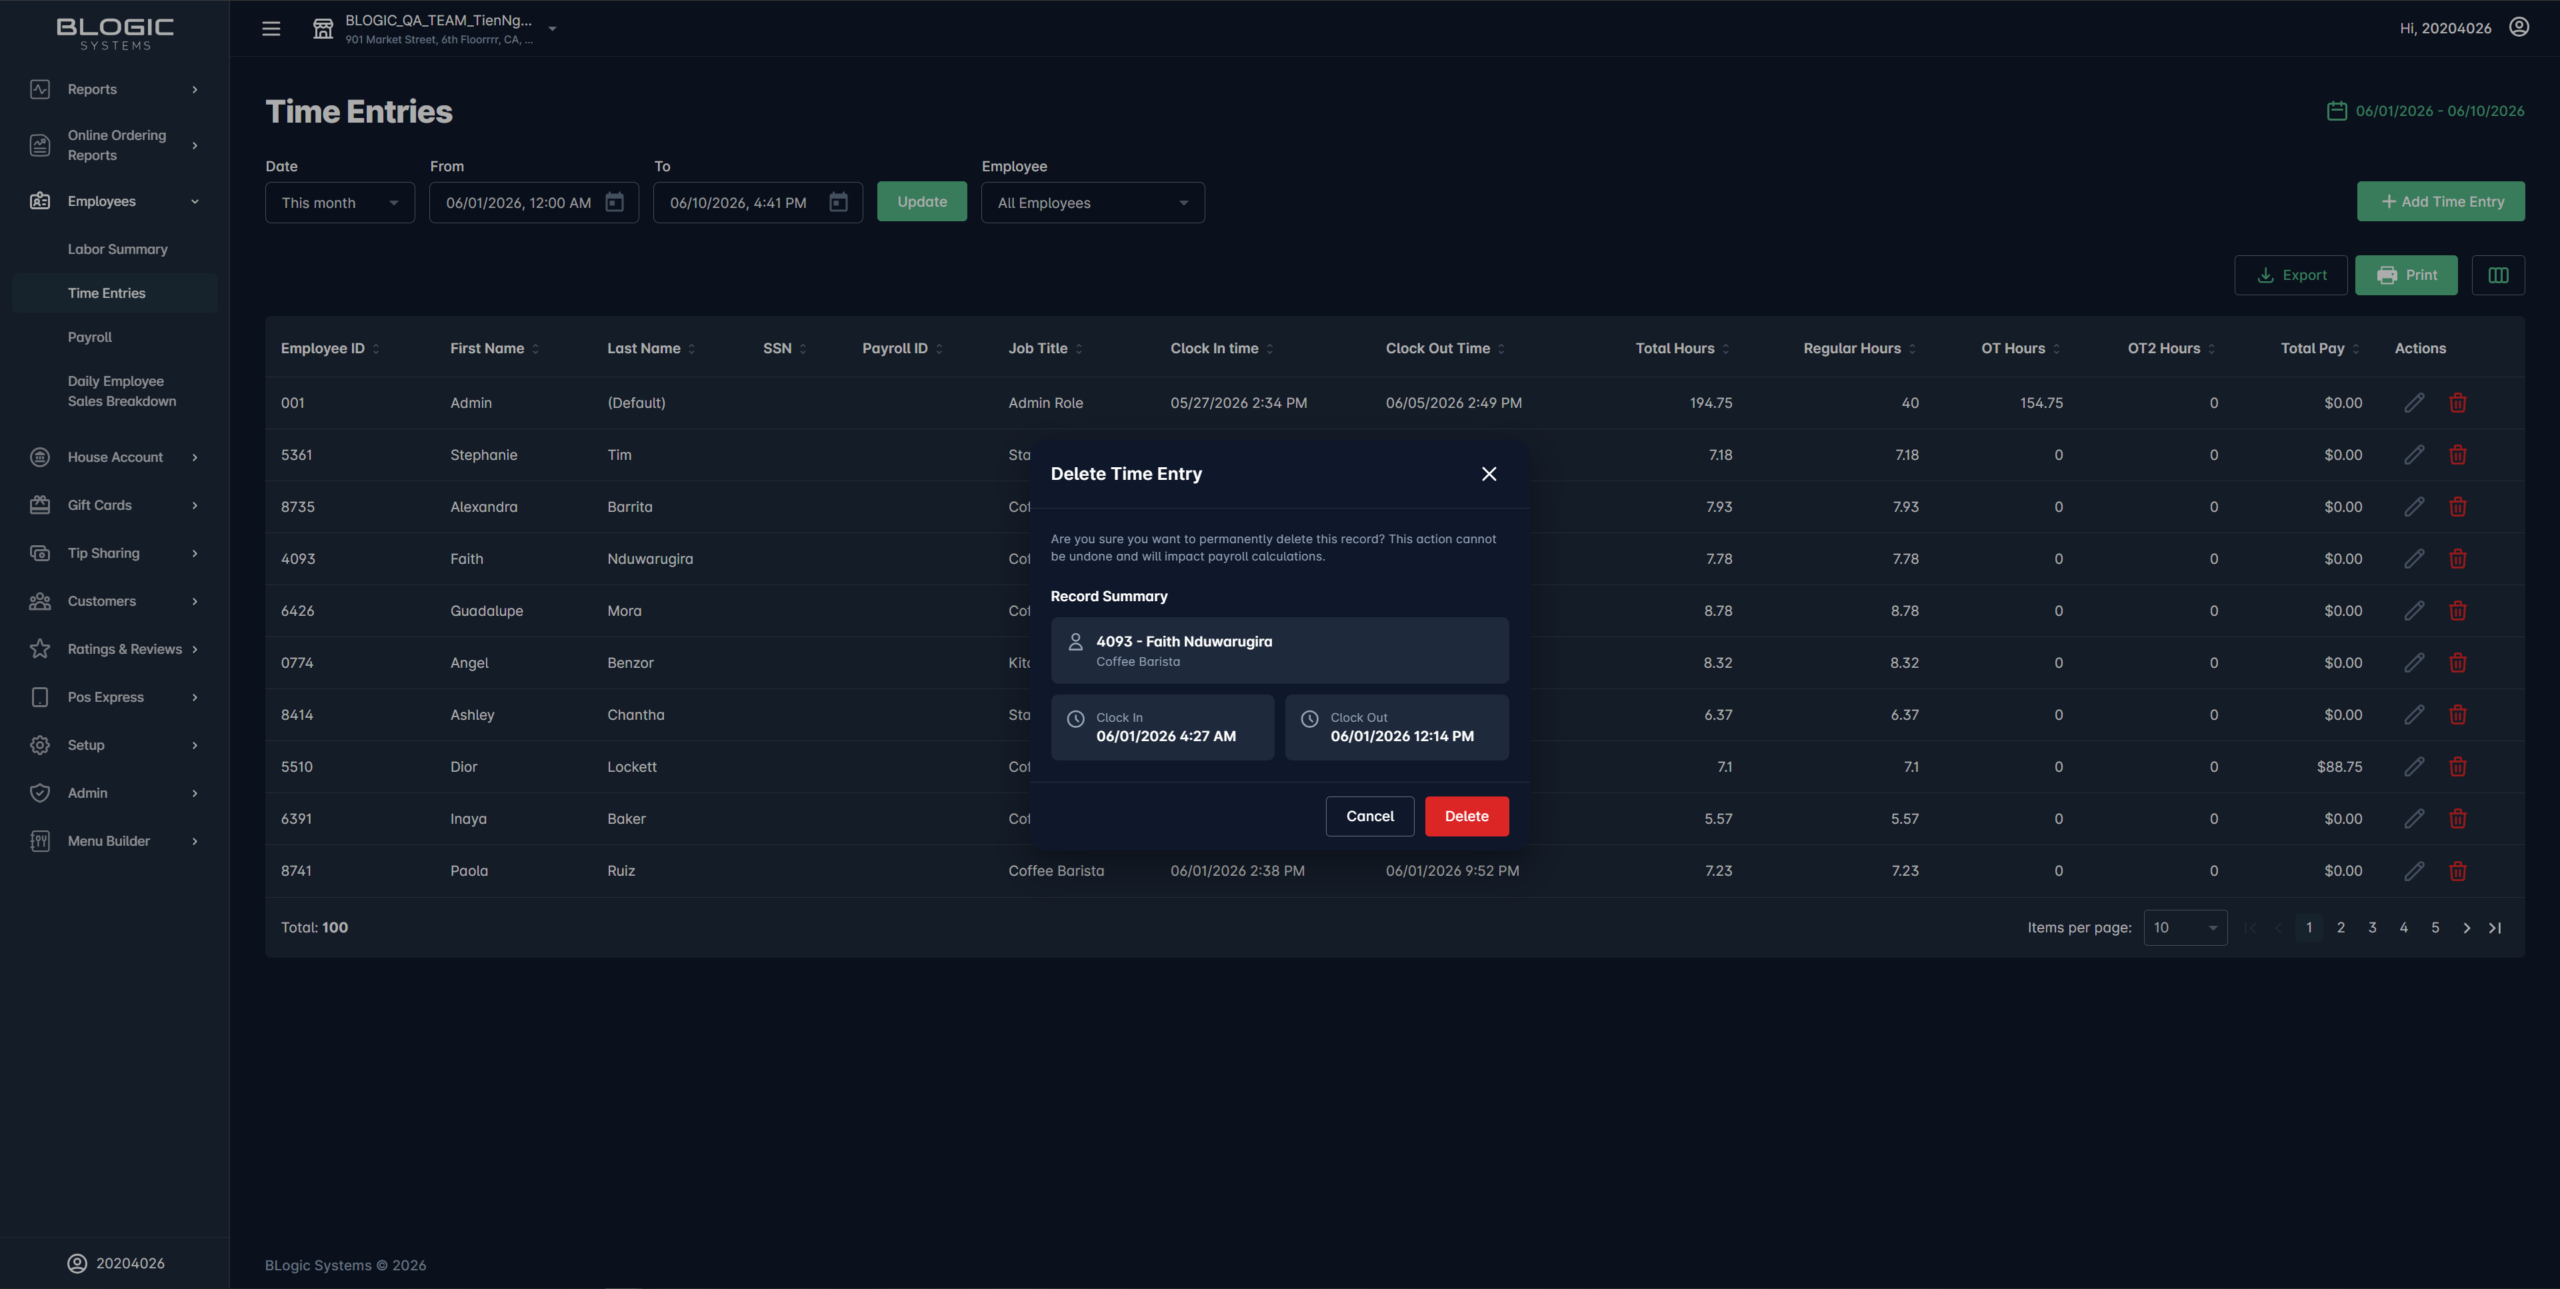
⚠️ Warning: Once deleted, the entry will be removed and payroll will be recalculated accordingly. Make sure the entry is confirmed as an error before deleting.
Where to View or Confirm the Result
After adding, editing, or deleting a time entry, you can verify the change by:
- Returning to the Time Entries list and refreshing the view to confirm the entry appears correctly.
- Checking the Labor Summary or Payroll report under the Employees section to confirm that total hours and payroll amounts have been recalculated.
FAQ
1. Why can’t I see the Time Entries section? Your user role may not have the Time Entries permission enabled. Ask your Admin to go to Admin > Role & Permissions, select your role, and toggle on Time Entries under the Employees granular permissions.
2. Who can manage time entries? Any role with the Time Entries permission enabled can view and manage time entries. By default, only the Admin role has full access. Other roles such as Store Manager or Accountant must be granted permission manually.
3. Will editing or deleting a time entry affect payroll? Yes. The system will automatically recalculate payroll data whenever a time entry is added, edited, or deleted. Review your Payroll report after making changes to confirm the updated totals.
4. Can I give a specific role access to Time Entries only — without access to Payroll or other reports? Yes. The Employees section in Role & Permissions supports granular permissions. You can enable Time Entries independently from Labor Summary, Payroll, and Daily Employee Sales Breakdown.
5. What should I do if the time entry is not saving? Check that all required fields (employee, date, clock-in and clock-out times) are filled in. If the issue continues, refresh the page and try again, or contact Support for assistance.
Closing
If you still need help managing time entries in BLogic View, please contact Support for further assistance.