Introduction
This article explains how to set up your restaurant’s table layout using the Full Service Layout feature in BLogic POS Dashboard. You will learn how to create seating areas, add table symbols to a floor plan grid, configure area settings such as gratuity fees, and resize tables to match your actual floor plan. This feature helps your staff visually identify tables and manage dine-in orders more efficiently.
Table of Contents
- Access Full Service Layout
- Create and Configure a Seating Area
- Add Tables to the Floor Plan Grid
- Rename Tables on the Grid
- Adjust Table Dimensions
- Resize Individual Tables
- Where to View or Confirm the Result
- FAQ
Access Full Service Layout
Step 1: Open the Full Service Layout screen
- Log in to BLogic POS Dashboard.
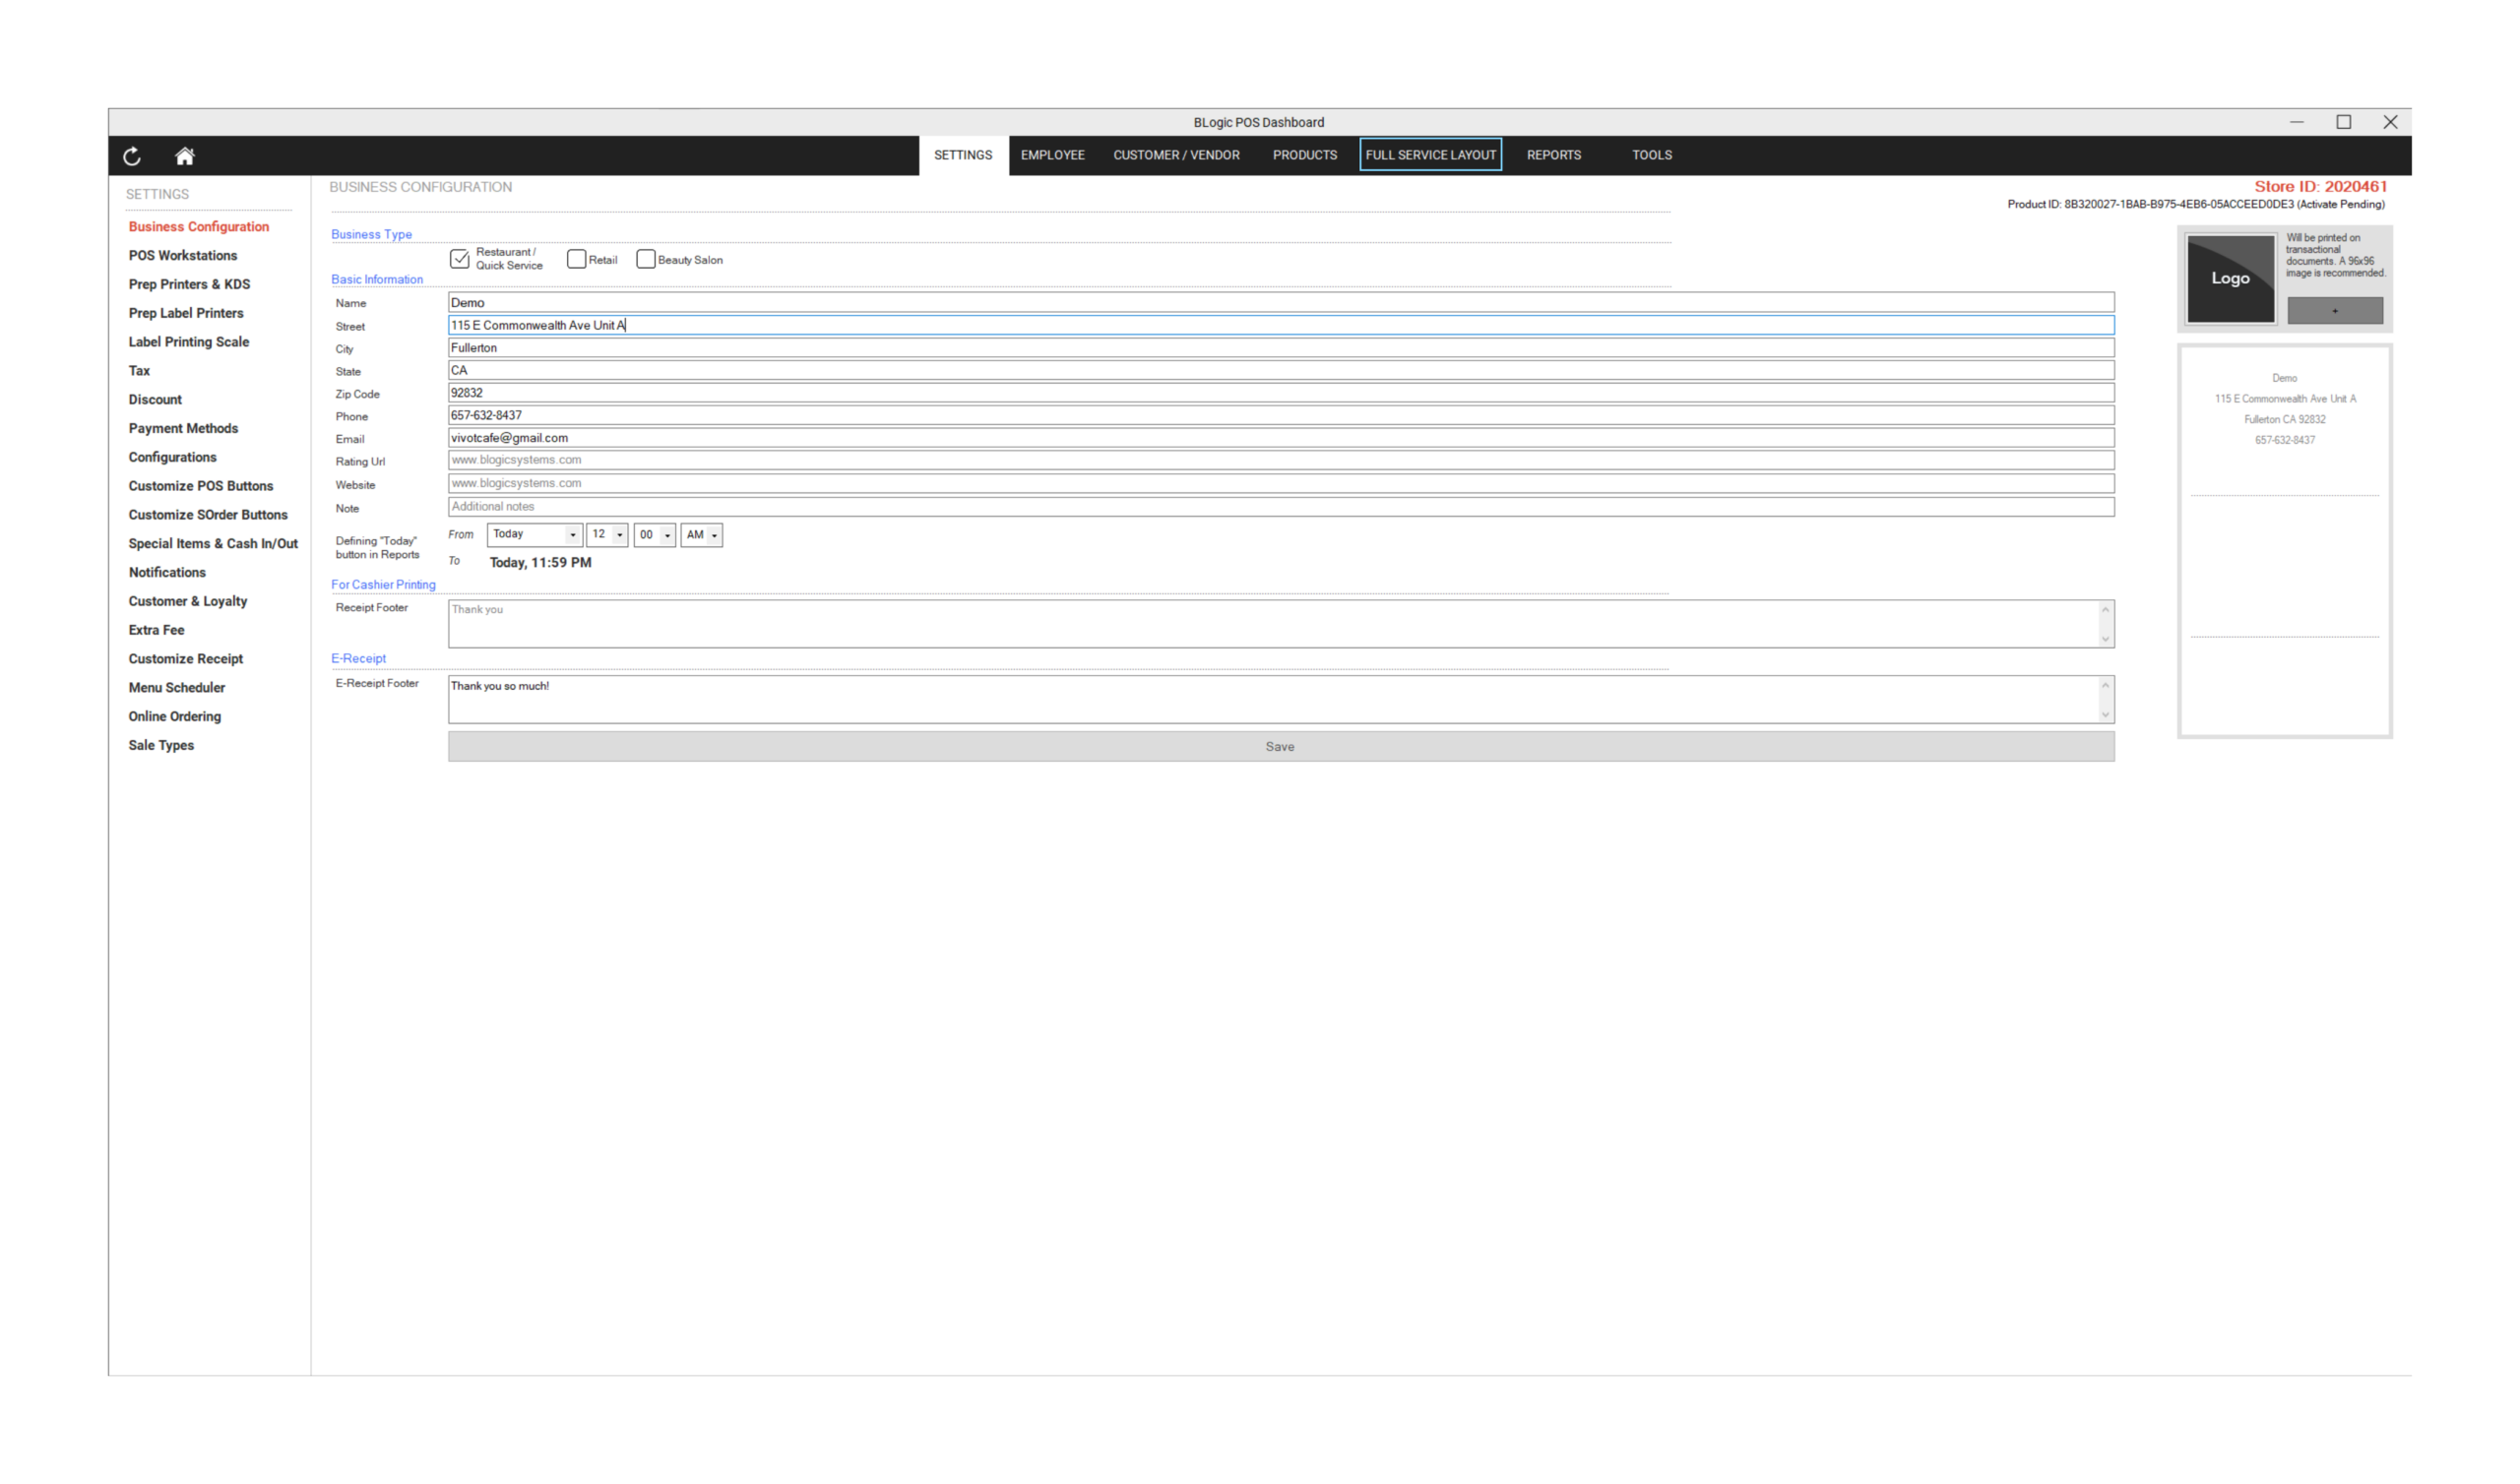
- Click FULL SERVICE LAYOUT in the top navigation bar.
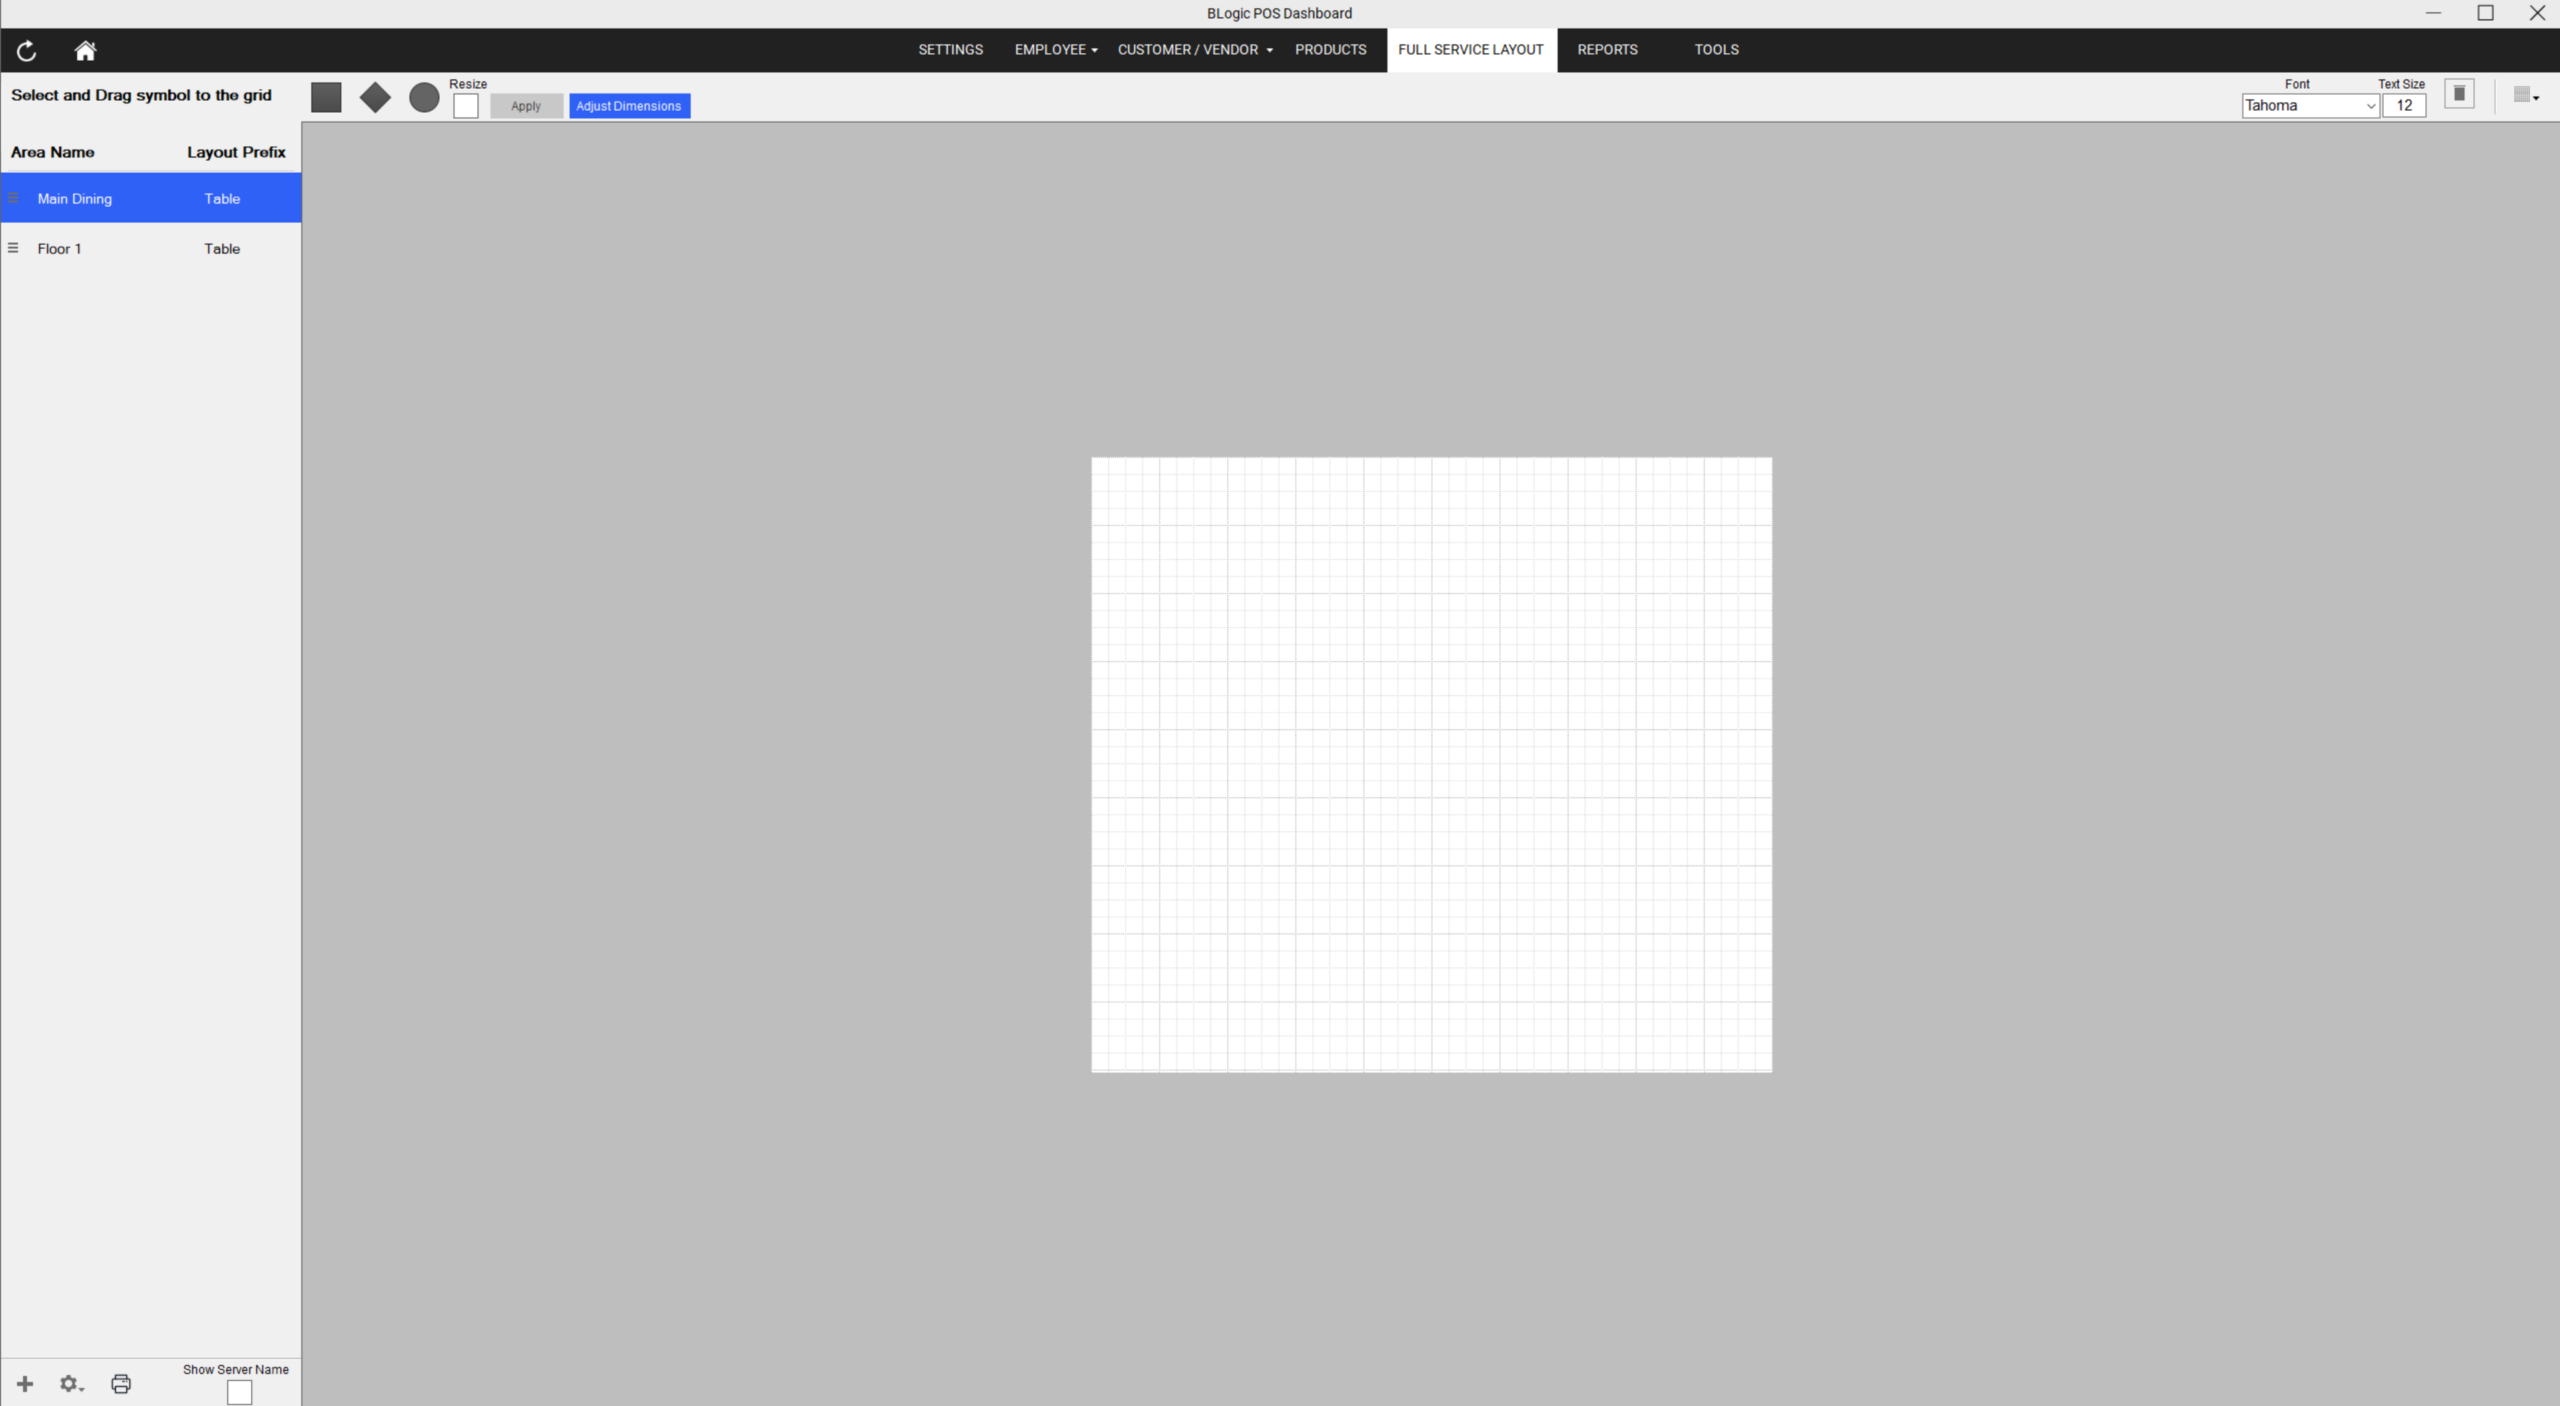
- The layout editor opens with a white grid in the center and the Area panel on the left side.
Create and Configure a Seating Area
Areas represent sections of your restaurant (e.g., Floor 1, Outdoor, Bar). Each area has its own grid where you place table symbols.
Step 1: Add a new area
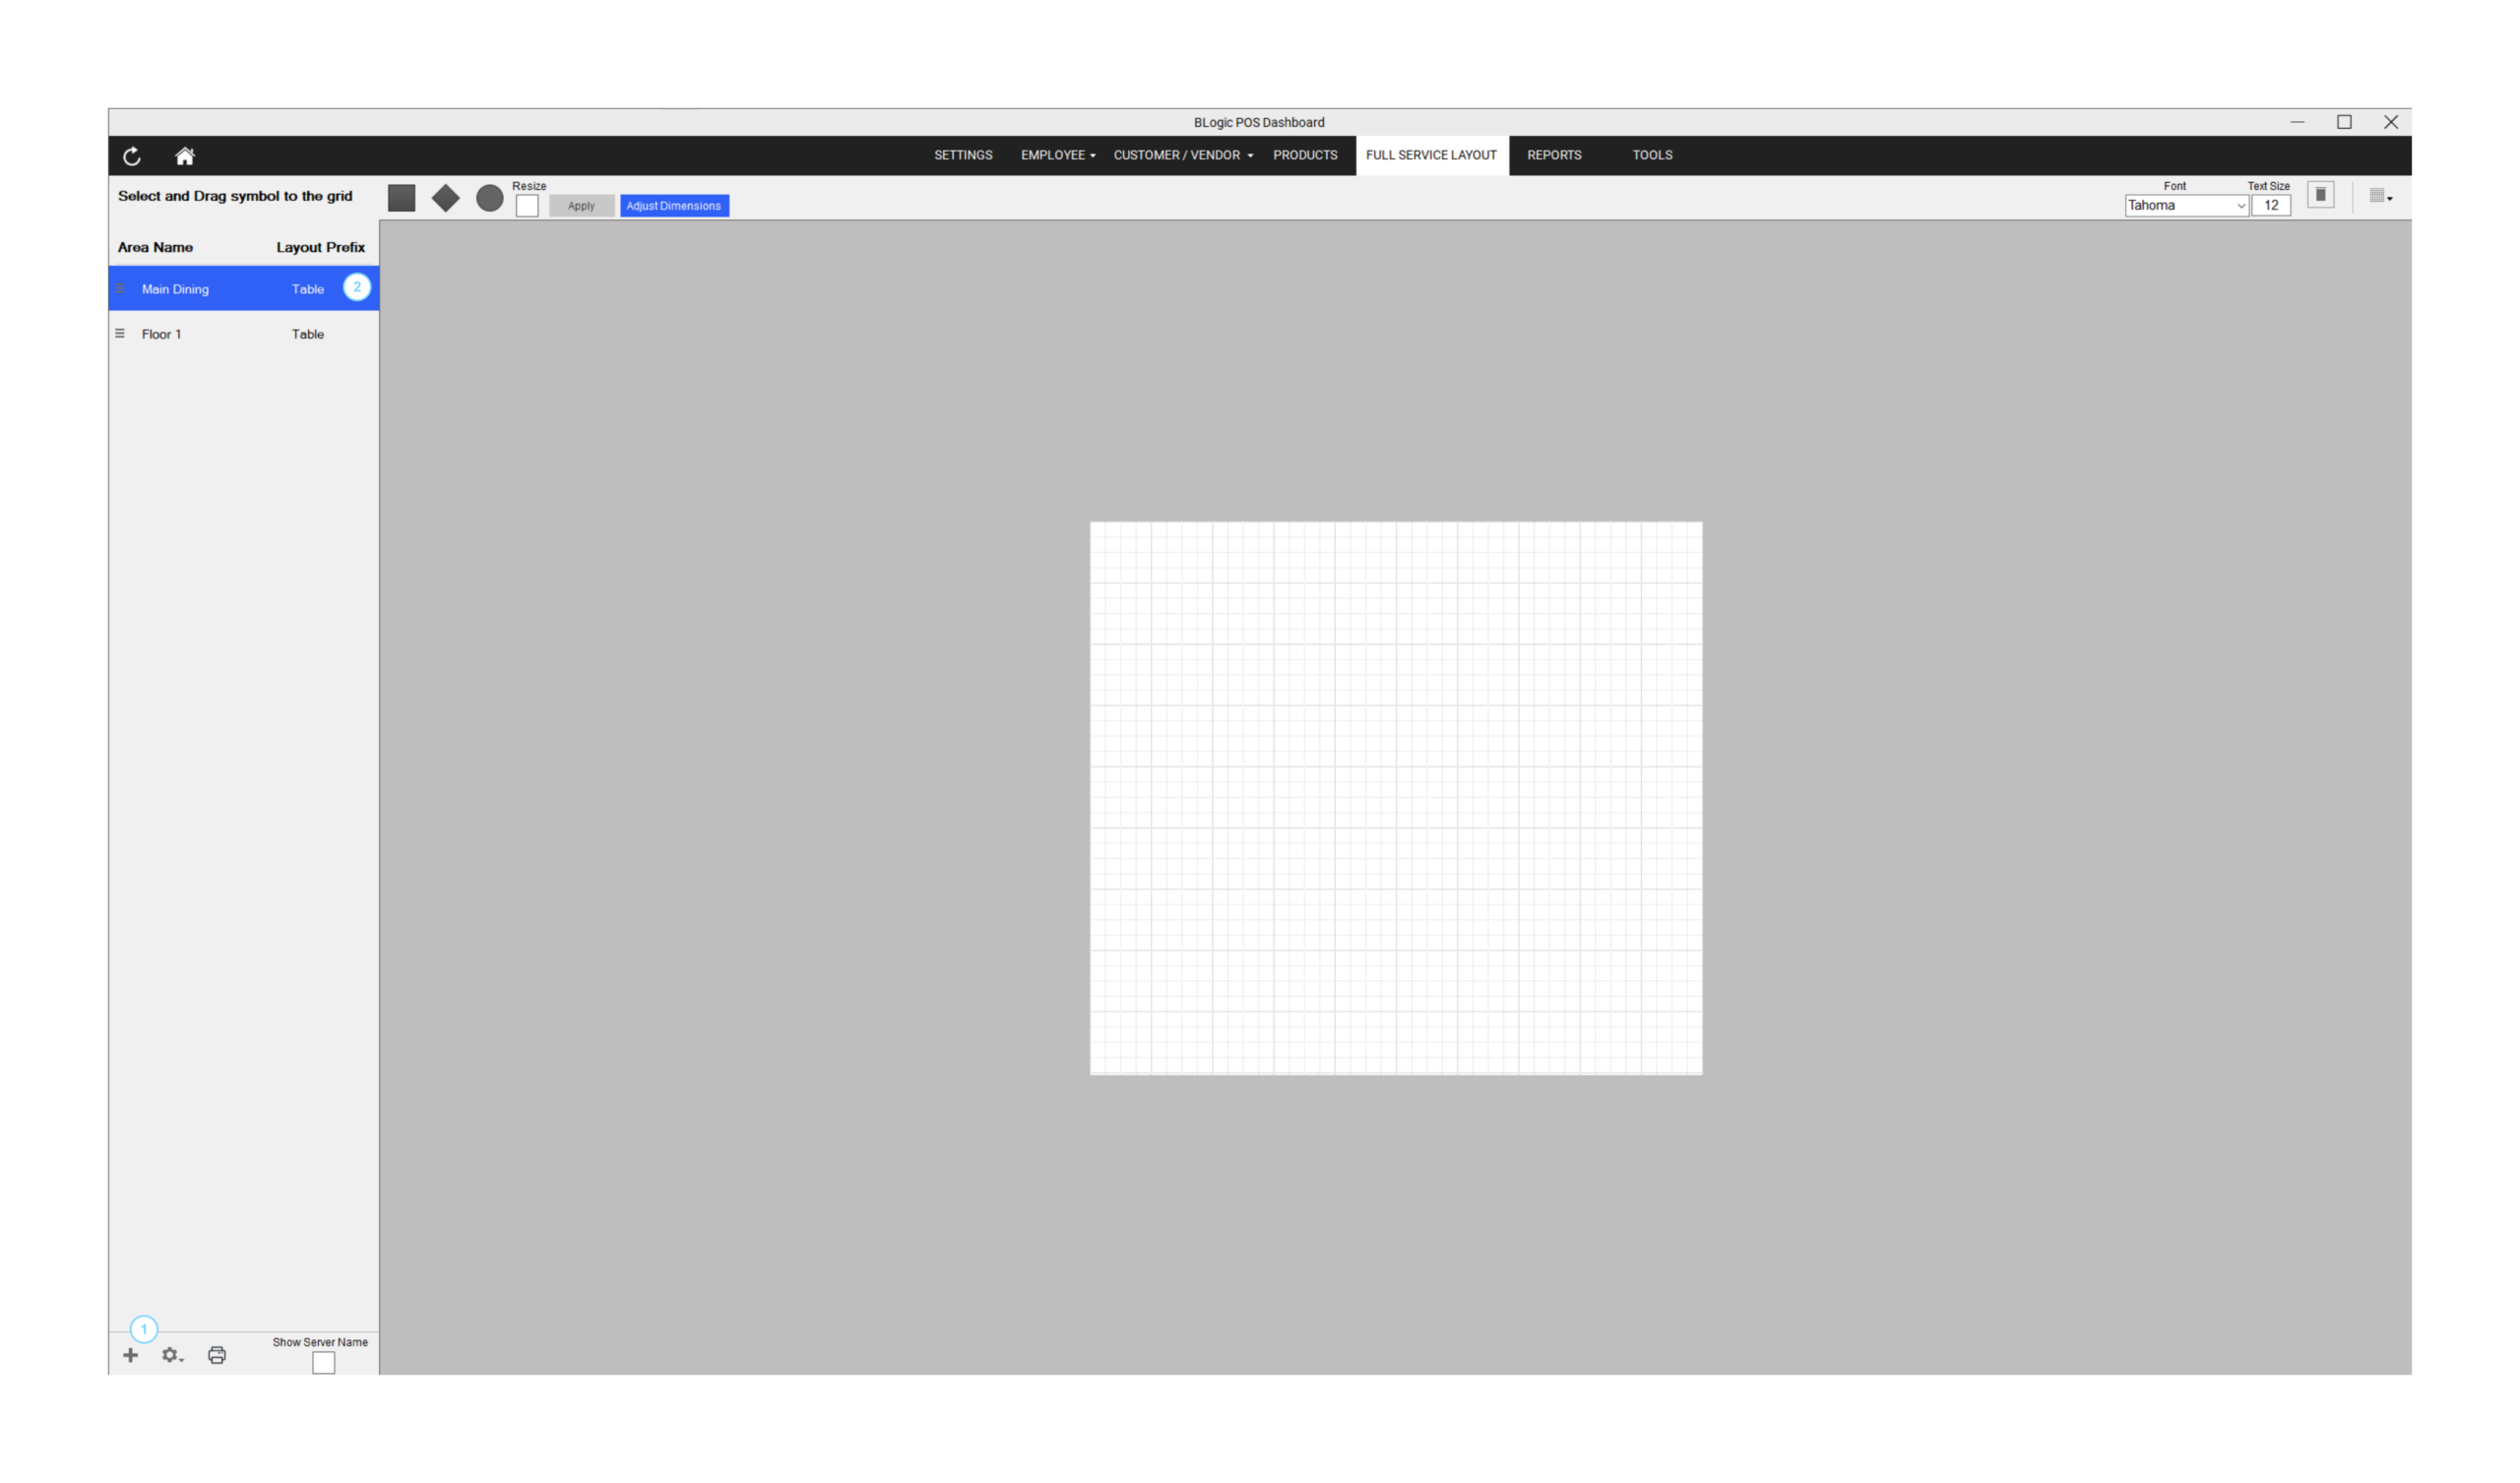
- Click the “+” button at the bottom left of the Area panel.
- A new row appears in the Area panel with a default name (e.g., New Area 1) and a default Layout Prefix (e.g., Table).
- You can click directly on the area name in the panel to rename it inline.
Step 2: Open the Manage Area settings
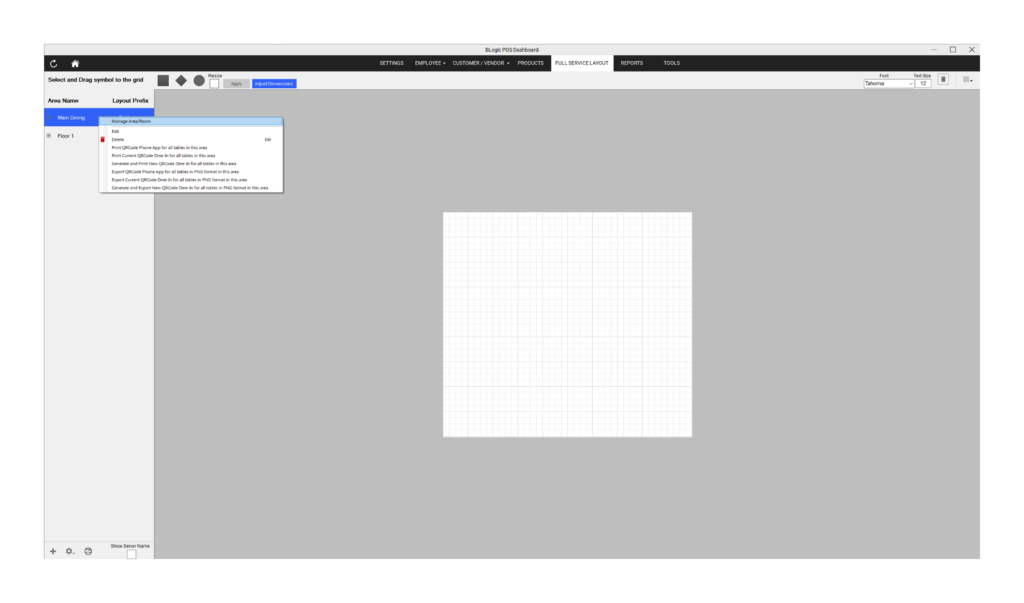
- Click the settings icon (gear) next to the area name in the left panel, or right-click the area row.
- The Manage Area popup opens.
Step 3: Fill in the area details
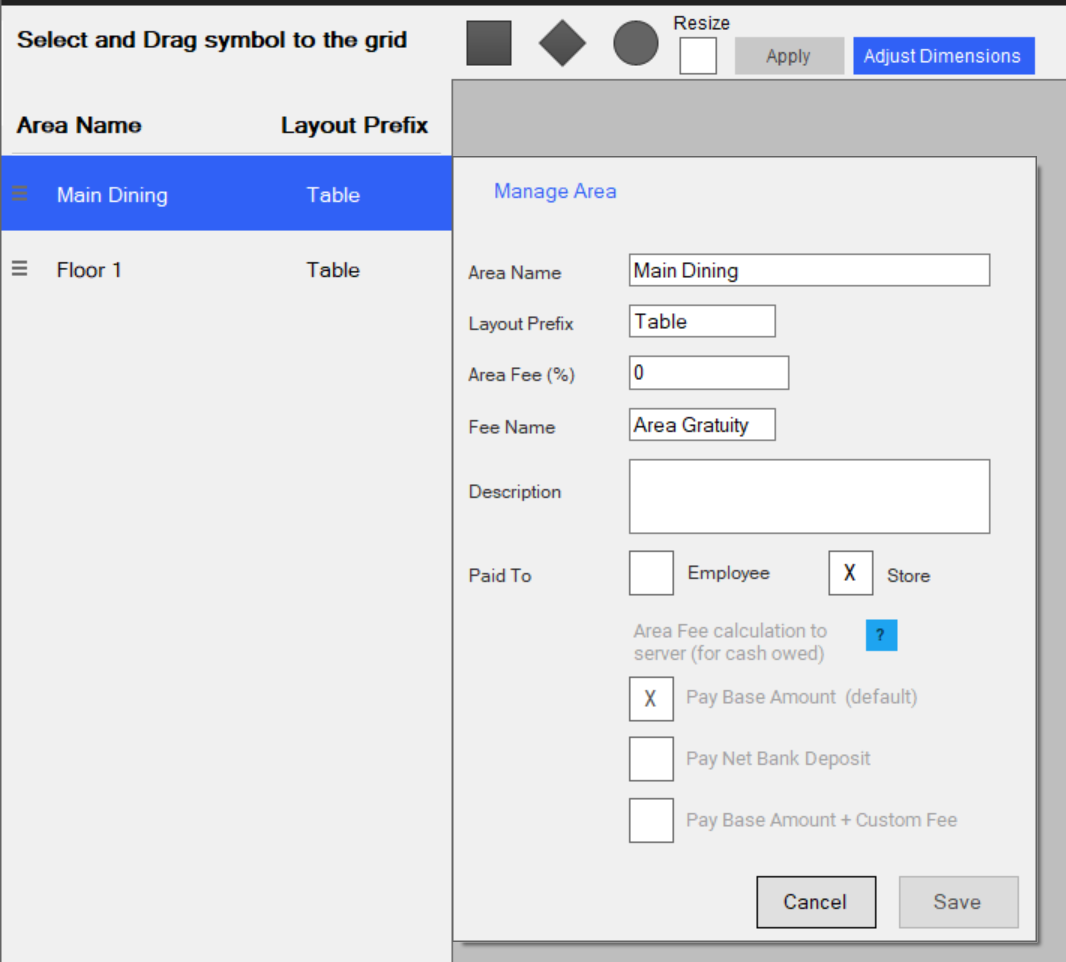
In the Manage Area popup, configure the following fields:
| Field | Description |
|---|---|
| Area Name | Name of the section (e.g., Floor 1, Outdoor Terrace) |
| Layout Prefix | Prefix used to auto-name tables added to this area (e.g., “Table” → Table1, Table2; “Room” → Room1, Room2) |
| Area Fee (%) | Optional service charge percentage applied to orders in this area |
| Fee Name | Display name for the fee (default: Area Gratuity) |
| Description | Optional notes about this area |
| Paid To | Select whether the area fee goes to Employee or Store |
| Area Fee calculation to server (for cash owed) | Toggle this on if the fee should be tracked per server |
| Pay Base Amount (default) | Fee is calculated on the base order amount |
| Pay Net Bank Deposit | Fee is calculated after bank deposit deduction |
| Pay Base Amount + Custom Fee | Fee is calculated on base amount plus any custom fee |
- Click Save to confirm.
✅ Tip: Use a meaningful Layout Prefix. For example, “T” for tables in Floor 1 (T1, T2, T3…) makes it easier for staff to identify tables on the POS screen.
Add Tables to the Floor Plan Grid
Step 1: Select an area
- Click on an area in the left panel to select it (it highlights in blue).
- The white grid in the center now represents that area’s floor plan.
Step 2: Choose a table symbol
In the top toolbar, there are three shape types available:
| Symbol | Shape | Best For |
|---|---|---|
| ■ Square | Rectangle | Standard dining tables |
| ◆ Diamond | Rotated square | Round or bar-style tables |
| ● Circle | Round | Round tables |
Step 3: Drag and drop a table symbol onto the grid
- Click and hold one of the shape icons in the top toolbar.
- Drag it onto the white grid and release to place it.
- The table is automatically named using the area’s Layout Prefix + a number (e.g., 1, 2, 3).
- Repeat for each table you want to add.
ℹ️ Note: Tables are placed snapping to the grid. You can drag them to reposition at any time.
Rename Tables on the Grid
By default, tables are named automatically (e.g., New, New1, T1). You can rename each table to match your physical floor plan.
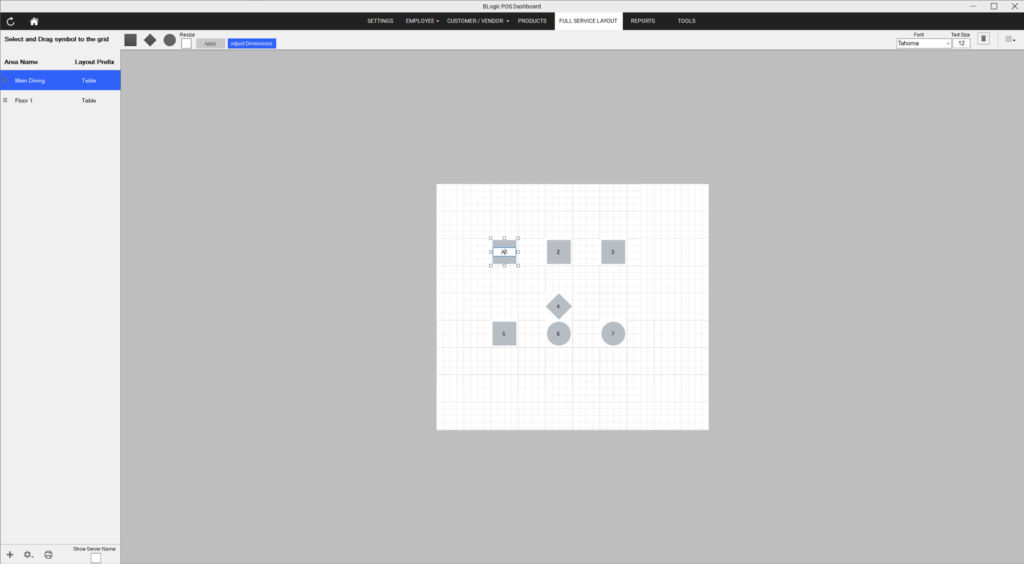
Step 1: Click on a table label to rename it
- Click on the label text of any table on the grid (e.g., “1”).
- The label becomes editable (shows a text input with selection handles).
- Type the new name (e.g., T1, T2, Table 1).
- Click elsewhere on the grid to confirm the new name.
⚠️ Warning: Table names must be unique within the same area. Duplicate names may cause confusion when staff select tables on the POS.
Adjust Table Dimensions
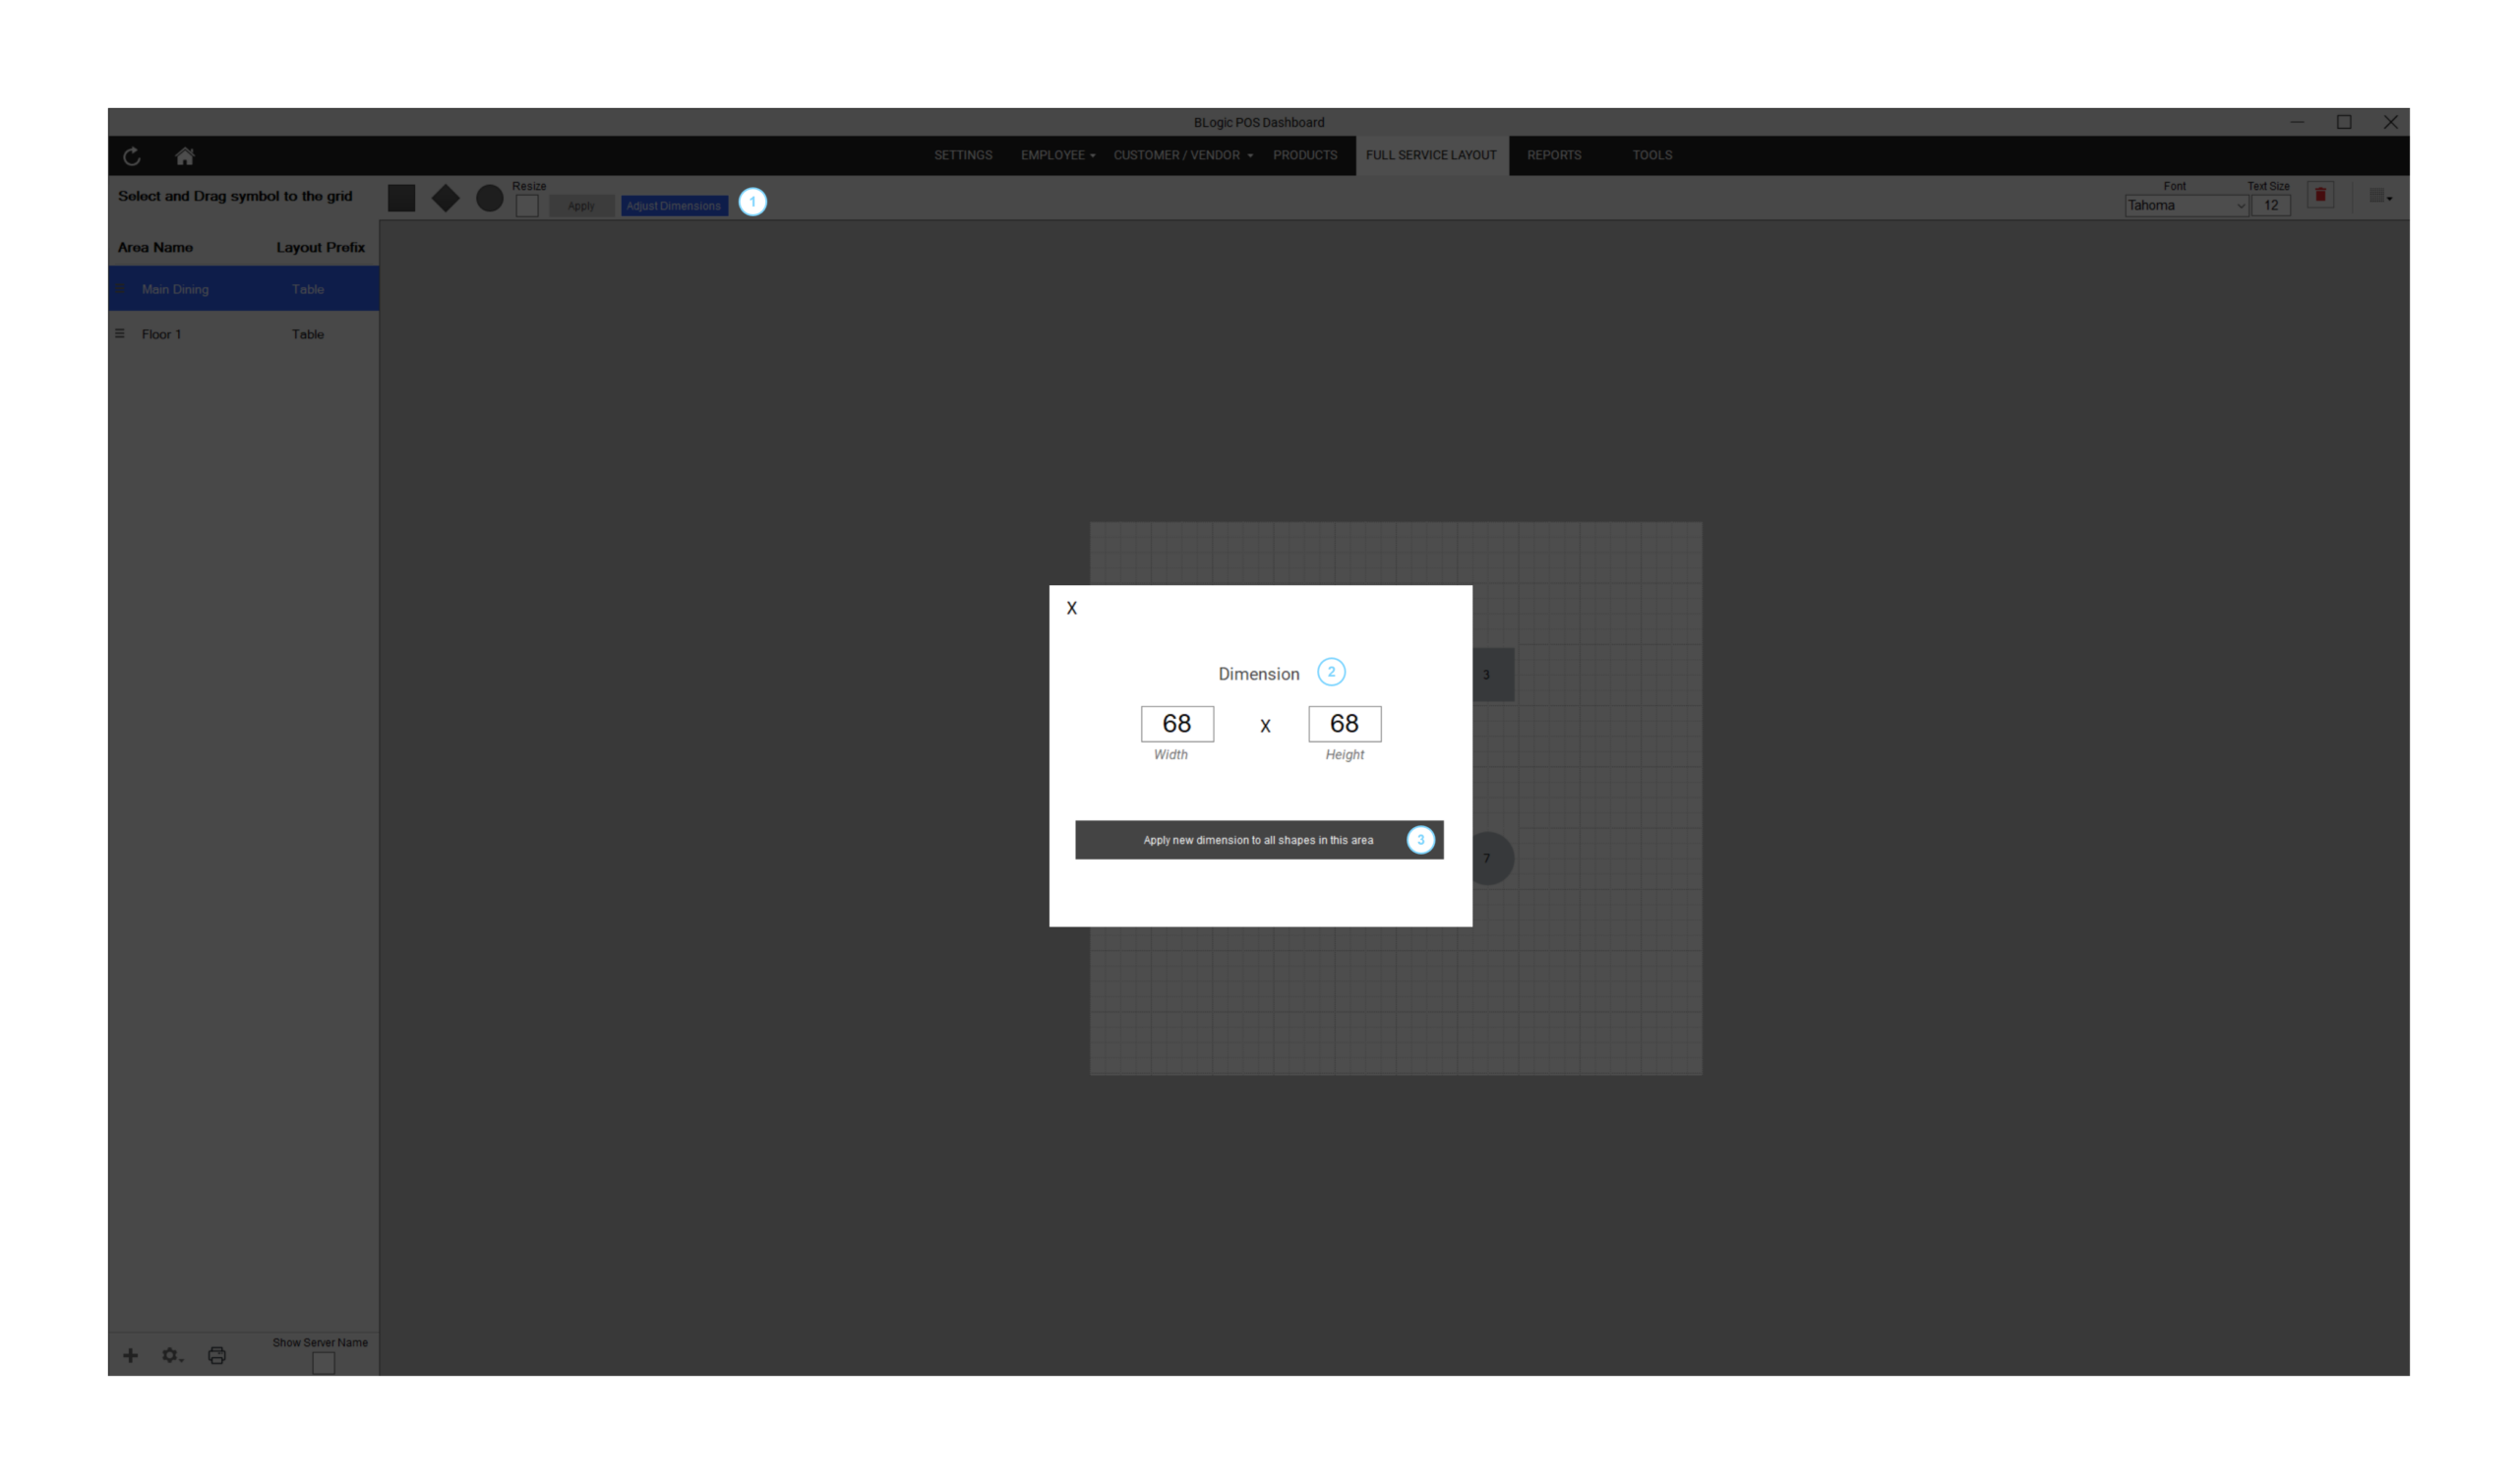
Use Adjust Dimensions to resize all table symbols in the selected area at once. This is useful when you want all tables to have a consistent, uniform size.
Step 1: Open the Adjust Dimensions popup
- Make sure the correct area is selected in the left panel.
- Click the Adjust Dimensions button in the top toolbar.
- The Dimension popup appears showing Width and Height fields (default: 68× 68).
Step 2: Set the new dimensions
- Enter the desired Width value in pixels.
- Enter the desired Height value in pixels.
- Click Apply new dimension to all shapes in this area.
- All table symbols in the current area resize immediately.
✅ Tip: Start with the default 68 × 68 and adjust based on how many tables need to fit on the grid. Larger values make tables easier to tap on a touchscreen POS.
Resize Individual Tables
If you need to resize just one specific table (e.g., a large group table), use the Resize mode.
Step 1: Enable Resize mode
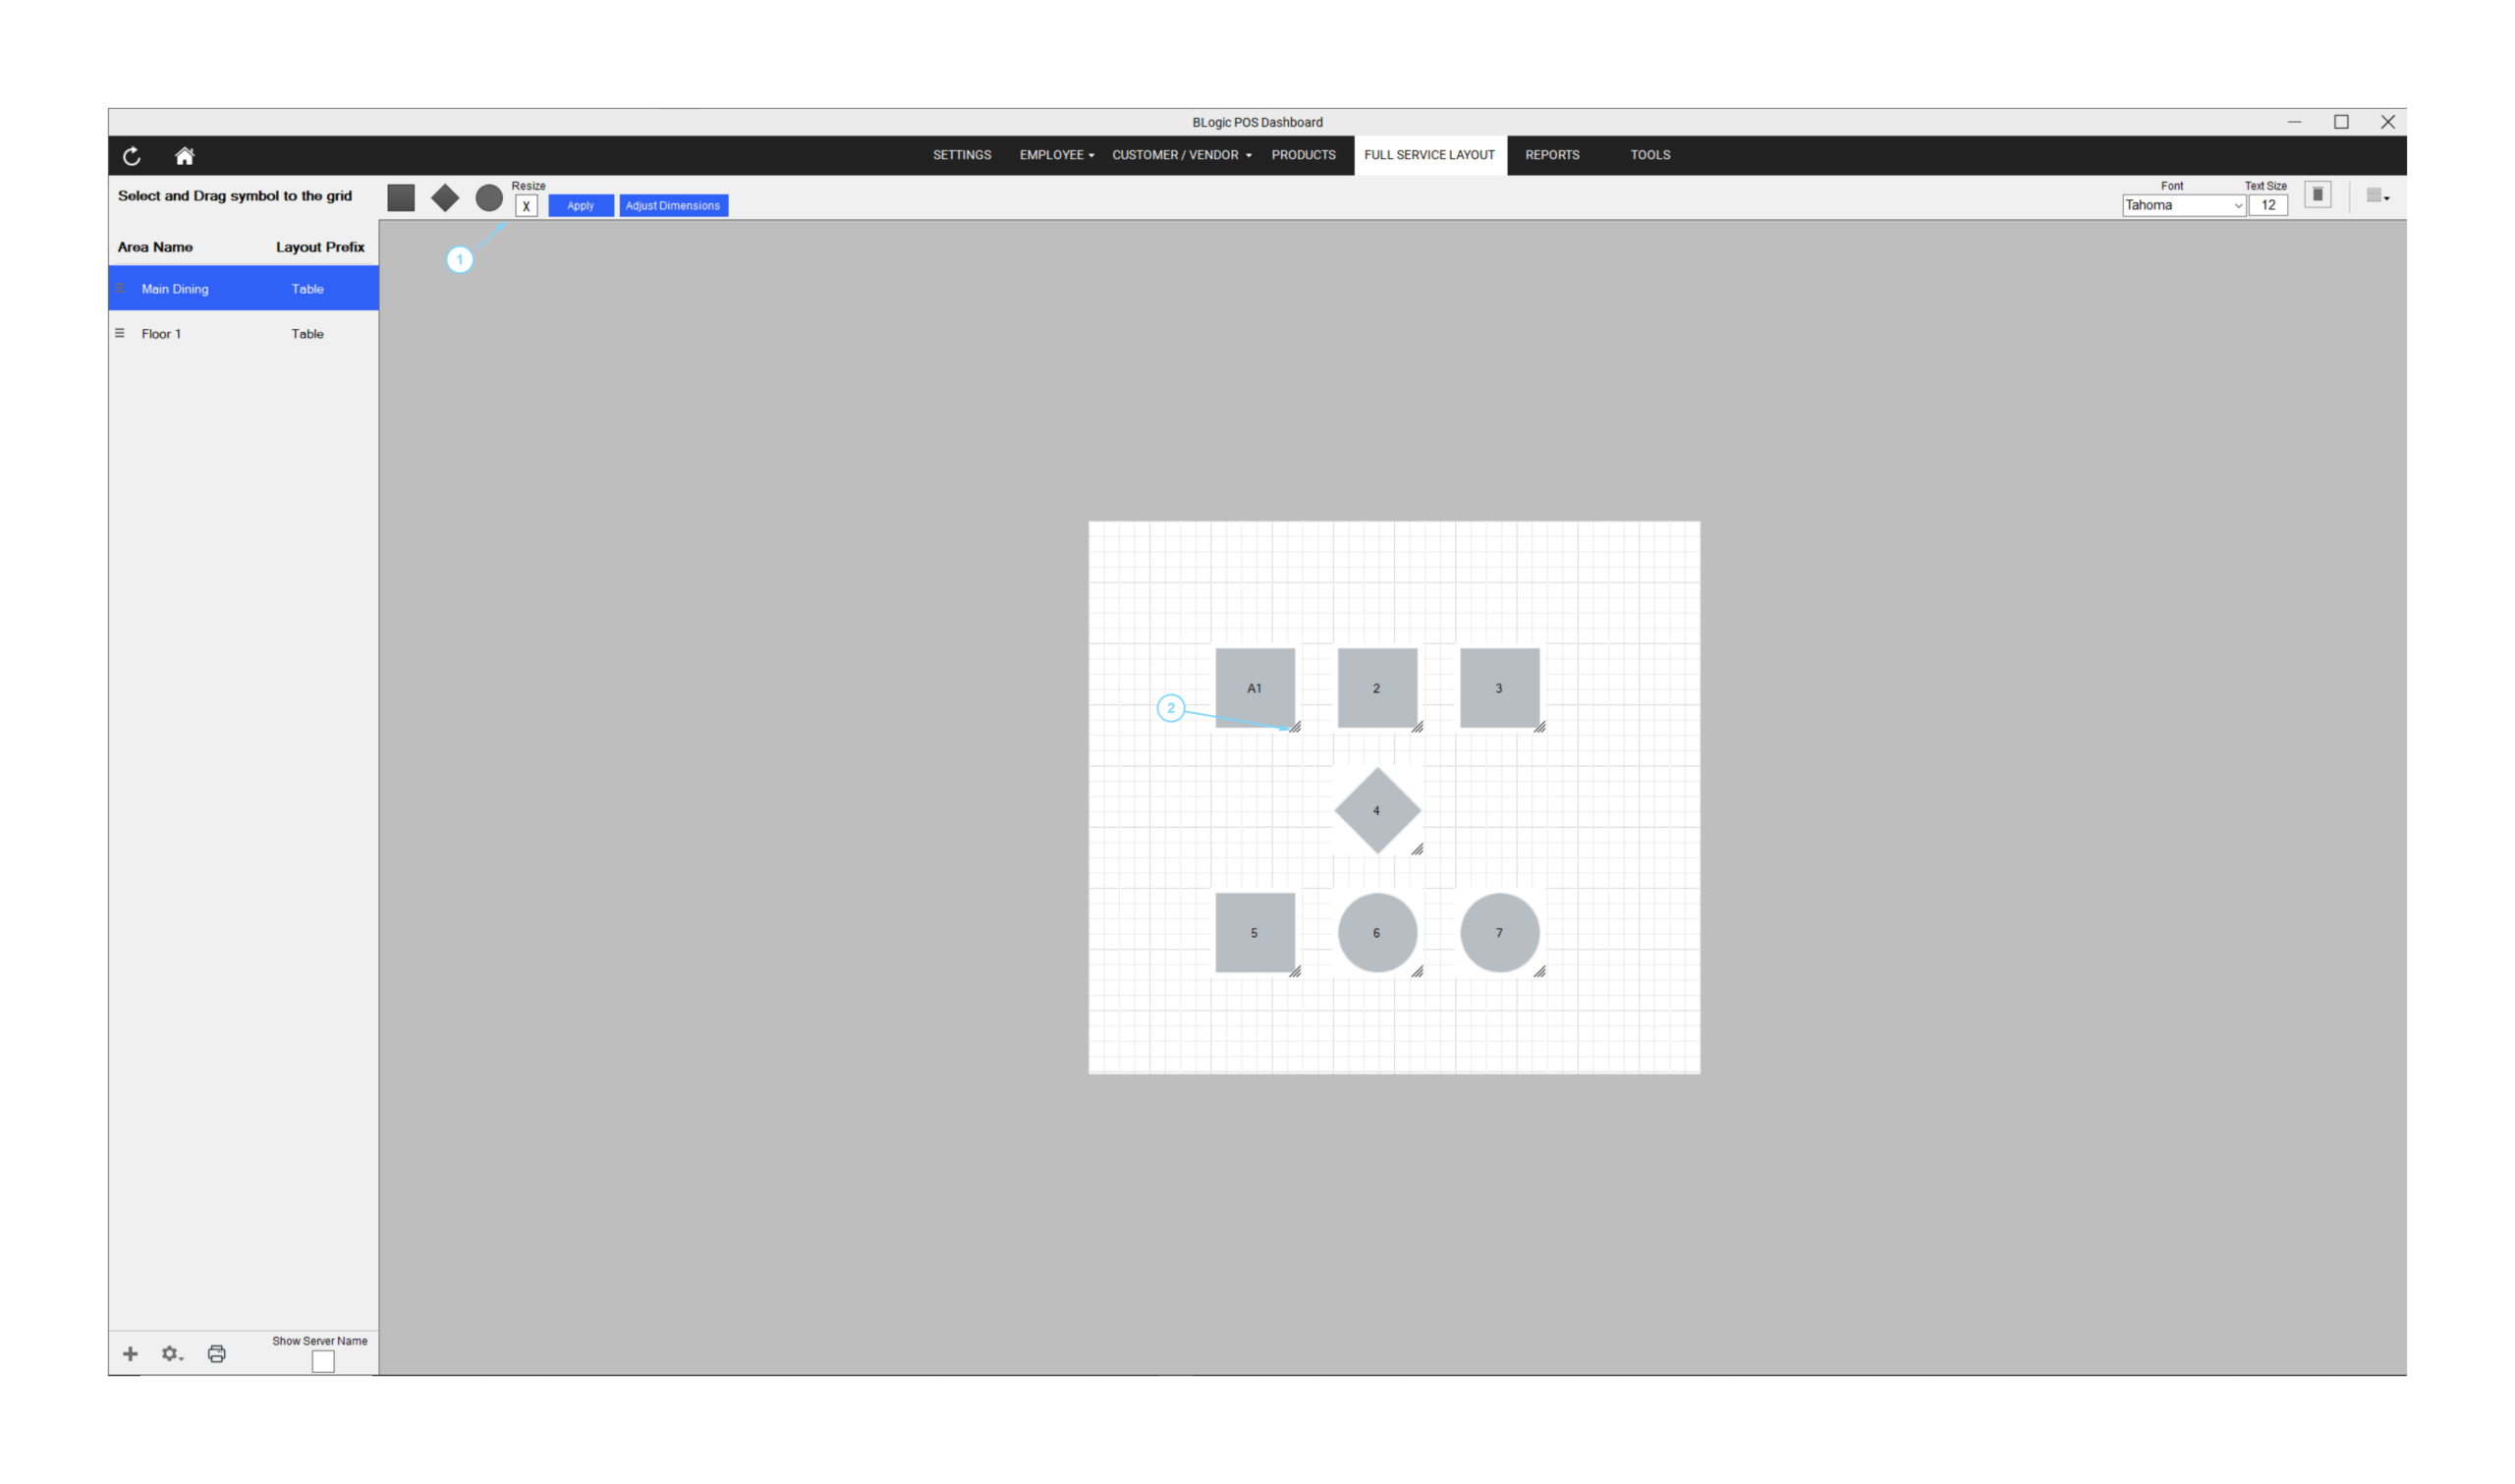
- Check the Resize checkbox in the top toolbar.
- An “X” button appears next to it, indicating resize mode is active.
Step 2: Resize a table
- Click on the table you want to resize on the grid.
- Small white selection handles appear around the table shape.
- Click and drag any corner handle to resize the table.
- Release when the table reaches the desired size.
Step 3: Save Exit Resize mode
- Click the “Apply” button next to the Resize checkbox to turn off resize mode and apply new size.
⚠️ Warning: Resizing individual tables does not affect other tables in the area. Use Adjust Dimensions if you want all tables to be the same size.
Where to View or Confirm the Result
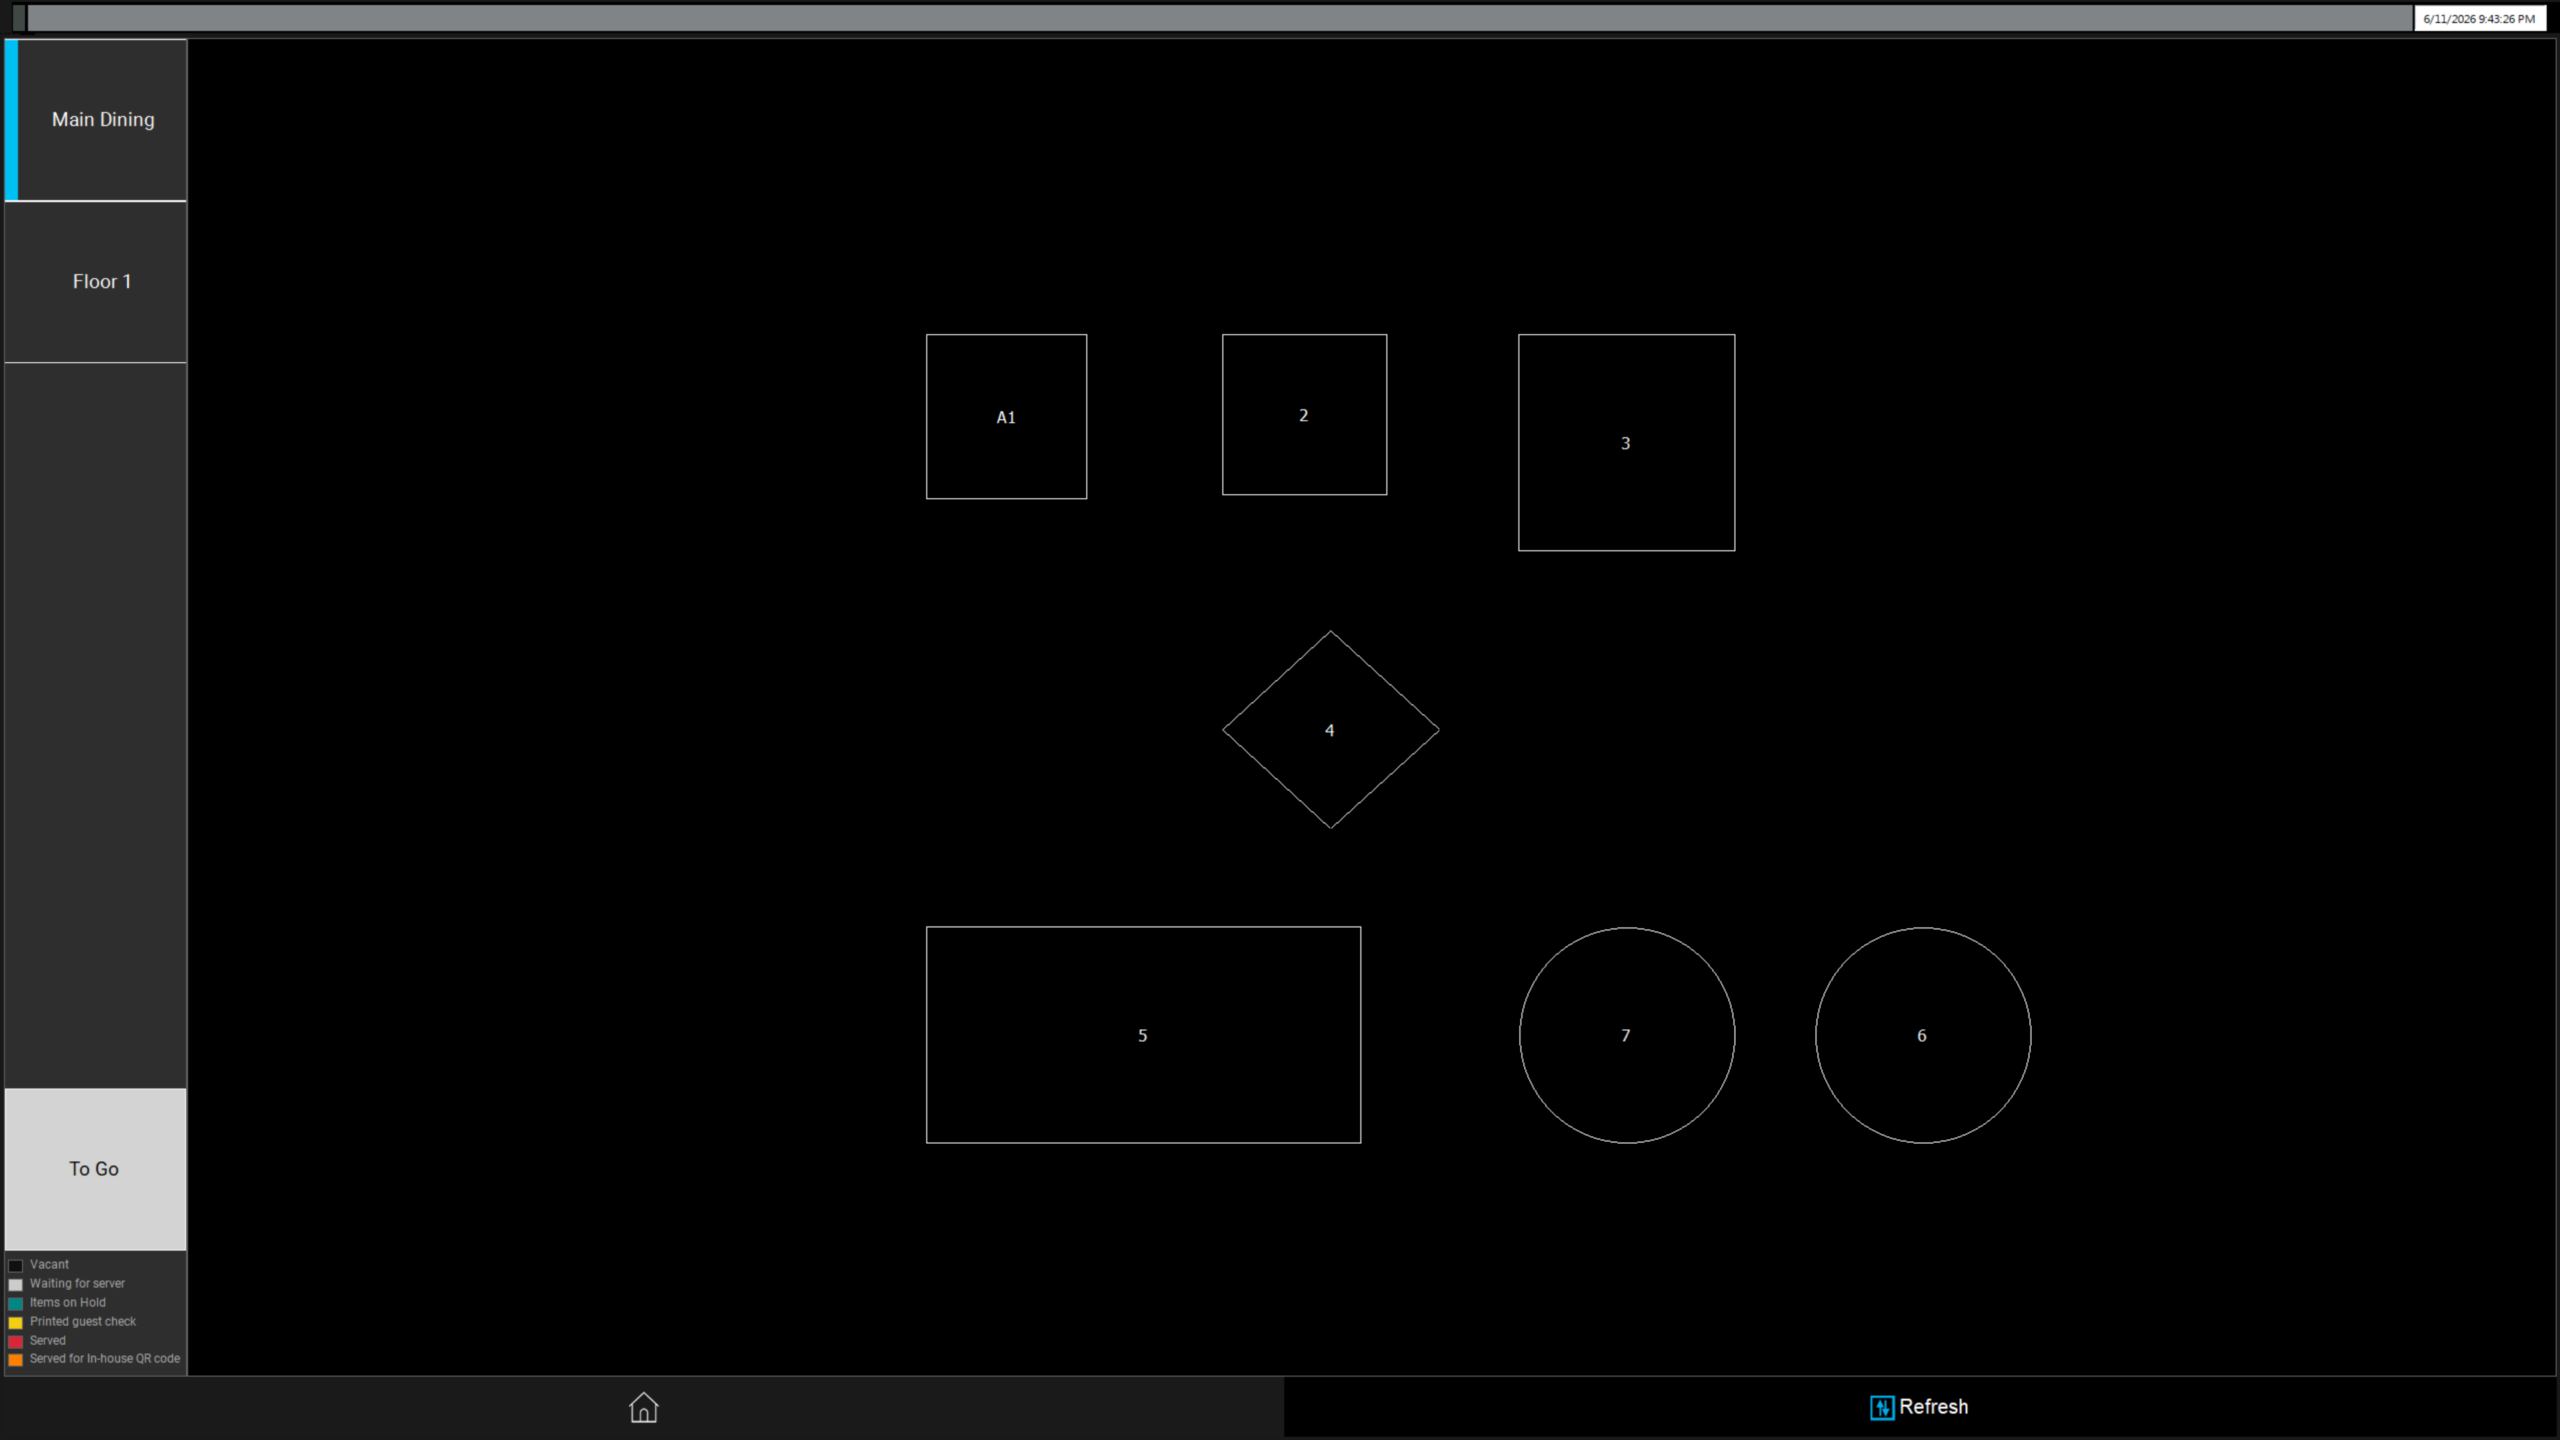
After completing your layout setup, the floor plan will appear on the Full Service / Dine-In screen on the POS when staff open a new table order. Staff will see the areas and table labels exactly as configured here.
To confirm your layout is saved correctly:
- Return to FULL SERVICE LAYOUT in BLogic POS Dashboard.
- Select each area from the left panel and verify the tables are positioned and labeled correctly.
FAQ
1. Why can’t I see the Full Service Layout menu? Your user account may not have permission to access this setting, or this module may not be enabled for your store. Contact Support to confirm your store is on a supported version and that your role has the required access.
2. Can I have multiple areas (floors/sections)? Yes. Click the “+” button at the bottom left of the Area panel to add as many areas as needed. Each area has its own grid and can have different settings (name, prefix, gratuity fee, etc.).
3. Does changing the Area Fee (%) affect existing orders? Area fee changes apply to new orders created after the change is saved. Existing open orders may not be affected. Please contact Support to confirm behavior for your version.
4. What happens if I change the Layout Prefix after tables are already added? Changing the Layout Prefix in Manage Area only affects new tables dragged onto the grid after the change. Tables already on the grid keep their existing names. Rename them manually if needed.
5. What should I do if the layout does not appear correctly on the POS? Ensure you have saved all changes in the layout editor. If the POS does not reflect the updated layout, try refreshing or restarting the POS terminal. Contact Support if the issue persists.
Closing
If you still need help setting up your Full Service Layout, please contact Support for further assistance.