Introduction
This article explains how to enable and configure the Print Sales Type option on your Prep Ticket. Once turned on, the order type (e.g., Dine In, To Go, Delivery) will automatically print at the top of every Prep Ticket — so kitchen staff can instantly identify the order without relying on manual notes.
Version Support
| Product / Module | Supported Version |
|---|---|
| POS / POS Dashboard | 06.30.2026 or later |
Note: If you do not see the Print Sales Type option in your Prep Receipt config, please contact Support to confirm your store is on a supported version.
Table of Contents
- Configure Print Sales Type
- Customize Font, Size, and Bold
- How Sales Type Appears on the Prep Ticket
- FAQ
Configure Print Sales Type
Step 1: Go to Prep Receipt Settings
- Log in to your POS Dashboard.
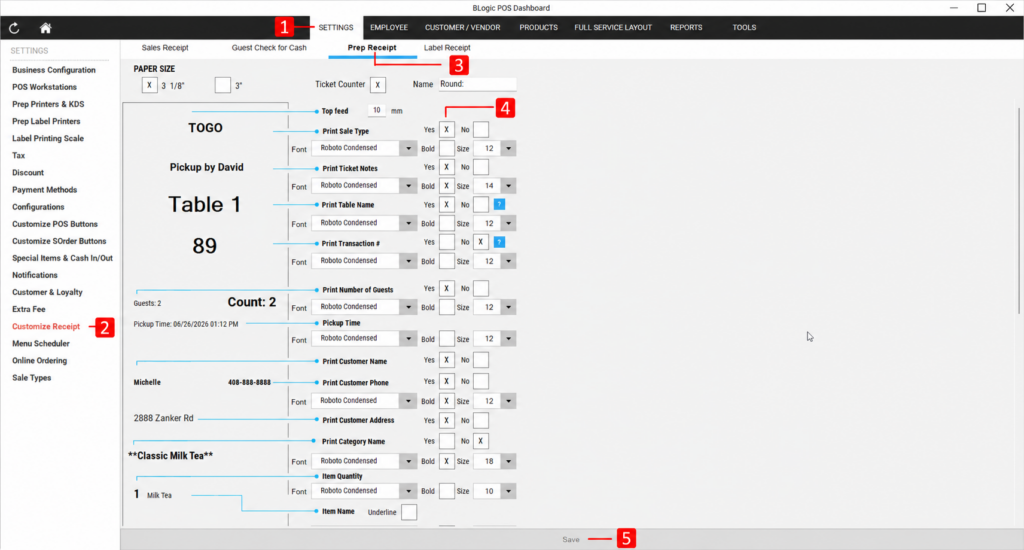
- Go to Settings > Customize Receipt > Prep Receipt.
- Locate Print Sales Type at the top of the config list — it appears as the first item, above Print Ticket Notes.
Step 2: Enable or Disable the Option
- Set Print Sales Type to Yes to enable, or No to disable.
- Click Save to apply your changes.
ℹ️ Note: After a new deployment, Print Sales Type defaults to Yes (ON). No action is needed to activate it for the first time.
Customize Font, Size, and Bold
When Print Sales Type is set to Yes, you can customize how the sales type text appears on the printed ticket.
Step 1: Adjust Text Formatting
- With Print Sales Type set to Yes, locate the formatting options directly below it.
- Configure the following fields as needed:
| Field | Default Value | Options |
|---|---|---|
| Font | Roboto Condensed | Available system fonts |
| Size | 12 | Numeric value |
| Bold | OFF | ON / OFF |
- Click Save to apply your changes.
How Sales Type Appears on the Prep Ticket
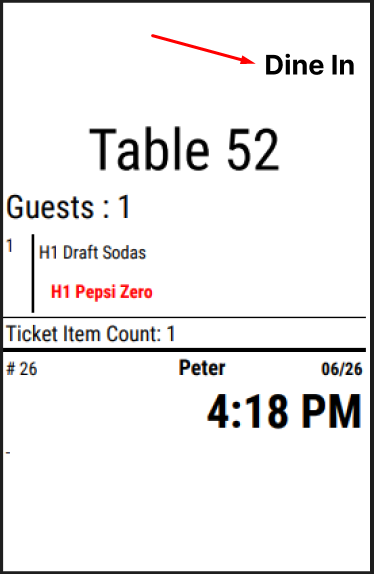
Once enabled, the sales type prints at the very top of the Prep Ticket, before Ticket Notes and all other fields.
- The printed value is the Display Name only — for example:
To Go,Dine In,Delivery. - This applies to all order sources: POS, QOrder, SOrder, Online Ordering, QR Code Dine In, and Kiosk.
FAQ
1. Why can’t I see the Print Sales Type option in Prep Receipt config? Your store may not be on a supported version yet. Please contact Support to confirm whether this feature has been deployed to your store.
2. Where does the Sales Type print on the ticket? Sales Type always prints first — at the very top of the Prep Ticket, above Ticket Notes and all other fields. This position cannot be changed.
3. What text will print on the ticket? Only the Display Name of the sales type is printed — for example, To Go or Dine In. No prefix or label (such as “Sales Type:”) is included.
4. Does this work for all ordering channels? Yes. Print Sales Type works for all order sources: POS, QOrder, SOrder, Online Ordering, QR Code Dine In, and Kiosk. It does not apply to Sales Receipts, Guest Check for Cash, or Label Receipts.
5. What happens if I turn Print Sales Type off? The sales type line will no longer appear on Prep Tickets. The ticket will look the same as it did before the feature was enabled. You can re-enable it at any time from the same Prep Receipt config screen.
Closing
If you still need help, please contact Support for further assistance.