Introduction
This article explains how to configure and use the BLogic Kitchen Display System (KDS) V2. You will learn how to connect your KDS to a server, adjust display settings, and manage tickets — including marking items done, opening notes, and submitting completed orders. KDS V2 helps your kitchen team track and process orders faster with a clear, real-time display.
Version Support
| Product / Module | Supported Version |
|---|---|
| BLogic KDS V2 | POS Server (2026.06.26) |
Note: If you do not see this option, please contact Support to confirm your store is on a supported version.
Table of Contents
- Connect to a Server
- Understand the KDS Home Screen
- Open a Ticket Detail
- Fulfill Items in a Ticket
- Undo a Fulfilled Item
- Fulfill an Entire Ticket at Once
- Fulfill a Ticket Directly from the Home Screen
- Understand Special Ticket States
- View Recently Fulfilled Orders
- Configure General Settings
- Troubleshoot Server Connection
- FAQ
Connect to a Server
KDS V2 must be connected to a POS server to receive orders in real time.
Step 1: Open the Server Selection screen
- On the KDS home screen, tap the Settings icon (⚙️) in the top-right corner.
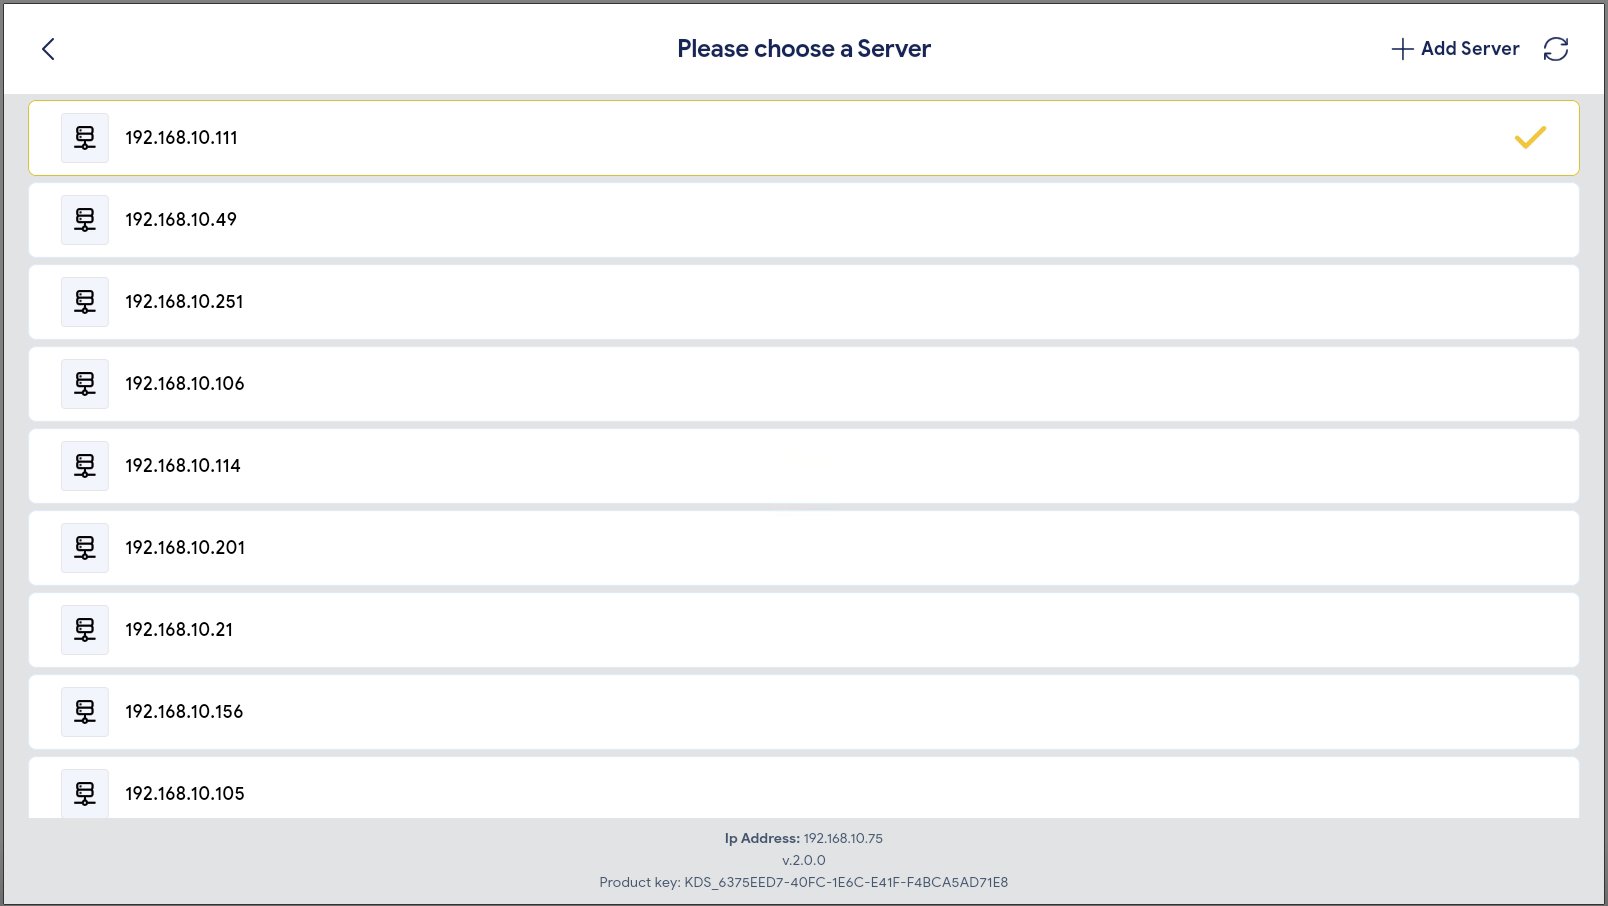
- The “Please choose a Server” screen will appear, listing all servers detected on your network.
Step 2: Select a server
- Tap the server IP address you want to connect to.
- The selected row will be highlighted with a yellow border and a ✓ yellow checkmark on the right.
- The KDS will connect automatically once a server is selected.
ℹ️ Note: The current device’s IP address, software version (v.2.0.0), and Product Key are shown at the bottom of the server screen for reference.
Step 3: Add a new server (if needed)
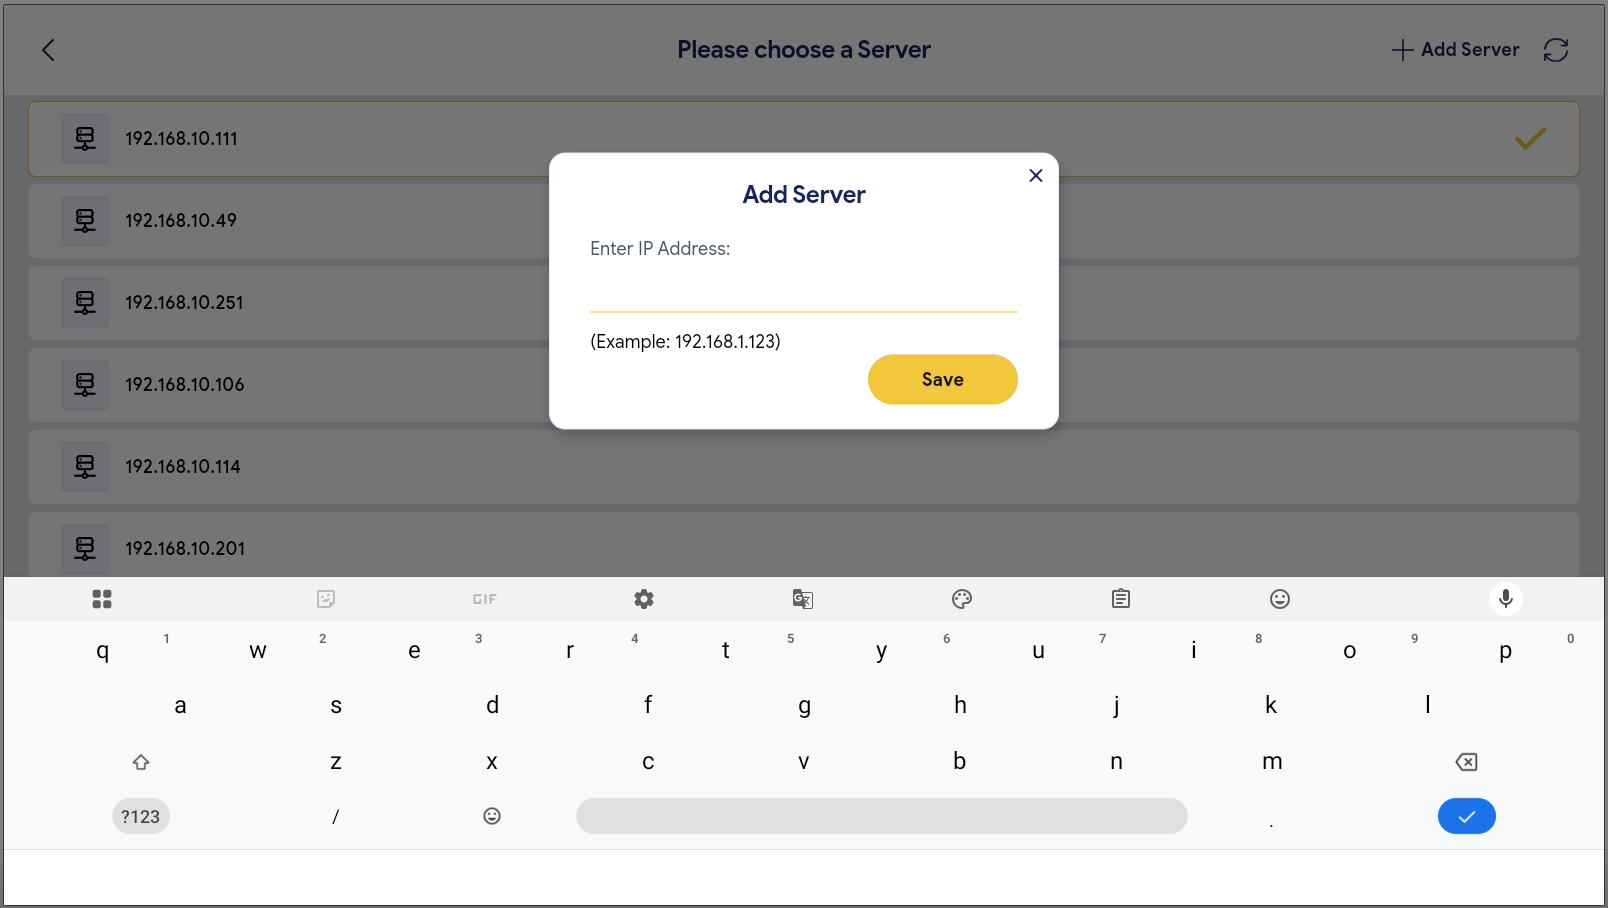
- On the Server screen, tap + Add Server in the top-right corner.
- An Add Server dialog will appear with an “Enter IP Address” field.
- Type the IP address of the server (e.g.,
192.168.1.123). - Tap the yellow Save button to confirm.
⚠️ Warning: If the IP address is invalid or the server cannot be reached, an “Unable to Add IP Address” error dialog will appear. Tap Try Again to retry with a corrected IP address. No server will be added if the connection fails.
Understand the KDS Home Screen
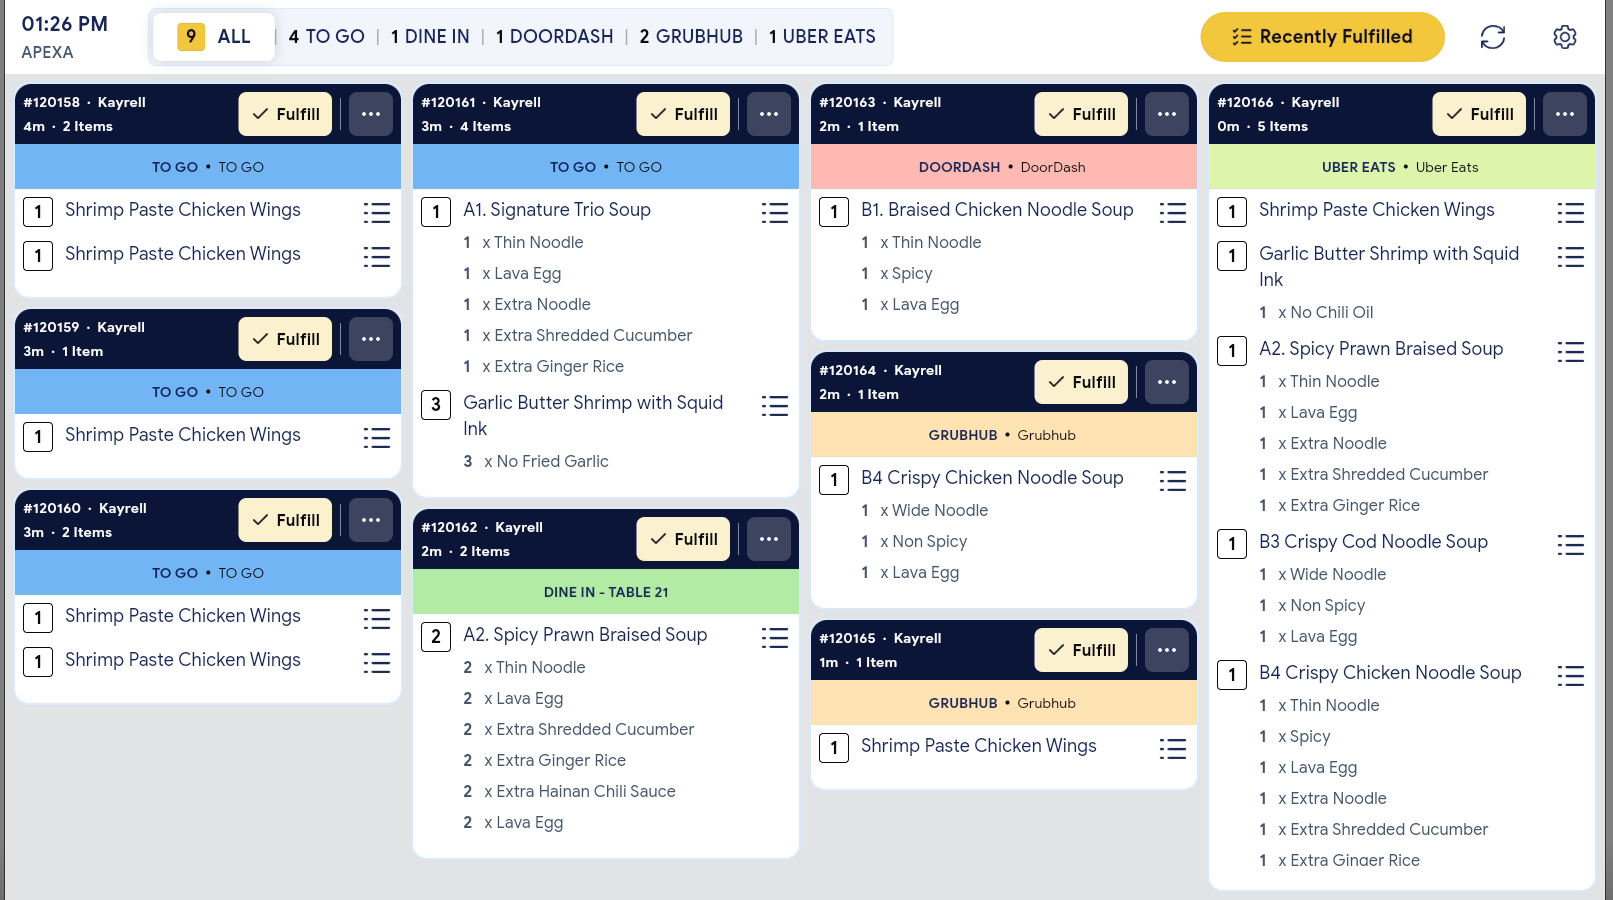
Once connected to a server, the KDS home screen displays all active order tickets.
Top navigation bar:
- Current time and Station name (e.g., APEXA) — top left
- Filter tabs — filter tickets by order type:
- ALL (shows total active ticket count with yellow badge)
- TO GO
- DINE IN
- DOORDASH
- GRUBHUB
- UBER EATS
- Recently Fulfilled button — top right (yellow)
- Refresh icon and Settings icon — top right
Ticket cards:
Each order appears as a ticket card. Cards are color-coded by order type:
| Header Color | Order Type |
|---|---|
| Blue | TO GO |
| Green | DINE IN (with table number) |
| Pink / Rose | DoorDash |
| Tan / Gold | GrubHub |
| Light Green | Uber Eats |
| … |
Each ticket card shows:
- Ticket number (e.g.,
#120158) and Server name (e.g.,Kayrell) — top left of card header (dark navy) - Elapsed time since order was created (e.g.,
4m) and item count (e.g.,2 Items) — below ticket number - ✓ Fulfill button — tap to fulfill the entire ticket from the home screen
- ··· (three-dot) button — tap for additional options
- Order type label (e.g.,
TO GO • TO GO,DINE IN - TABLE 21,DOORDASH • DoorDash) — colored header below the card header - Item rows — each item shows quantity badge (e.g.,
1), item name, and a ≡ (list icon) on the right
Fulfilled/crossed-out items on the home screen:
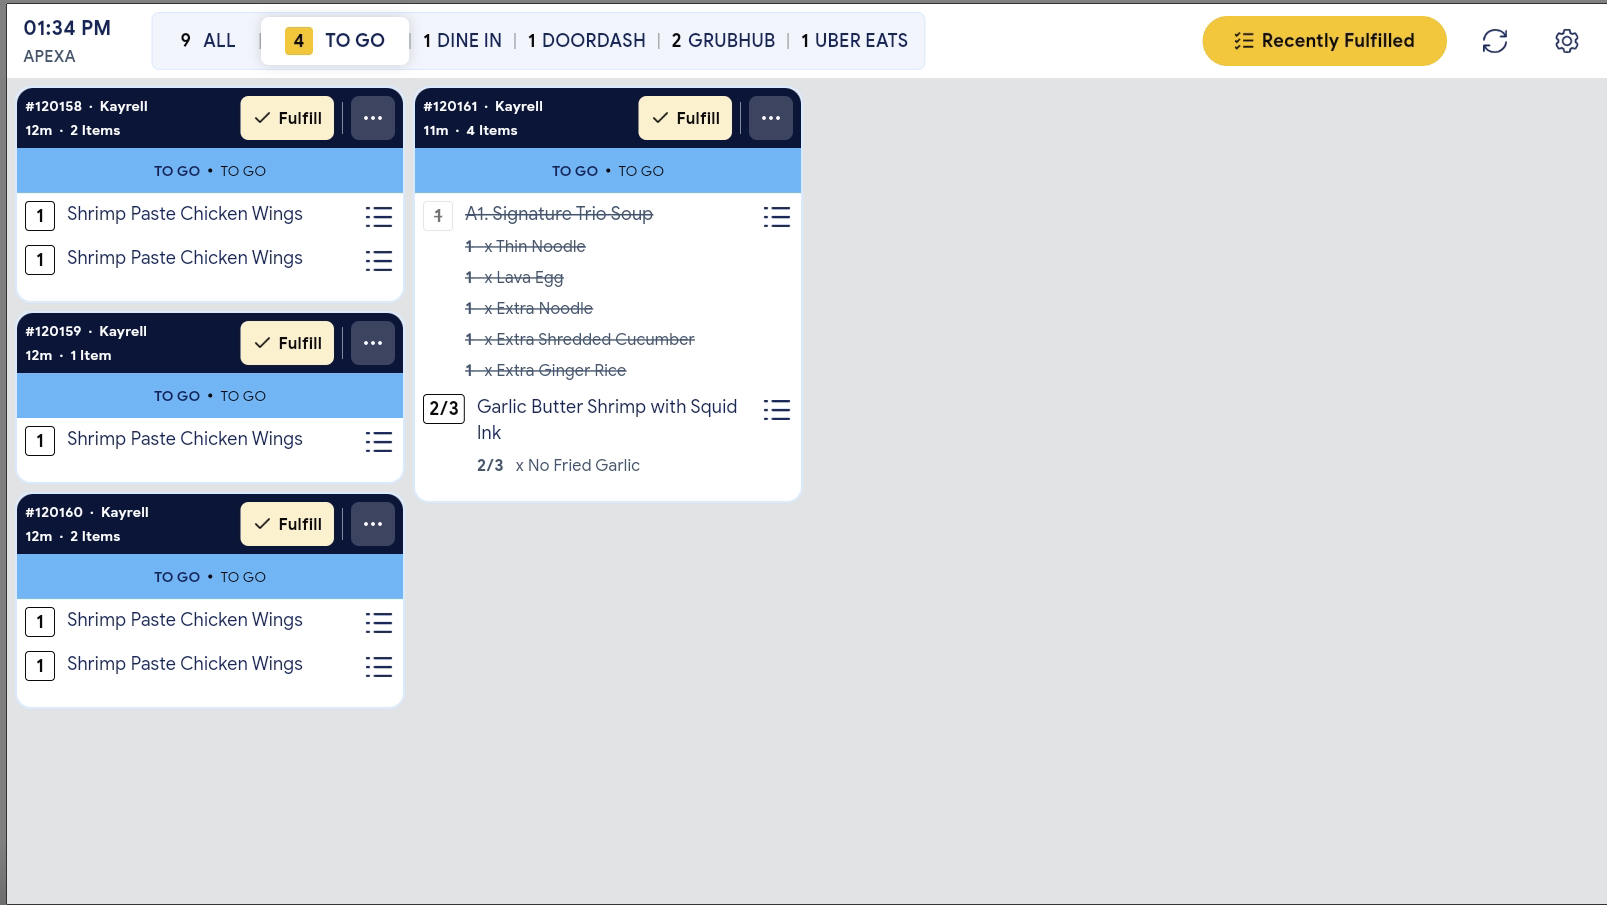
When items in a ticket have been fulfilled via the Ticket Detail view, they appear with strikethrough text on the home screen card, giving the kitchen a quick progress overview without opening the ticket.
Open a Ticket Detail
Tap anywhere on a ticket card (or tap the ··· button) to open the full Ticket Detail view.
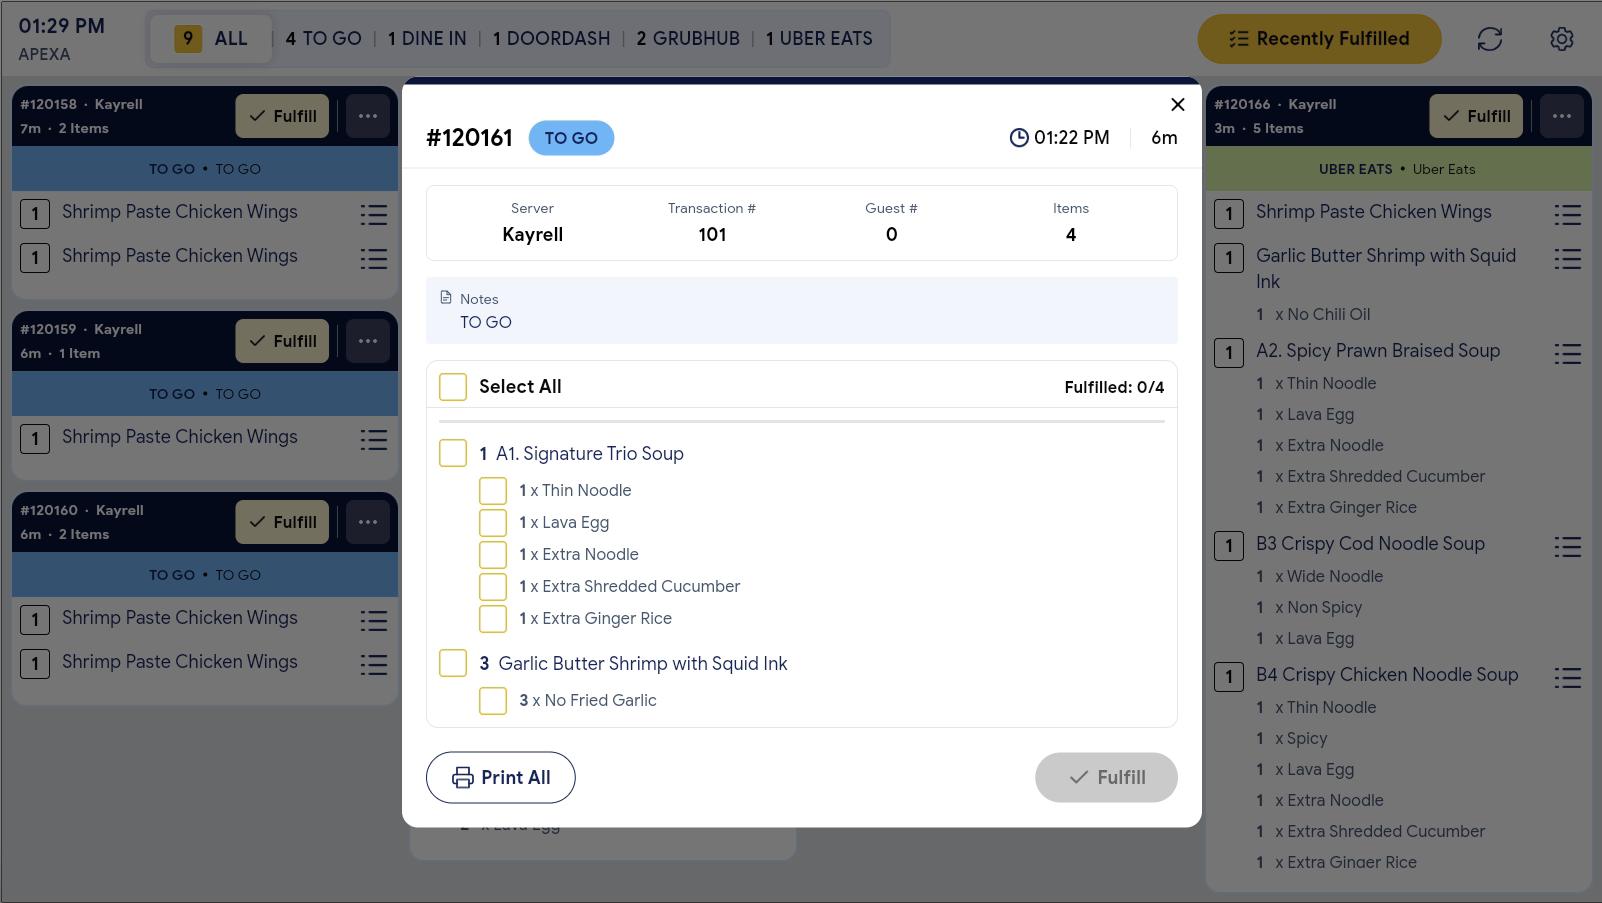
The Ticket Detail dialog shows:
- Ticket number and Order type badge (e.g.,
TO GO,UBER EATS) — top left - Order time and elapsed time (e.g.,
01:22 PM · 6m) — top right - Server, Transaction #, Guest #, and Items count — info row
- Notes section — displays notes sent from POS (e.g.,
TO GO,Uber Eats, or custom notes) - Select All checkbox — check all items at once; shows Fulfilled: X/Y counter on the right
- Item list — each item has a checkbox; sub-items (modifiers/add-ons) are listed below with their own checkboxes
- Print All button — bottom left, prints all items in the ticket
- Fulfill button — bottom right (yellow when all items are checked; greyed out when incomplete)
Fulfill Items in a Ticket
Step 1: Open the Ticket Detail
- Tap the ticket card on the home screen to open the Ticket Detail dialog.
Step 2: Fulfill an individual item
- Tap the checkbox next to the item name you want to fulfill (e.g.,
A2. Spicy Prawn Braised Soup). - A quantity picker dialog will appear showing the item name, a message “Select the quantity to mark as fulfilled”, the number of remaining items, and − / + controls.
- Adjust the quantity if needed, then tap Fulfill.
- A Confirm dialog will appear: “Are you sure you want to fulfill [Item Name]?”
- Tap Fulfill to confirm, or Cancel to go back.
Step 3: Check progress
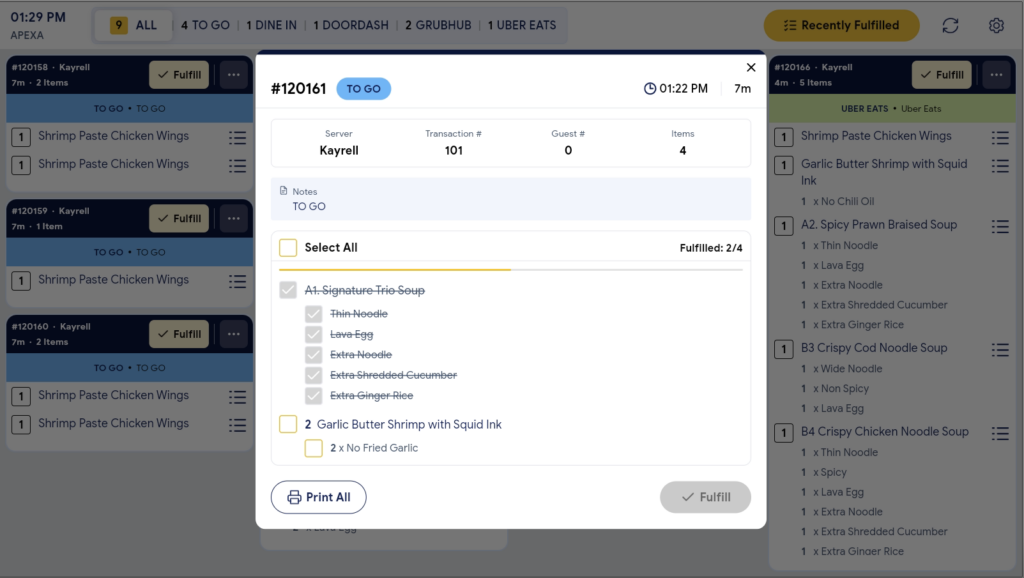
- Fulfilled items are shown with strikethrough text and greyed-out checkmarks in the item list.
- The Fulfilled: X/Y counter (top right of the item list) updates automatically.
- A yellow progress bar appears below the Select All row as items are fulfilled.
Step 4: Complete the ticket
- Once all items are fulfilled, the Fulfill button (bottom right) turns yellow/active.
- Tap Fulfill to complete and close the ticket.
Undo a Fulfilled Item
If an item was fulfilled by mistake, you can undo it while the Ticket Detail is still open.
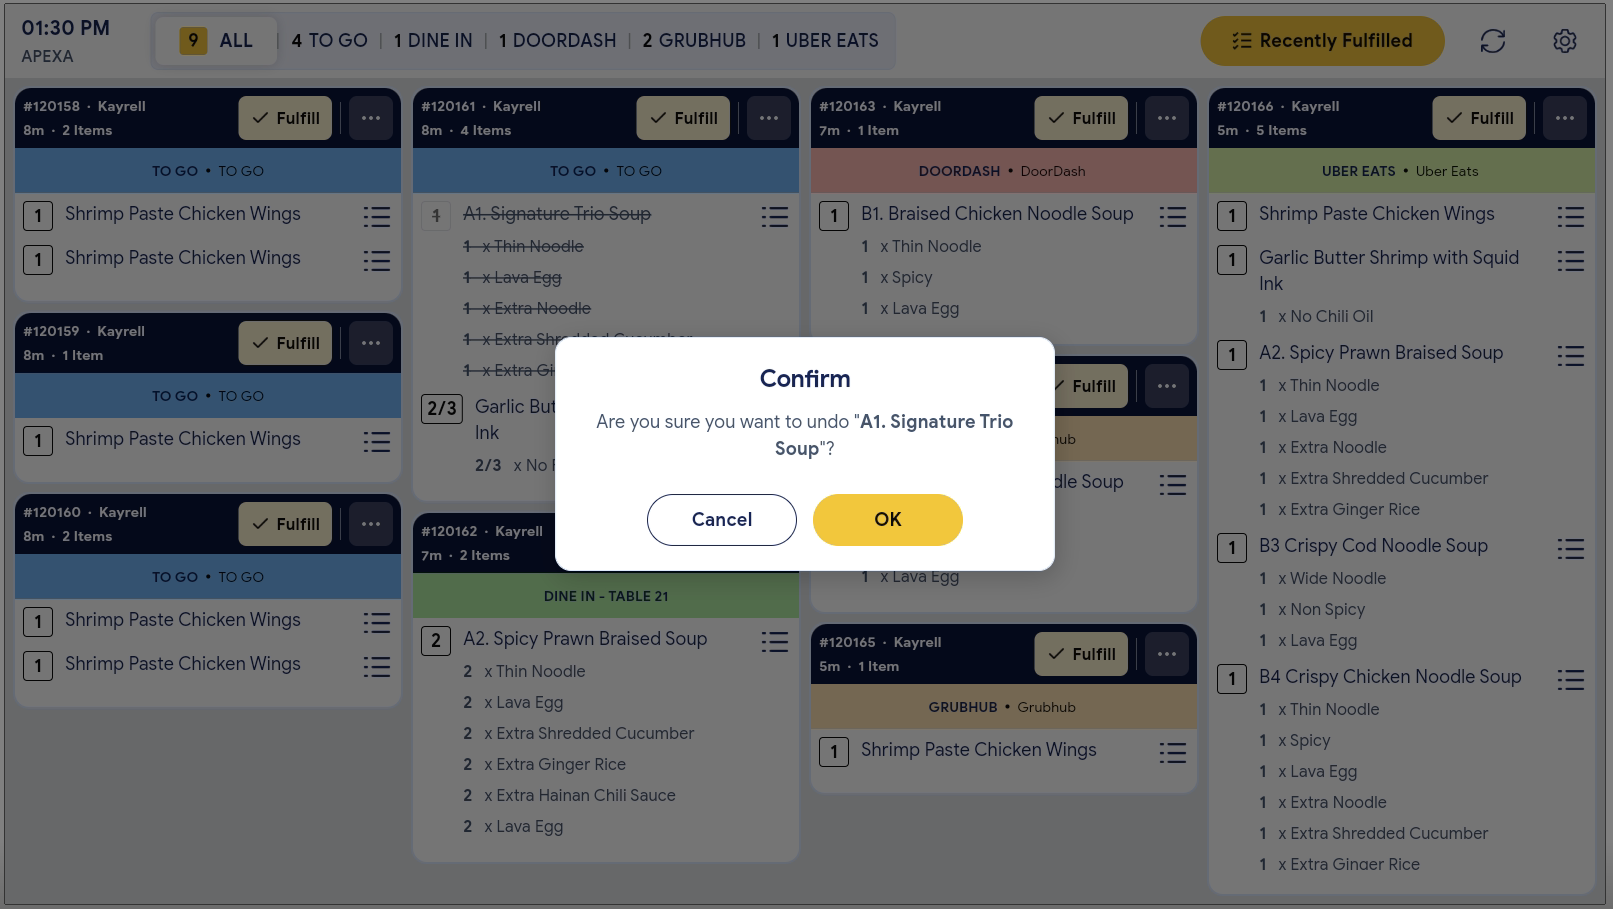
- Tap the fulfilled (greyed-out, crossed-out) item you want to undo.
- A Confirm dialog will appear: “Are you sure you want to undo ‘[Item Name]’?”
- Tap OK to undo the fulfillment. The item will return to its active (unchecked) state.
- Tap Cancel to keep the item as fulfilled.
ℹ️ Note: The undo action is only available from within the Ticket Detail view. Once a ticket has been fully fulfilled and closed, use the Undo button in the Recently Fulfilled list instead.
Fulfill an Entire Ticket at Once
To fulfill all items in a ticket in one action:
- Open the Ticket Detail.
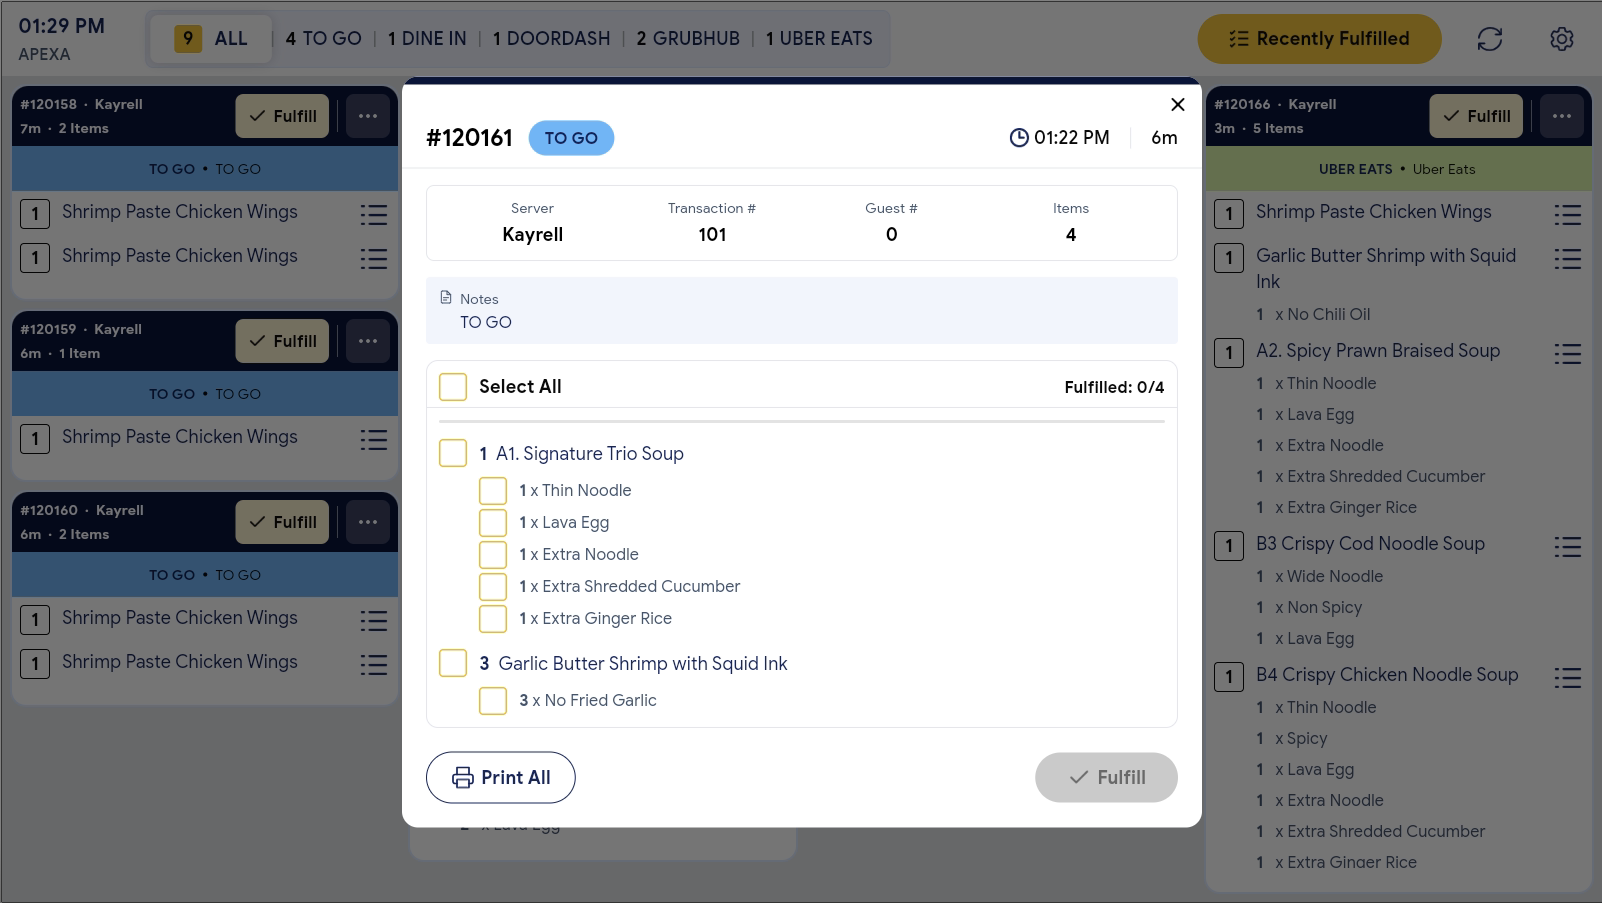
- Tap the Select All checkbox at the top of the item list.
- All item checkboxes will be checked (yellow).
- The Fulfill button (bottom right) will become yellow/active.
- Tap Fulfill to complete the entire ticket.
✅ Tip: Use Select All for simple single-item orders or when all items in a ticket are ready at the same time.
Fulfill a Ticket Directly from the Home Screen
For quick fulfillment without opening the Ticket Detail:
- On the KDS home screen, locate the ticket card you want to fulfill.
- Tap the ✓ Fulfill button directly on the ticket card header.
- A Confirm dialog will appear: “Are you sure you want to fulfill [Item Name]?”
- Tap Fulfill to confirm.
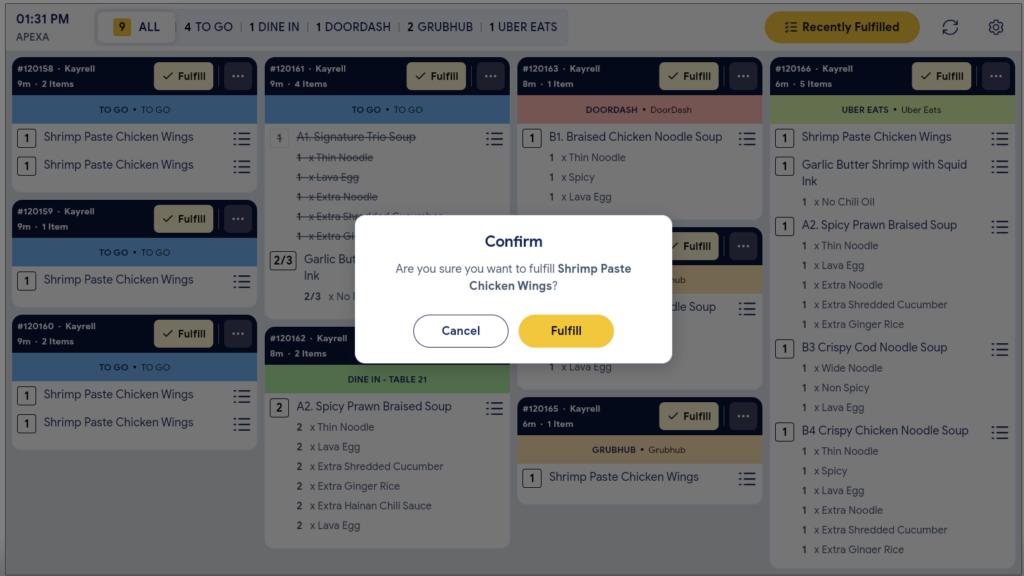
⚠️ Warning: Fulfilling from the home screen marks all items in the ticket as fulfilled at once. Open the Ticket Detail first if you need to fulfill items individually or check quantities.
Understand Special Ticket States
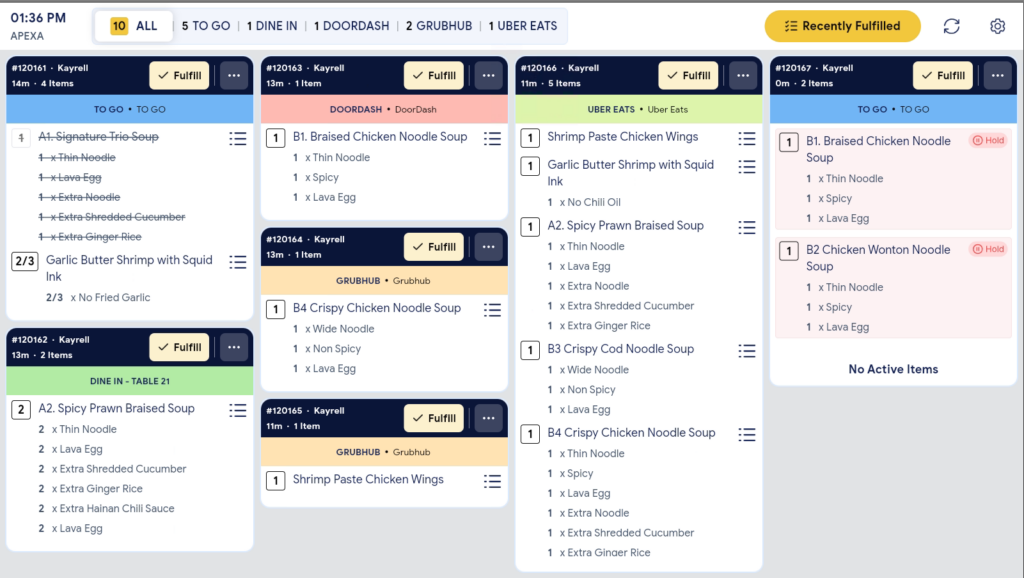
Items with a “Hold” badge
Some items may display a red Hold badge next to the item name. This means the item has been placed on hold from the POS and should not be prepared yet.
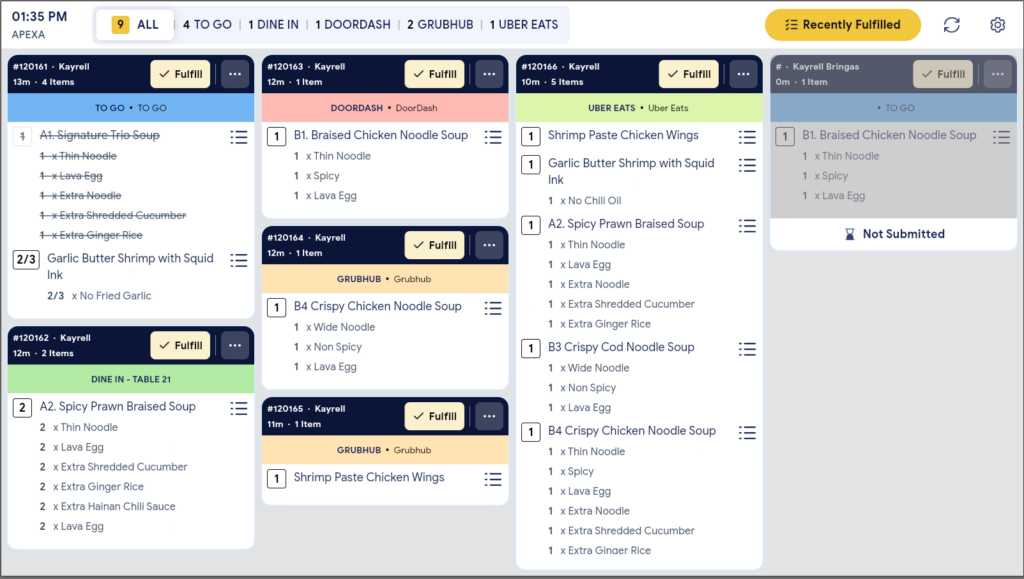
“Not Submitted” state
A ticket may display a ⏳ Not Submitted label in grey. This means the order was received by the KDS but has not yet been submitted from the POS side. The kitchen should wait for the order to be submitted before preparing.
View Recently Fulfilled Orders
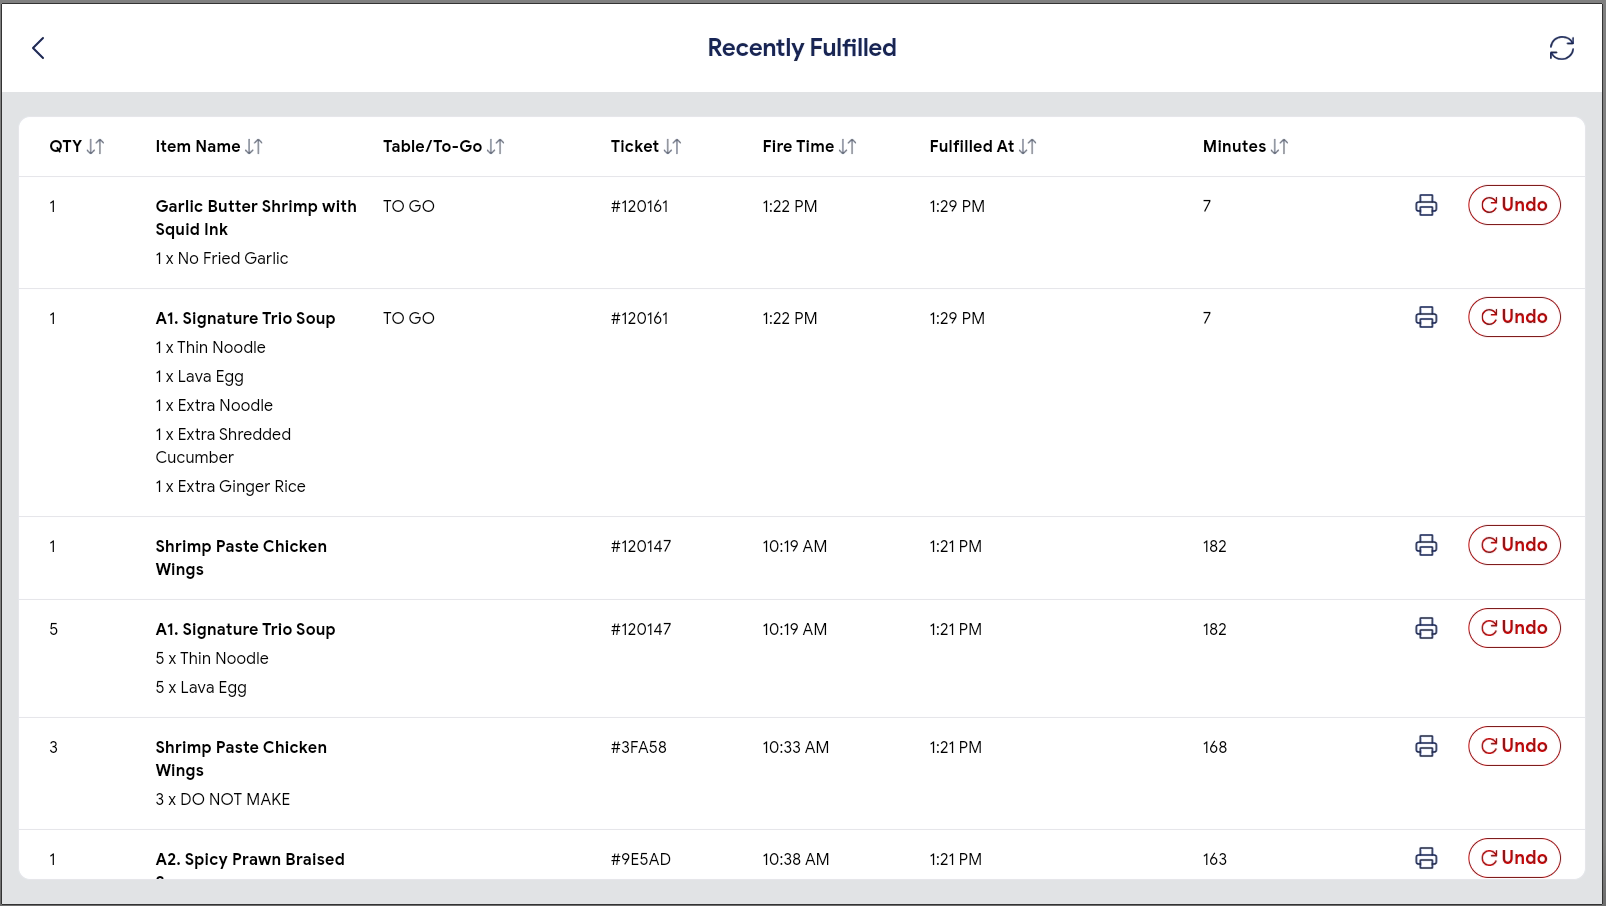
The Recently Fulfilled list shows all items that have been fulfilled during the current session.
Step 1: Open Recently Fulfilled
- Tap the Recently Fulfilled button (top right, yellow) on the KDS home screen.
Step 2: Review the list
The list displays the following columns:
| Column | Description |
|---|---|
| QTY | Quantity of the item fulfilled |
| Item Name | Item name and any modifiers/add-ons |
| Table/To-Go | Order type or table number |
| Ticket | Ticket number (e.g., #120161) |
| Fire Time | Time the order was originally placed |
| Fulfilled At | Time the item was marked as fulfilled |
| Minutes | Total minutes from Fire Time to Fulfilled At |
Step 3: Undo a fulfilled item from this list
If an item was fulfilled by mistake:
- Find the item in the Recently Fulfilled list.
- Tap the red ↺ Undo button on the right side of the row.
- The item will be removed from the Recently Fulfilled list and returned to its active ticket on the home screen.
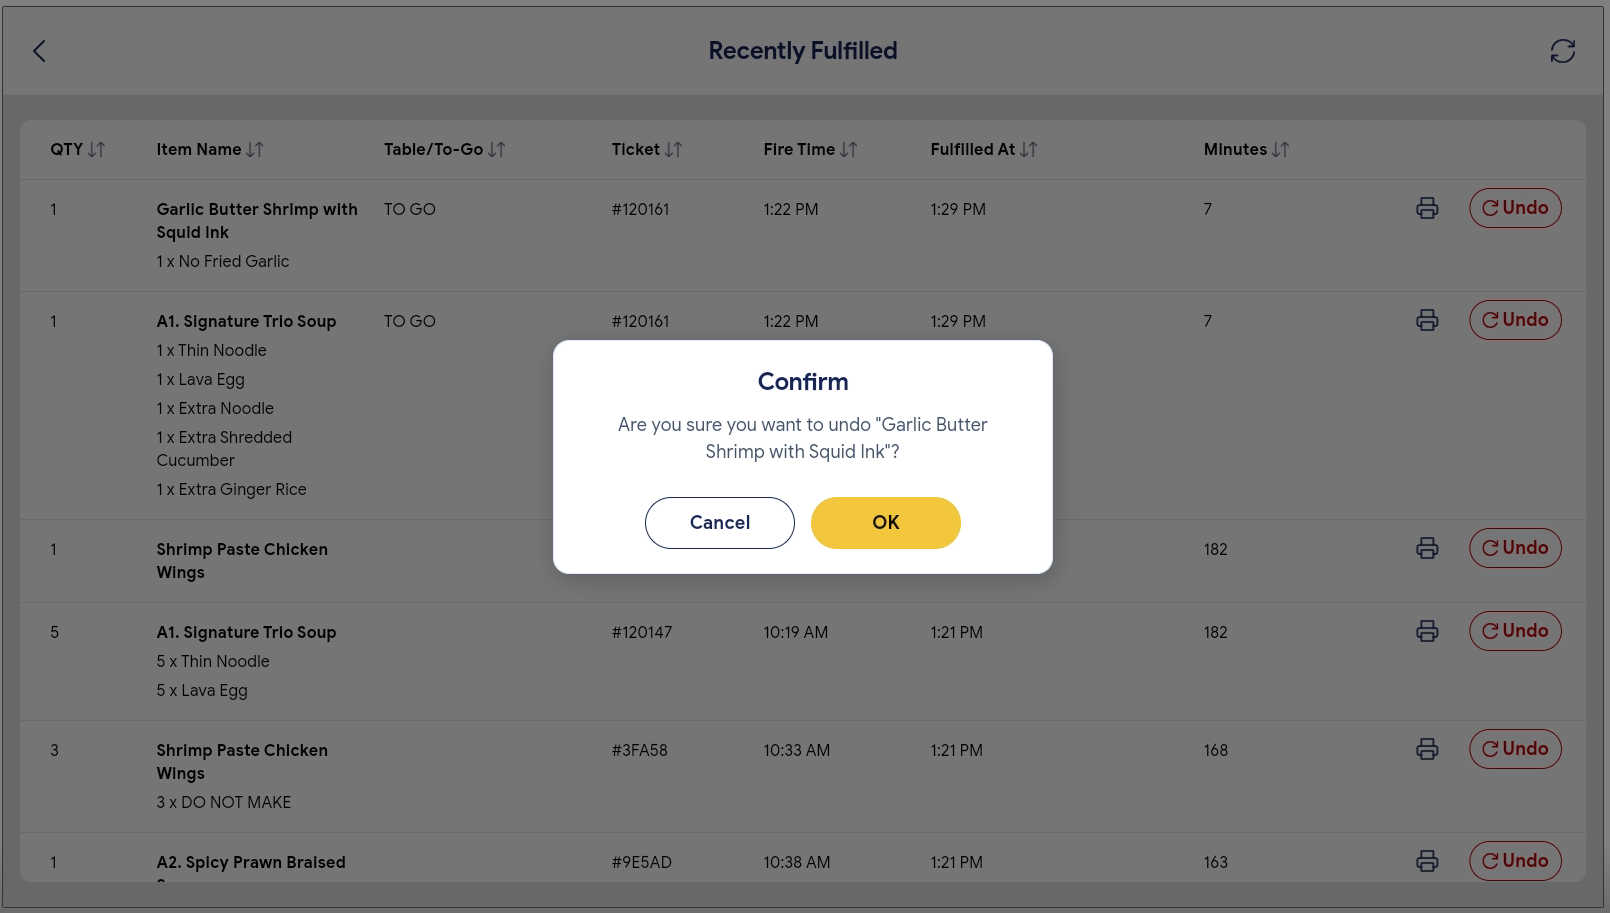
✅ Tip: Use the Print icon (🖨️) on each row to reprint an individual item’s label or receipt from this list.
Configure General Settings
Step 1: Open Settings
- On the KDS home screen, tap the Settings icon (⚙️) in the top-right corner.
- The Settings panel will open.
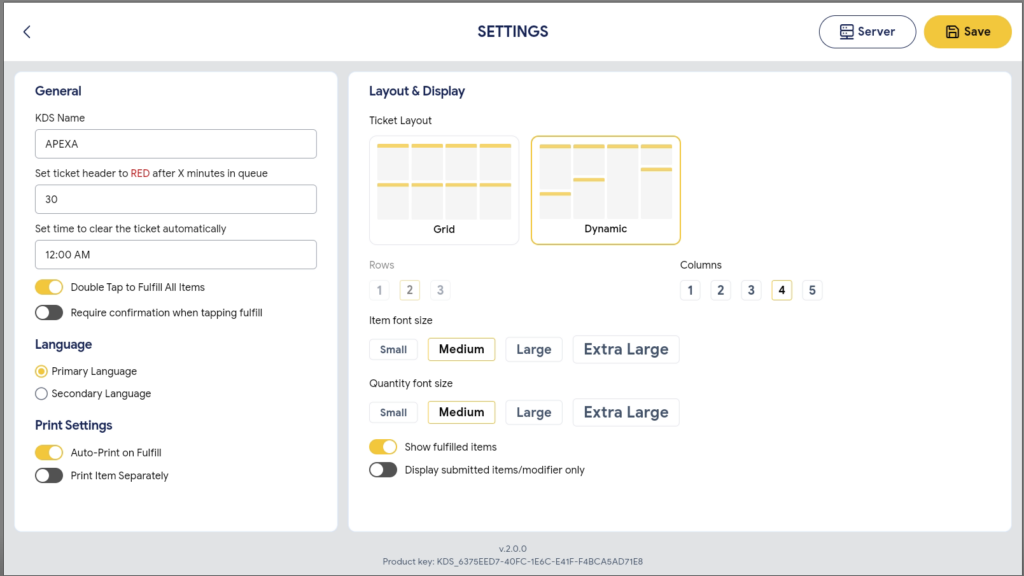
Step 2: Configure Layout & Display
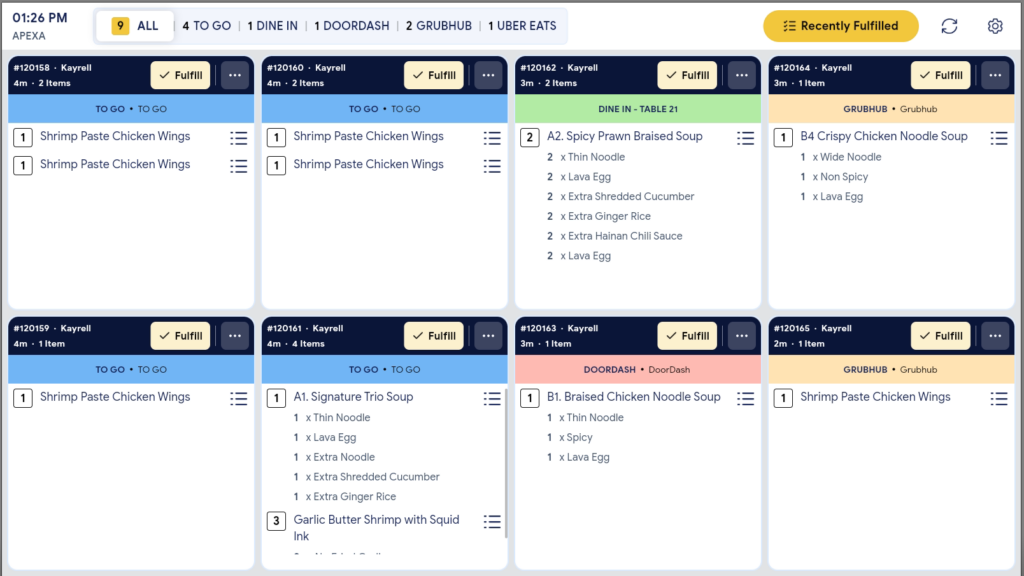
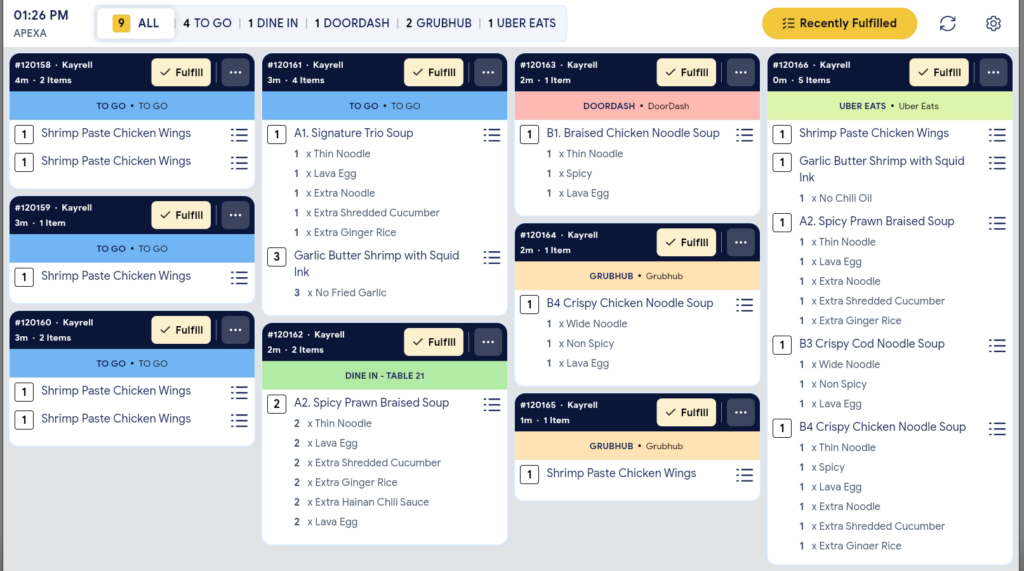
- Under Layout & Display, select the preferred layout style: Grid or Dynamic.
- Set the Font size using the row selector: 1, 2, or 3 (small to large).
- Choose Density Per Row: Medium, Large, or Extra Large — controls how many ticket columns appear on screen.
Layout style: Grid
Layout style: Dynamic
Step 3: Configure Language
- Under Language, select the display language: Primary Language or Secondary Language.
Step 4: Configure Print Settings
Step 5: Save Settings
- After configuring all options, tap the yellow Save button in the top-right corner of the Settings panel.
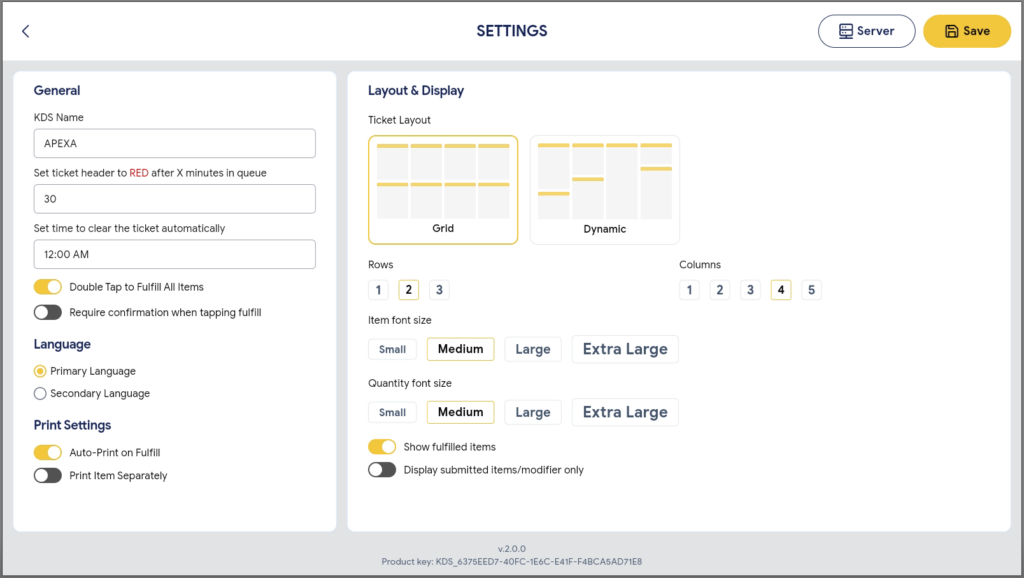
✅ Tip: Increase Density Per Row to Extra Large to display more ticket columns at once during busy service periods.
Troubleshoot Server Connection
| Issue | What to check |
|---|---|
| No tickets appearing on the home screen | Go to Settings (⚙️) → confirm a server is selected (yellow highlight). If not, tap the desired server IP or add a new one via + Add Server. |
| “Unable to Add IP Address” error | Verify the IP address format (e.g., 192.168.10.123). Ensure the server device is powered on and reachable on the same network. |
| KDS shows old/no orders after reconnect | Tap the Refresh icon (🔄) in the top-right corner of the home screen. |
| Settings changes not applying | Ensure you tap Save (yellow button) after every settings change. |
| Items appear as “Not Submitted” | The order has not yet been submitted from the POS. Wait for the POS operator to submit the order before preparing. |
| Items showing a red Hold badge | The item is on hold from the POS. Do not prepare the item until the Hold is released. |
FAQ
1. Why can’t I see any tickets on the KDS home screen? The KDS may not be connected to a server. Tap the Settings icon (⚙️) → confirm a server is selected (highlighted in yellow). If no server appears, tap + Add Server and enter the correct IP address of your POS server.
2. How do I fulfill only part of an order (e.g., 1 of 2 items)? Open the Ticket Detail by tapping the ticket card. Tap the checkbox next to the specific item you want to fulfill. A quantity picker will appear — adjust the quantity if needed, then tap Fulfill and confirm.
3. Can I undo a fulfillment after closing the Ticket Detail? Yes. Tap Recently Fulfilled (top right, yellow button) on the home screen. Find the item in the list and tap the red ↺ Undo button to reverse the fulfillment.
4. What does the red “Hold” badge on an item mean? It means the item has been placed on hold from the POS and is not ready to be prepared. Do not fulfill items marked Hold until the hold is released by the POS operator.
5. What does “Not Submitted” mean on a ticket? The order was received by the KDS but the POS operator has not yet submitted it. The ticket will remain visible with a ⏳ Not Submitted label. Wait for the order to be submitted before preparing.
6. Can multiple KDS units connect to the same server? Yes. Multiple KDS devices can connect to the same server IP address. Each device will receive the same order stream in real time.
7. What should I do if the KDS freezes or stops showing new orders? Tap the Refresh icon (🔄) on the home screen. If the issue continues, go to Settings (⚙️) and re-select the connected server. Contact Support if the problem persists and provide your server IP address and software version (v.2.0.0).
Closing
If you still need help, please contact Support for further assistance.