This article shows you how to handle a customer appointment from start to finish on the POS Dashboard. You will learn how to create a new appointment, pick services and add-ons, assign an employee, check the customer in, complete the services, and take payment. Using this flow keeps your front desk organized and makes sure every service is tracked and paid correctly.
Version Support
Product / Module
Version
POS Dashboard — Appointment
04.30.2026
Note: If you do not see these options, please contact Support to confirm your store is on a supported version.
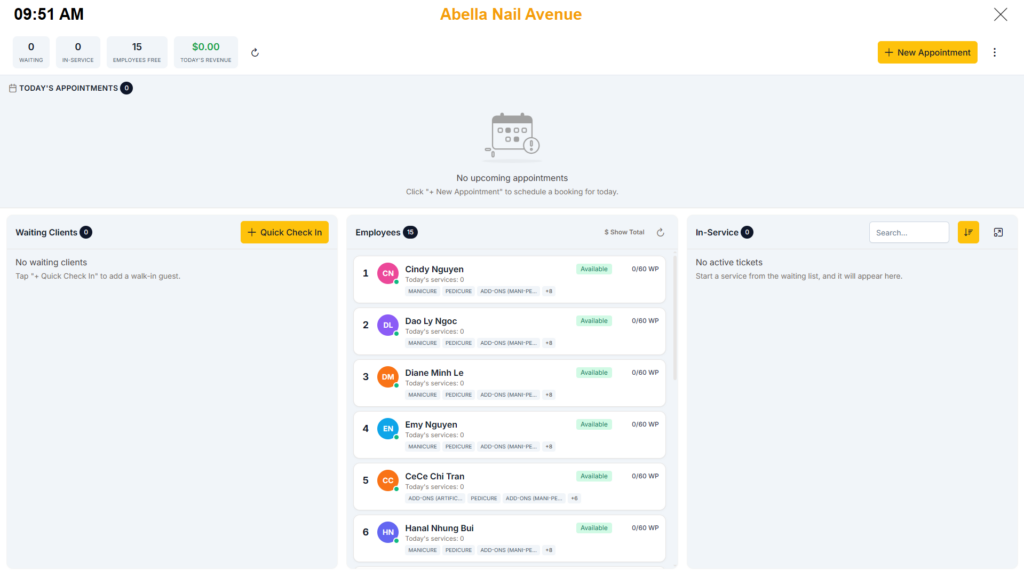
On the main Dashboard, tap + New Appointment (top right).
Step 2: Choose the customer
Search for the customer by phone number or by name, or choose Walk-in if they have no profile.
If the phone number is not found, fill in the new customer form to create a profile, then continue.
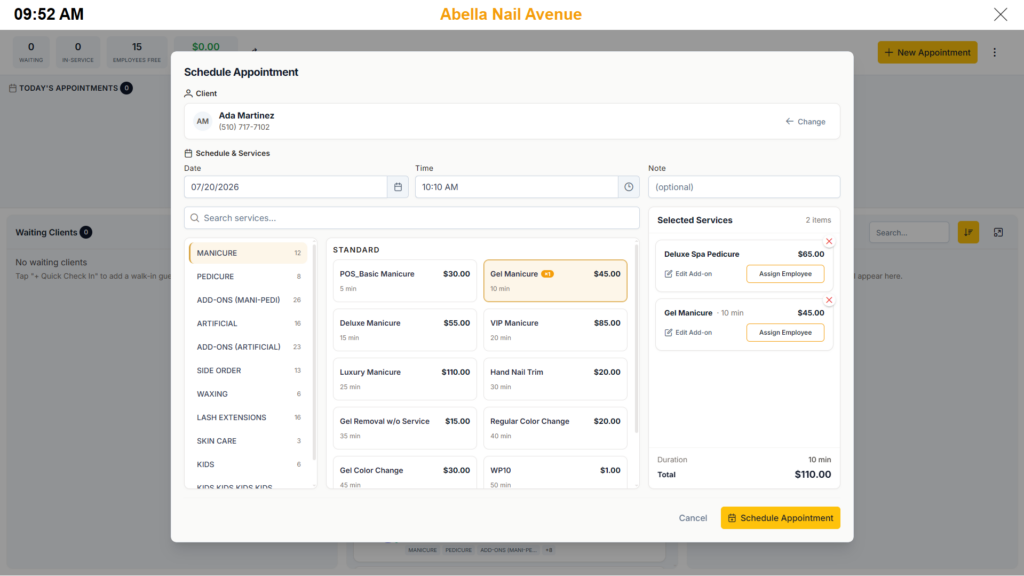
The selected customer appears at the top of the Schedule Appointment screen.
ℹ️ Note: For a walk-in customer, no phone or name is required — you can go straight to selecting services.
Step 3: Set the date, time, and services
Choose the Date and Time for the appointment. Add an optional Note if needed.
Pick a category on the left (for example, Manicure or Pedicure), then tap the service you want. The category list comes from your QuickSale setup.
If a service has add-ons (modifiers), the add-on picker opens automatically. Tick the add-ons you want, then close the picker.
Each selected service — with its add-ons listed underneath — appears in the Selected Services panel on the right. The Total updates as you make changes.
Step 4: Save the appointment
(Optional) Tap Assign Employee on a service to choose who will perform it now.
Tap Schedule Appointment to save.
ℹ️ Note: The Total on the Appointment screen shows the base price only (service + add-ons). Tax, tips, and discounts are applied later at the POS payment step, not here.
Check In the Customer
Step 1: Check in from Today’s Appointments
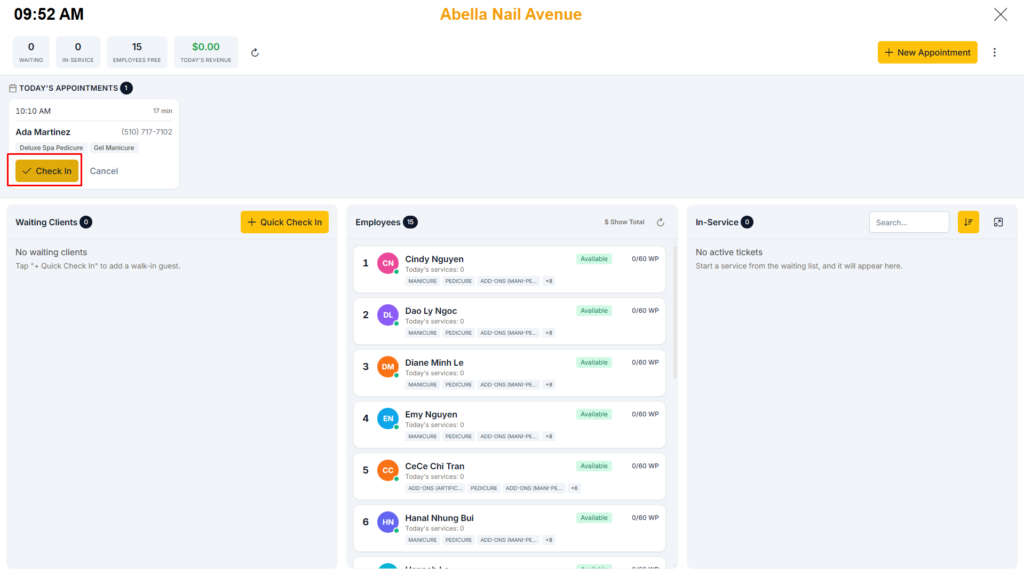
When the customer arrives, find their booking under Today’s Appointments at the top of the Dashboard.
Tap Check In on the appointment card.
After check-in, the ticket moves into the Waiting Clients list so you can assign staff and start the service.
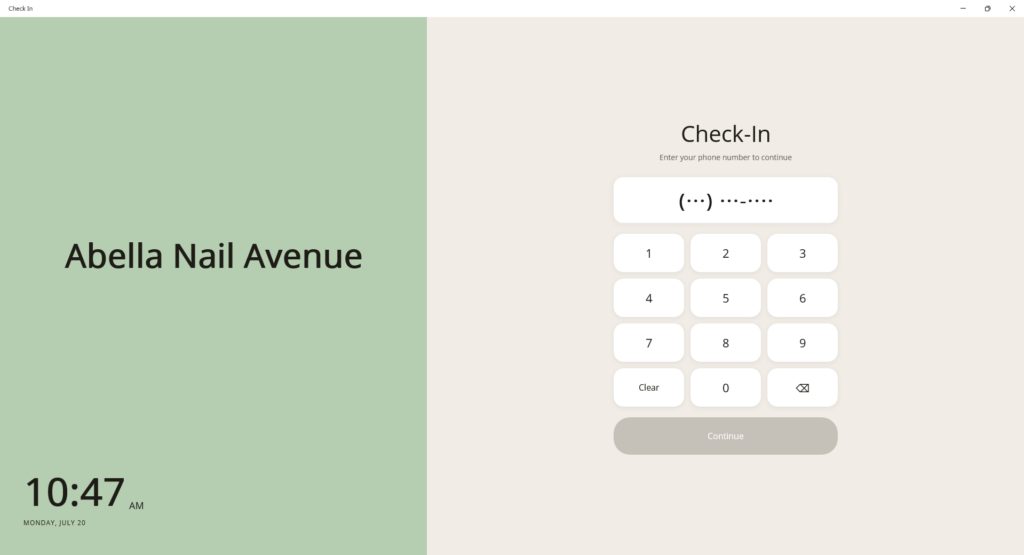
✅ Tip: Customers can also check themselves in using the check-in app. Their check-in data syncs automatically into the Dashboard, so the ticket appears in Waiting Clients without you having to check them in manually.
Assign an Employee and Start the Service
Step 1: Start the service from Waiting Clients
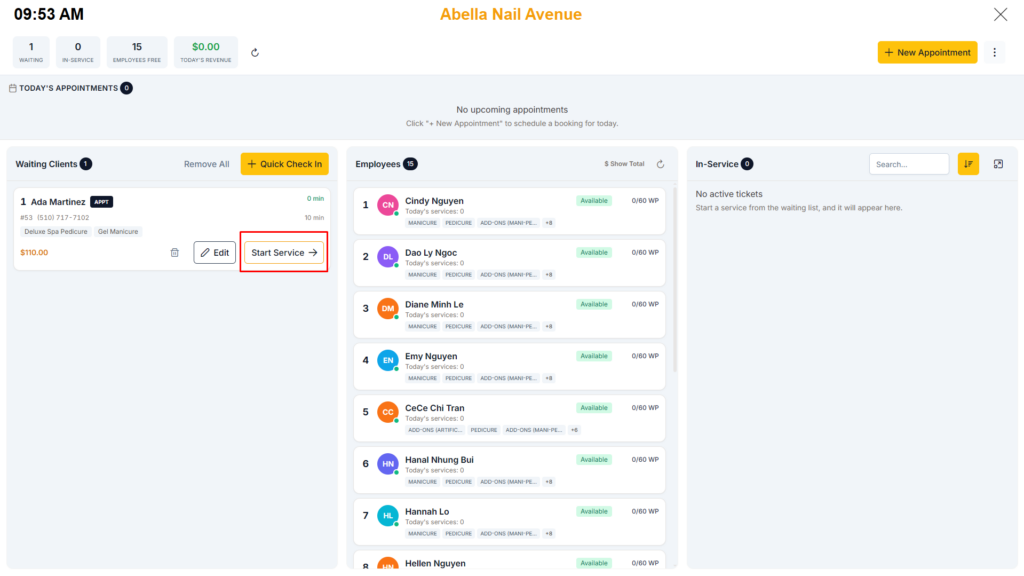
In the Waiting Clients panel, find the ticket.
Tap Start Service.
Step 2: Assign employees to each service
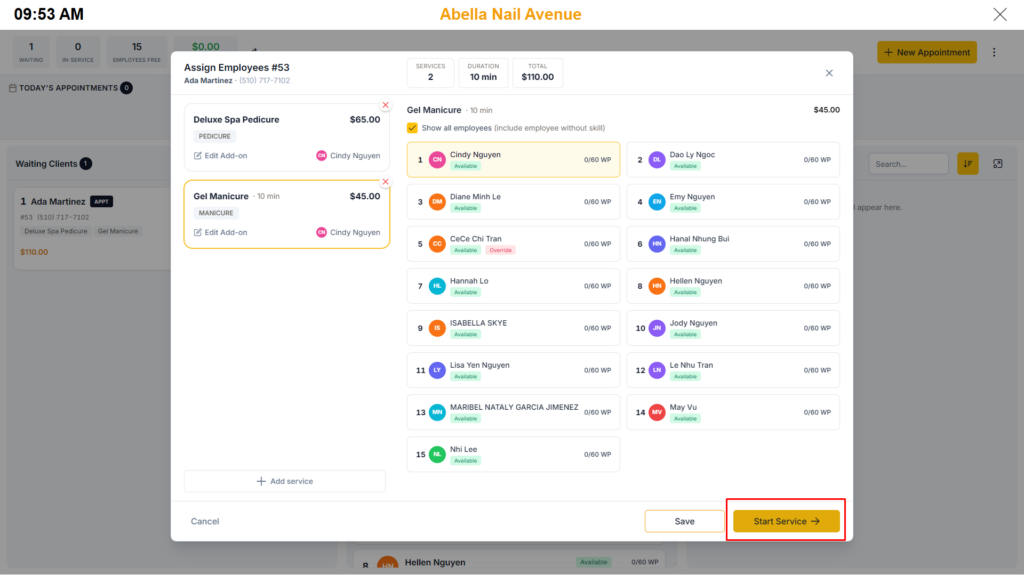
On the Assign Employees screen, pick an employee for each service.
By default, only employees with the right skill are shown. To see everyone, tick Show all employees (include employee without skill).
If you assign an employee who does not have the skill, an Override may be required to continue.
Tap Start Service to begin.
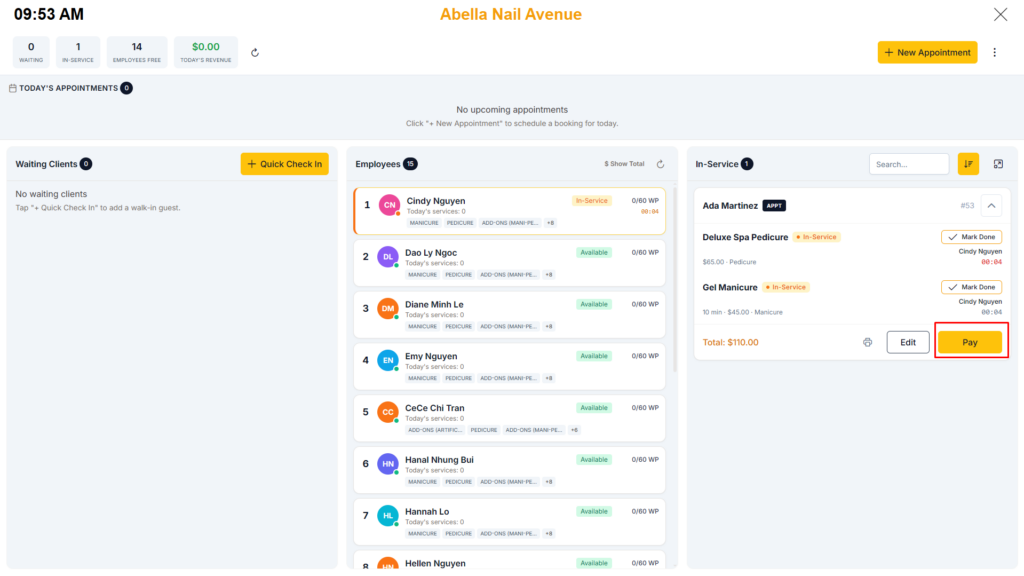
Once started, the ticket appears in the In-Service panel on the right.
Complete the Services and Open Payment
Step 1: Mark each service as done
Open the ticket in the In-Service panel.
As each service finishes, tap Mark Done next to it.
ℹ️ Note: Work Points are credited to the employee as soon as a service is marked Done. This happens right away, regardless of whether the ticket has been paid.
Step 2: Move to payment
Tap Pay on the ticket.
If some services are not marked done yet, a Proceed to Payment? dialog appears. Continuing will automatically mark the remaining services as “Done.”
Tap Continue to Payment.
Take Payment at POS
Step 1: Choose a payment method
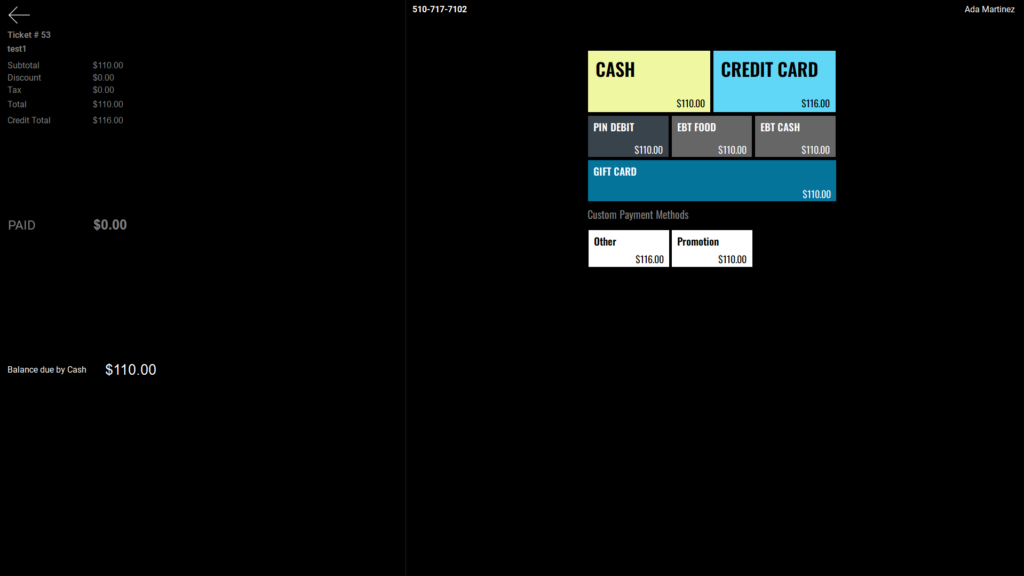
The POS Complete & Pay screen opens with the ticket total.
Select a payment method — for example Cash, Credit Card, Gift Card, or a custom method.
ℹ️ Note: The Cash amount and Credit Card amount can be different on this screen. This is expected — the price charged depends on the payment method you choose.
Step 2: Finish the transaction
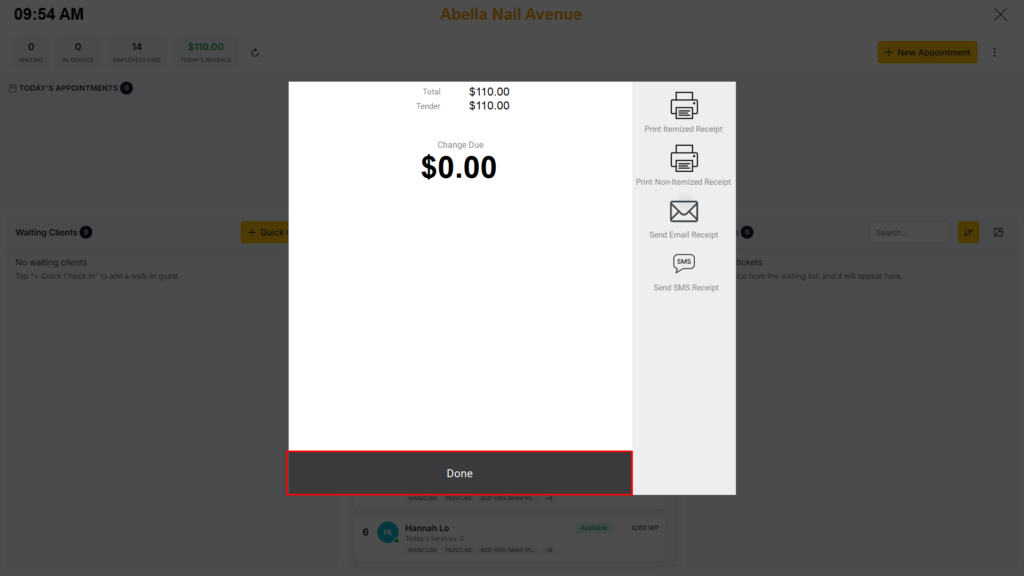
After payment, the screen shows the Total, Tender, and Change Due.
Choose a receipt option if needed: Print Itemized Receipt, Print Non-Itemized Receipt, Send Email Receipt, or Send SMS Receipt.
Tap Done to complete the sale.
ℹ️ Note: If a discount was applied, it is shown here at POS — not on the Appointment screen.
View the Appointments Calendar
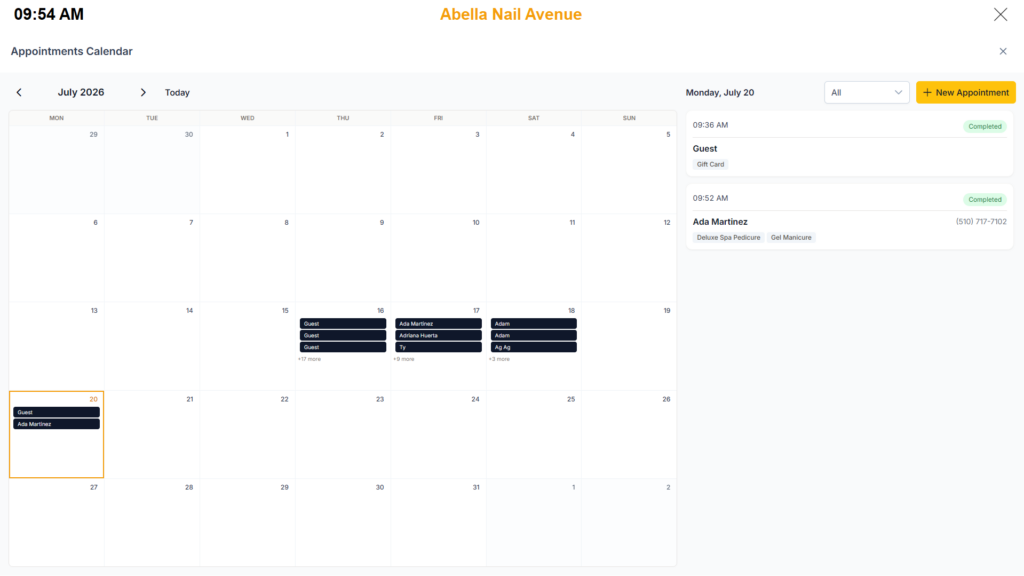
You can review bookings for any day using the calendar.
Open the Appointments Calendar from the Dashboard.
Use the arrows to move between months, or tap Today to jump back to the current date.
Tap a date to see that day’s appointments on the right, along with each booking’s status (for example, Completed).
The + New Appointment button is always available, even on days with no bookings.
View Employee Service History
You can check how many services an employee has completed and their totals for the day.
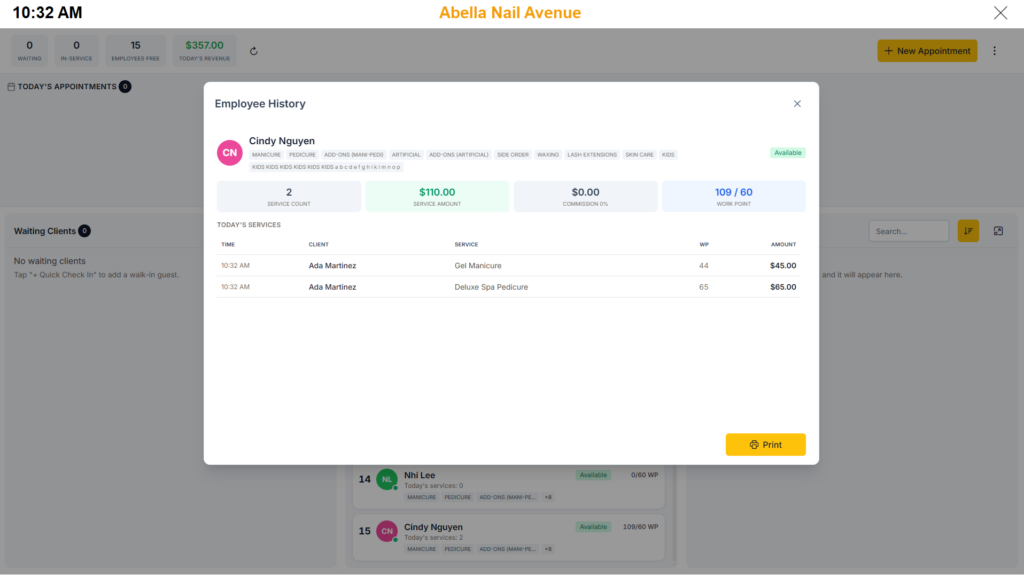
Open an employee’s card to view their Employee History.
Review the summary tiles: Service Count, Service Amount, Commission, and Work Point.
The Today’s Services table lists each service with its time, client, Work Points, and amount.
ℹ️ Note: The Service Amount column shows the service’s Cash price. A ticket appears in this list only after it has been paid — services that are done but not yet paid are not listed, although their Work Points are already counted.
⚠️ Warning: Access to All employee history depends on your role. Staff see only their own history by default; managers and admins can see everyone. See the FAQ if the list looks limited.
Where to View or Confirm the Result
You can confirm the appointment and payment in several places:
Today’s Revenue widget at the top of the Dashboard — updates after each payment.
In-Service panel — shows tickets currently in progress.
Appointments Calendar — shows the booking with a Completed status once paid.
Employee History — shows the completed service under the assigned employee.
Receipt — printed, emailed, or texted from the payment screen.
ℹ️ Note:Today’s Revenue is counted by payment method. A cash payment adds the ticket’s Cash price; a credit card payment adds its Credit Card price. Mixed payments count each portion by its own price.
FAQ
1. Why can’t I see the “+ New Appointment” or Appointment options? You may not be on a supported version, or your user role may not have permission to access this area. Please contact Support if the option is not visible.
2. Do I have to mark every service as Done before I can take payment? The Pay button becomes fully active once all services are done. If you tap Pay early, a confirmation dialog appears and any remaining services are automatically marked “Done” when you continue.
3. A service was removed after it was marked Done — will the employee lose their Work Points? No. Once Work Points are credited at Mark Done, they are not reversed, even if the item is later removed in POS.
4. Why don’t I see tax, tips, or a discount on the Appointment screen? The Appointment screen shows only the aggregate base-price Total. Tax, tips, and discounts are handled at the POS payment step, not on the Appointment screen. Once a ticket is paid successfully, it is automatically removed from the In-Service list. To review the detailed payment amounts (tax, tips, discount, and final total), open the ticket in the Paid Ticket section.
5. Why can’t I see other employees’ service history? Access is controlled by your role. Staff can see only their own history by default, while Store Managers and Admins can see all employees. Ask an admin to adjust your permission group if you need broader access.
6. What should I do if the flow does not work as expected? Check that the customer is checked in, that each service has an assigned employee, and that your store is on a supported version. If the problem continues, contact Support.
Closing
If you still need help, please contact Support for further assistance.